David S. Mash, Chairman, Music Synthesis Department, Berklee College of Music
KURZWEIL
250
USER'S GUIDE
P/N 91010501 - REV A
Kurzweil K250 Users Guide
By David S. Mash
©1986 By David S. Mash All Rights Reserved
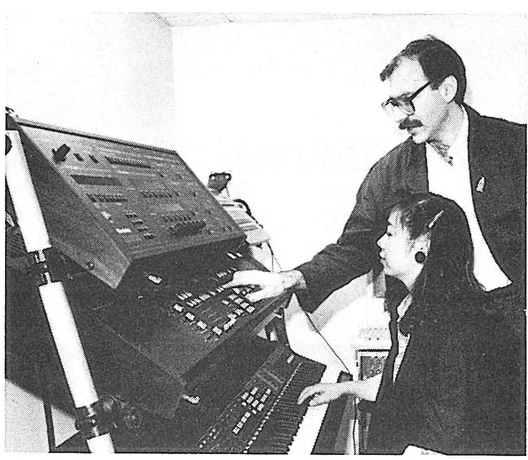
David Mash shows student Angela Ng a feature of the K250.
ABOUT THE AUTHOR
David Mash holds a Bachelor of Music degree from the Berklee College of Music in Boston. His composition/synthesis credits include Airborn recording artists ICTUS, the Boston Shakespeare Theater, and Donald Byrd. Mash has received a Jazz Composition Fellowship from the Massachusetts Council on the Arts and Humanities, and an Arts/Partnership Grant from the Massachusetts Cultural Educational Collaborative.
David has been a full-time member of the Berklee College Faculty since 1975, and is now Chairman of its Music Synthesis Department. He has spearheaded the development of a curriculum of fifteen courses, which he and his colleagues teach in five fully equipped laboratory classrooms.
David Mash's wide-ranging expertise in synthesis, plus his teaching experience, are highly regarded by people in the electronic music field. A constant stream of musicians, world-class artists and beginning students alike, come to David's department to learn the latest in synthesis technology and practice. In addition, Mash has given clinics in numerous colleges, and is a consultant to several developers of music instrumentation and software.
THE K250 USER'S GUIDE draws on David Mash's experience in teaching the Kurzweil K250 to some 450 musicians, most of whom were full-time students at the Berklee Synthesis Department and learned on the Department's thirty-one K250 instruments.
PREFACE
The Kurzweil K250 is a software-based instrument, which means that the way the K250 operates is controlled by its operating software (instructions) stored on EPROM chips. The instructions contained in these chips may be updated from time to time in order to refine the instrument's operation and to add new features. This capability insures that the K250 will not become "obsolete" in the near future, protecting your investment and allowing your instrument to grow in power over time.
The K250 has already experienced an incredible amount of growth over its lifetime to date. Changes in operating software are marked in version numbers, or abbreviated V (n) where "n" is the current version number. Whole numbers, those to the left of the decimal usually indicate major additions to the operating software, and numbers to the right of the decimal point indicate refinements.
This manual is current as of the software release V 4.1.
To provide a little perspective about the growth of the K250 since its release, here is a short history of software and hardware releases.
- June 1984: V1.0. The first version of the K250 is released.
- Feb. 1985: V2.0. No charge software update, Sequencer RAM upgrade, 25kHz sampling option, MacAttach software.
Features:
Keyboard, Instrument, and Sequence Editors introduced, Sequencer upgraded from 4000 to 8000 notes, and the first version of the Sound Modeling Program (25kHz) is offered. MacAttach, a software package for the Macintosh computer is released.
- May 1985: Optional Soundblock A released on separate printed circuit board (daughter board).
- Oct. 1985: V2.2. No charge software update, 50kHz sampling option and upgrade.
Features:
This new software supported the faster sampling rates, and offered new sampling features (SMP V 2.0).
- Mar.1986: V3.1. Purchased software upgrade, Enhanced base unit soundblock (involving a new CGP board which allows room for four additional sound block groups, and Sound Block B (rock block) released.
Features:
Sequencer increased to 12000 notes, improved sequencer operation, new synchronization capabilities, and MIDI sync. Enhanced sounds with better tunings and 53 additional base keyboard set-ups.
- Aug. 1986: V3.2. Purchased software upgrade, QLS software for the Macintosh, and Soundblock C (Classical Block)
Features:
V3.2 software supported the new QLS board and software allowing much faster access to saving and loading sounds. Soundblock C offers a selection of classical instruments such as solo violin, cello, harp, celeste, and others.
- Mar. 1987: V4.1. Purchased software upgrade, SUPERAM I and II hardware upgrades, and QLS V 2.0 released.
Features:
Enhanced sampling, supporting the 2 megasample memory board and supporting Digidesign's Sound Designer software. Enhanced sequencer operation, with punch in/out, recording continuous controllers, MIDI enhancements, and MIDI sync/clock sync simultaneous operation. Mono and Poly pressure received through MIDI, and continuous controllers received over individual MIDI channels. Software support for expansion controllers such as ribbon controllers.
You can check which software version your unit contains by pressing F11, then SELECT twice, then 4, then pressing SELECT twice. See page 42 for more details. If your unit does not contain the latest operating software (V4.1 ED111586), contact your local authorized Kurzweil representative for information on obtaining upgrade kits. Operating system upgrades are simple to perform, and may be performed by most users in less than thirty minutes. If you are unsure of how to replace EPROM chips, you should refer the work to a qualified service technician.
If your unit does not contain V4.1 software, some aspects of this manual may not agree with your instrument's operating system. This will be most noticeable in the OVERVIEW and SEQUENCER chapters. With a few exceptions, most of the information contained in the rest of this manual will work with versions 2.2 and later. The most noticeable discrepancies will be found in the keyboard setup and instrument descriptions (found on pages 15-21 and APP 1-21), which were dramatically changed with V3 and the upgraded CGP.
TABLE OF CONTENTS
| Topic | Page |
|---|---|
| PART I: An Overview of the K250 | None |
| Introduction | 1 |
| The User Interface | 3 |
| Definitions | 9 |
| Setting Up | 11 |
| Playing the K250 | 12 |
| Resident Voices | 13 |
| The LIST | 14 |
| Base unit setups | 15 |
| The KEYPAD BINS | 22 |
| The PLAY Editors | 24 |
| The LIST Editor | 24 |
| The KEYPAD BINS Editor | 25 |
| The TRANSPOSE Editor | 26 |
| The KEYBOARD DYNAMICS Editor | 28 |
| The PRESSURE ASSIGNMENT Editor | 29 |
| The CHANNEL STEAL Algorithm Editor | 31 |
| The LEVERS | 34 |
| PEDALS and SLIDERS | 36 |
| SUSTAIN | 37 |
| PITCH BEND | 39 |
| TREMOLO | 41 |
| VIBRATO | 43 |
| The CHORUS Editor | 44 |
| The MAINTENANCE Editor | 46 |
| RESET Instructions | 47 |
PART II: Applications
| Topic | Page |
|---|---|
| PART II: Applications | None |
| The KEYBOARD Editor | KBD |
| Overview | KBD 1 |
| HELP Feature | KBD 3 |
| Functions | KBD 4 |
| Layering Keyboards | KBD 10 |
| Balancing Levels | KBD 11 |
| Transposing Keyboard layers | KBD 12 |
| Naming and Saving Keyboards | KBD 13 |
| Split Keyboards | KBD 15 |
| The INSTRUMENT VOICING Editor | INST |
| Background | INST 1 |
| Parameters | INST 5 |
| Voicing options | INST 6 |
| Chorus options | INST 7 |
| Vibrato | INST 8 |
| Tremolo | INST 9 |
| Envelope Generator | INST 10 |
| Miscellaneous Effects | INST 14 |
| Library options | INST 16 |
| Sampling—The Sound Modeling Program | SMP |
| Background | SMP 1 |
| Recording Sounds | SMP 7 |
| Processing Sounds | SMP 12 |
| Tuning | SMP 12 |
| Trimming | SMP 14 |
| Looping | SMP 15 |
| Reversing | SMP 17 |
| Keyboard Editing options | SMP 17 |
| Delete options | SMP 19 |
| Duplicate options | SMP 20 |
| Display options | SMP 20 |
| Saving samples | SMP 21 |
| Complete Menu | SMP 22 |
| Hints | SMP 23 |
MIDI
| Topic | Page |
|---|---|
| MIDI | MIDI |
| Software | MIDI 1 |
| Message Types | MIDI 7 |
| Hardware | MIDI 10 |
| Configurations | MIDI 12 |
| The MIDI Editor | MIDI 14 |
| Typical System setups | MIDI 18 |
| The Sequencer | SEQ |
| Background | SEQ 1 |
| Short tutorial | SEQ 3 |
| Recording | SEQ 4 |
| Playback | SEQ 5 |
| Overdubbing | SEQ 5 |
| Naming and Saving sequences | SEQ 6 |
| Editing | SEQ 7 |
| Global parameters | SEQ 11 |
| Annotated menu | SEQ 14 |
| Musical applications | SEQ 16 |
| Special PLAY MODE features | SEQ 22 |
| Software Utilities | UTIL |
| Saving Files | UTIL 1 |
| Loading Files | UTIL 5 |
| Organizing Files | UTIL 6 |
| External File Editing | UTIL 11 |
| File Format Conversion | UTIL 15 |
PART III: Appendices
| Topic | Page |
|---|---|
| Base Unit | APP 1 |
| Sound Block A | APP 7 |
| Sound Block B | APP 11 |
| Sound Block C | APP 13 |
| Sound Block D | APP 15 |
| Base Unit | APP 20 |
| Sound Block A | APP 22 |
| Sound Block B | APP 24 |
| Sound Block C | APP 25 |
| Sound Block D | APP 26 |
| Keyboard control | APP 27 |
| Controllers and assignments | APP 28 |
| Global control | APP 29 |
| MIDI Implementation sheets | APP 30 |
INTRODUCTION
The Kurzweil K250 is a 12 voice polyphonic digital synthesizer. Based on the latest in digital sampling technology, the K250 uses "Contoured Sound Modeling" to create the most natural sounding resident voices available in synthesizers today. These resident sounds are stored on-board in permanent memory, avoiding the need for repeated loading from disks that plagues most other sampling instruments. User sampling is available with the digitizer and Sound Modeling Program. The resident sounds may also serve as raw materials for digital sound manipulation and synthesis with powerful features such as:
- • a 256 stage envelope generator for precise amplitude shaping
- • 12 LFO's for vibrato and tremolo effects
- • an aliasing filter for timbral control
- • a stereo chorus for doubling, echo, and flanging effects
- • precision keyboard control of amplitude and timbral effects
User created sounds may be stored in on-board memory, saved to Macintosh disks, and combined with resident sounds for the ultimate in synthesis flexibility.
The Kurzweil K250 is a tremendously powerful digital musical instrument, with many applications in the fields of music synthesis, performance, production and recording, composition, and film scoring. Because it is such a powerful and therefore complex instrument, it is very important for the musician to have complete understanding of how the K250 carries out its various tasks and applications. This guide seeks to explain, in as simple terms as possible, how the K250 works and how the musician may derive maximum use in each chosen application.
HOW TO USE THIS GUIDE
This guide is designed to provide all users of the K250 with an easily understandable yet thorough explanation of each of the instrument's specific applications. For ease of study, this guide is divided into two sections. The first is a general introduction to the structure of the instrument, which should be read by all users of the K250; the second is grouped by section into specific applications, which may be read in any chosen order according to the user's specific needs. A thorough understanding of the material in the first section is necessary to all applications in the second part, so be sure to read it carefully before moving to the application of your choice.
THE K250 ARCHITECTURE
The user interface definition
A musical instrument is a tool with which a person expresses musical thought. The user interface is how the musician interacts with that instrument. For a violinist, it is the bow and strings. For a trumpet player it is the mouthpiece and valves. A thorough understanding of this interface is the key to mastering an instrument. The K250 is an extremely complex and powerful tool for the creation of music. To master it, the musician must understand its interface, which exists on two basic levels: musical performance and sound synthesis. For musical performance, the interface consists of a touch sensitive keyboard and real-time controllers for both hands and feet. To master these one must study keyboard technique (fingerings and touch) and understand what the real-time controllers can do for phrasing, dynamics, and musical effects. For sound synthesis the interface is a bit more complex because it is a means of addressing the computer/synthesizer itself. There are three basic types of synthesizer user-interfaces; Active Panel, Data Entry, and Panel Pages.
Active Panel Interface
This is a very friendly interface for relatively simple instruments. There is a controller (knob, slider, switch...) for every addressable parameter. The user simply identifies which parameter needs adjustment and reaches for the appropriate control. Examples of popular synthesizers with active panel interfaces are the ROLAND JUNO106® and MOOG MEMORYMOOG®. With an instrument as complex as the K250, however, an active panel would require an enormous panel with literally thousands of controls for its many adjustable parameters. This would make the instrument both cumbersome and confusing. Instead, the K250 uses a clever combination of data entry and panel pages as its interface.
Data Entry Interface
This type of interface uses just a single control, which can be assigned to any addressable parameter. This is inexpensive from the hardware standpoint, but can be a bit frustrating to the user, as only one parameter at a time is visible. With practice, however, this interface can become quite fast to use, assuming the user knows exactly which parameter needs to be addressed. Examples of synthesizers with data entry interfaces are the Yamaha DX7® and the N.E.D. SYNCLAVIER®.
Panel Page Interface
This type of interface is a compromise between the many controls of the active panel and the single data entry control, and uses a number of controllers whose functions change according to the "page" to which the panel is turned. For example, if the user wants to adjust the amplitude envelope settings, one would select the "envelope page" and the controls would then affect the envelope parameters. Those same controls might also control the sequencer tempo, track selection, etc. when the panel was in the "sequence page." Examples of synthesizers with panel page interfaces are the OBERHEIM XPANDER® and the OCTAVE-PLATEAU VOYETRA 8®.
*JUNO106 is a trademark of ROLANDCORP US, MEMORYMOOG is a trademark of MOOGMUSIC, DX7 is a trademark of YAMAHA INTERNATIONAL, SYNCLAVIER is a trademark of NEW ENGLAND DIGITAL, XPANDER is a trademark of OBERHEIM ELECTRONICS, VOYETRA 8 is a trademark of OCTAVE-PLATEAU ELECTRONICS.
THE K250 ARCHITECTURE
The user interface specifics
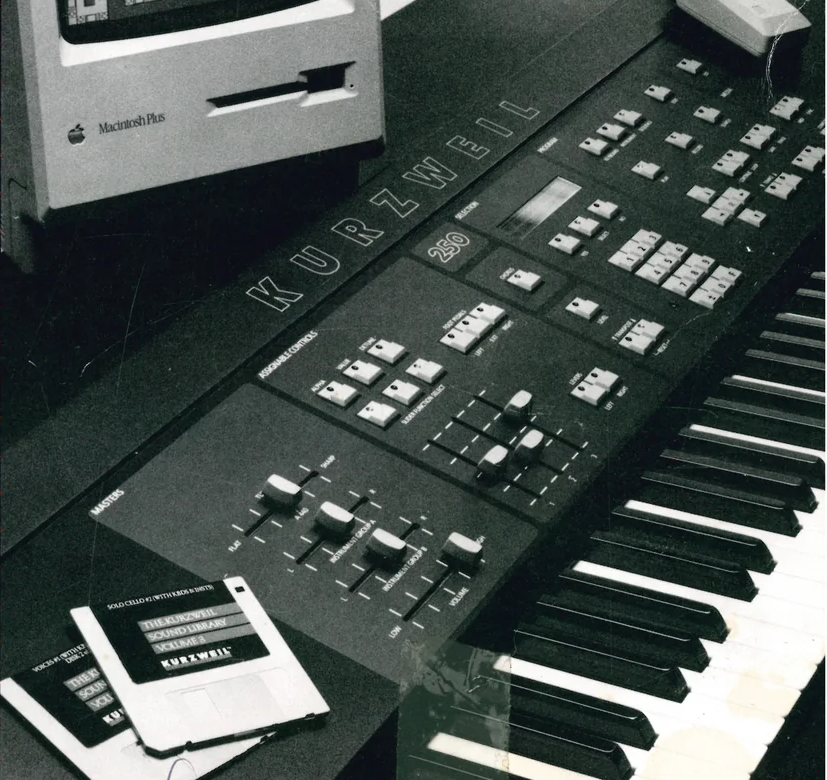
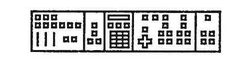
The K250 user interface has been designed to be as simple to use, flexible to update, and aesthetically pleasing as possible. It consists of a panel with 4 master slider controls, 3 assignable slider controls, 38 button switches, a set of cursor controls, a numeric keypad, and a 48 character Liquid Crystal Display which serves as a window into the instrument. The functions of the panel controls change with the current page of the panel, as indicated in the display.
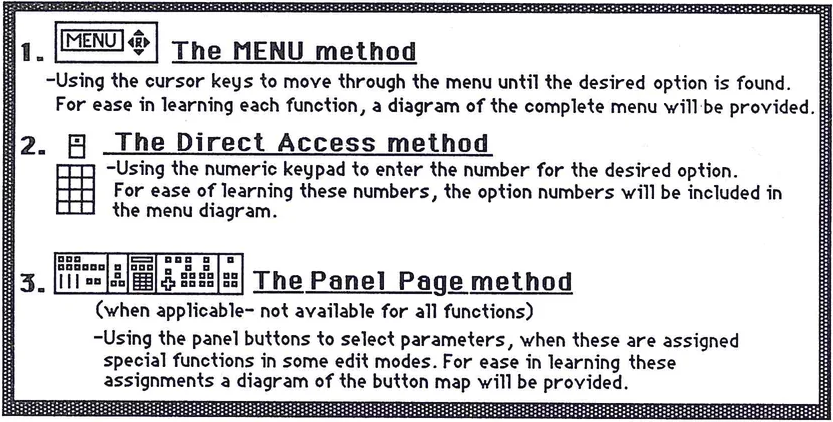
Parameters may be addressed through the buttons mapped on the panels, by cursoring through the menu to the desired option, or directly accessed by number through the numeric keypad. Data may be entered through an assigned data entry slider or by direct input through the numeric keypad. The method of access and entry is determined by the user, depending on which approach is deemed simpler or more efficient for the specific task at hand. This is a very friendly approach once the user becomes familiar with the terms and actions. In all subsequent sections of this guide that deal with editors, the three methods of parameter access will be explained in the following order:
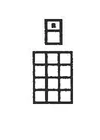
Interface methods diagram showing: 1. The MENU method - Using the cursor keys to move through the menu until the desired option is found. For ease in learning each function, a diagram of the complete menu will be provided. 2. The Direct Access method - Using the numeric keypad to enter the number for the desired option. For ease of learning these numbers, the option numbers will be included in the menu diagram. 3. The Panel Page method - Using the panel buttons to select parameters when these are assigned special functions in some edit modes. For ease in learning these assignments, a diagram of the button map will be provided.
The Menu method is the simplest to learn, while the Direct Access and Panel Page methods will eventually provide the quickest editing approach. It is advised that the user learn all three approaches, and in the order they are presented here.
The user interface panel specifics
Masters:
These are 4 slider controls whose function never changes. They control how the instrument functions in a global sense. These are:

TUNING- Adjusts the tuning of the entire instrument relative to A440. INSTRUMENT GROUP A&B- These allow the user to control the placement of instrumental sounds in the stereo image. Instruments are assigned to either GROUP A or B output busses (either by the factory for resident voices, or by the user through the INSTRUMENT VOICING EDITOR) and these may be panned left, right, center, or any degree thereof. VOLUME- This controls the overall output level of the K250. For best results in signal to noise ratio, set this slider to maximum and adjust the volume at your amplification system.
Assignable sliders
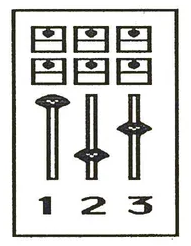
There are three sliders whose function is assignable by the user. The sliders have the following factory default assignments: • SLIDER1 - vibrato rate • SLIDER2 - chorus delay • SLIDER3 - brightness The function of these sliders may be altered through the use of the PLAY editor.
Multi-function buttons
Button icon diagram
There are 38 button switches whose function changes according to the current "edit page." Some of these functions are labeled on the panel. Some are labeled incorrectly because the software that governs the panel has been updated several times since the panel screening was originally designed. The functions of these buttons will be detailed under the "Panel Page Button Mapping" sections that follow. These will be flagged by the "Panel Page" icon:
Panel page icon with button layout
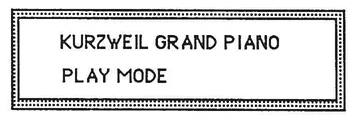
The display
KURZWEIL GRAND PIANO PLAY MODE display
The K250 has a 48 character LCD display which serves as a window into the computer's workings. The display may inform you of the K250's condition- as in KURZWEIL GRAND PIANO/ PLAY MODE; it may ask the user questions- as in ERASE RECORD TRACK? YES/NO; or it may prompt the user to take action- as in KBD EDIT MODE/SELECT KBD EDIT FUNCTION. Used in conjunction with the cursor keys the display will give a view of the menu options one line at a time for use in the menu edit method.
Menus
A menu is a list of options or parameters available to the user. The display serves as a single line view of this menu. By using the cursor keys the user may cycle through options one at a time.
Cursors
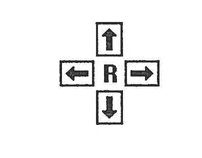
The cursor keys are used to move around the menu options as shown in the display. The keys represent left, right, up and down movements. The center key "R" is used to erase incorrect numeric entries. The cursor keys may also be used for other functions when in some panel modes.
Numeric keypad
The numeric keypad is used to access edit parameters, enter data values for parameters, access certain FUNCTIONS of the PLAY EDITOR, and to call up resident voices in the KEYPAD access mode.
K250 DEFINITIONS
Editors
An editor is a software program that allows the user to alter data for various parameters of sounds stored in the K250's Random Access Memory (RAM). In a sense, K250 editors are software "slaves" that run around performing various tasks as assigned by the user.
Editors are the key to user programming on the K250. The user cannot simply reach into the synthesizer and make changes, but rather can instruct the editors to make the requisite alterations. In this sense the editor acts as a slave carrying out the commands of the user. For each addressable function there is an individual editor specially trained for that specific task. Each editor may be instructed to carry out its task through the cursors and the keypad, or through its own page of panel controls. The interface between the user and an editor involves the EDIT button, 1) to call the editors' attention and any of a number of specific editor select buttons, 2) to call the proper editor and corresponding panel page into operation. Once the editor has been instructed to perform a specific task, it does so with lightning speed, so that the user may hear and evaluate the results in "real-time."
EDIT button diagram
K250 DEFINITIONS/cont.
Keyboard
To the K250, a keyboard is not just the physical collection of wooden keys that you play on, it is also responsible for what sounds will come out when you play certain keys. It is the heart of the K250, the first layer of interface to the computer. Sounds that are assigned to specific keys are KEYBOARD SETUPS and are user-definable through the use of the KEYBOARD SETUP EDITOR.
Instrument
A K250 instrument consists of two parts, a soundfile and a voicing, which when assigned to a keyboard may be played by the user. An instrument is the second layer of interface to the computer in the K250 and is approached through the INSTRUMENT VOICING EDITOR.
Soundfile
A soundfile is the raw data that represents the basic sound source for eventual performance. On its own, the soundfile is useless and inaudible. To use a soundfile, it must first be attached to an INSTRUMENT VOICING and then be assigned to a KEYBOARD SETUP. Users may enter their own soundfiles through the use of the Digitizer and Sound Modeling Program.
Voicing
A K250 voicing is a collection of parameters which are applied to a soundfile and define how it will sound when assigned to a KEYBOARD SETUP. Voicings are accessible through the INSTRUMENT VOICING EDITOR.
SETTING UP
There are two basic parts of the K250, the K250 itself and the pod, the foot pedal/power supply unit. For best results, please use the following procedure for setting up the K250.
PLAYING THE K250
The Keyboard
The K250 has an 88 note touch sensitive wooden keyboard with weighted action. The particular type of touch sensitivity on the K250 is technically known as velocity sensing, and senses both attack (key down/note-on) and release (key up/note-off) motions. The keyboard may be transposed by step or octave, split up to 64 times, and layered with up to 6 sounds. These functions will be explained in detail under the "PLAY editors" and "The KEYBOARD Editor" sections of this manual.
Real time controllers
The K250 has two assignable wheel-type controllers, 3 assignable slider controllers, and two foot switches; and allows for the connection of two more external foot pedals. There are also two additional expansion controllers which are implemented in software, but for which there is no currently available controller hardware. These will be reserved for future development of controllers such as ribbons or other specialized controllers. The assignable controllers come set from the factory with "default assignments" as follows.
SLIDER 1 - vibrato rate SLIDER 2 - chorus delay SLIDER 3 - brightness LEFT LEVER - vibrato depth RIGHT LEVER - pitch bend LEFT FOOTPEDAL - mute keystrikes RIGHT FOOTPEDAL - sustain EXT. FOOTPEDAL 1 - channel volume EXT. FOOTPEDAL 2 - no assignment EXPANSION 1- no assignment EXPANSION 2 - no assignment
The controllers' assignments may be altered with the "Play" editors- detailed in the next section.
PLAYING THE RESIDENT VOICES
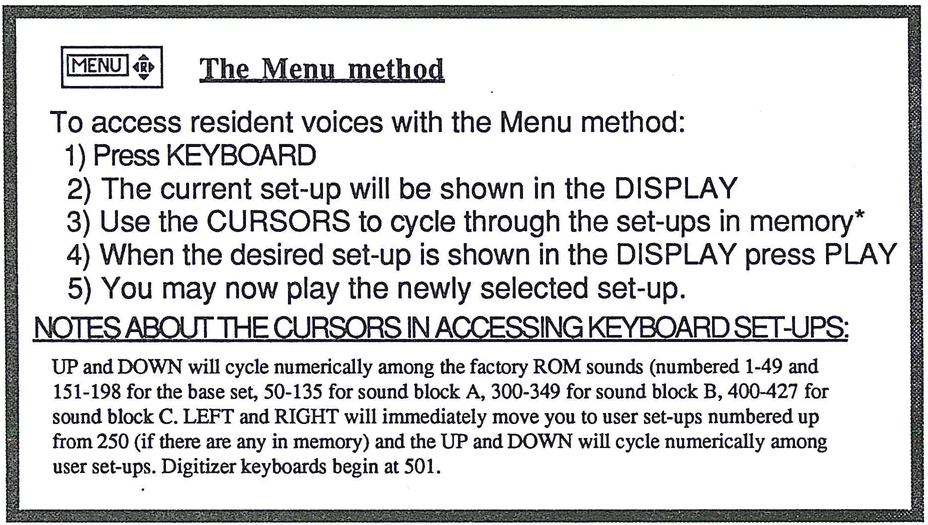
The Menu method
To access resident voices with the Menu method:
- 1) Press KEYBOARD
- 2) The current set-up will be shown in the DISPLAY
- 3) Use the CURSORS to cycle through the set-ups in memory*
- 4) When the desired set-up is shown in the DISPLAY press PLAY
- 5) You may now play the newly selected set-up.
NOTES ABOUT THE CURSORS IN ACCESSING KEYBOARD SET-UPS:
UP and DOWN will cycle numerically among the factory ROM sounds (numbered 1-49 and 151-198 for the base set, 50-135 for sound block A, 300-349 for sound block B, 400-427 for sound block C. LEFT and RIGHT will immediately move you to user set-ups numbered up from 250 (if there are any in memory) and the UP and DOWN will cycle numerically among user set-ups. Digitizer keyboards begin at 501.
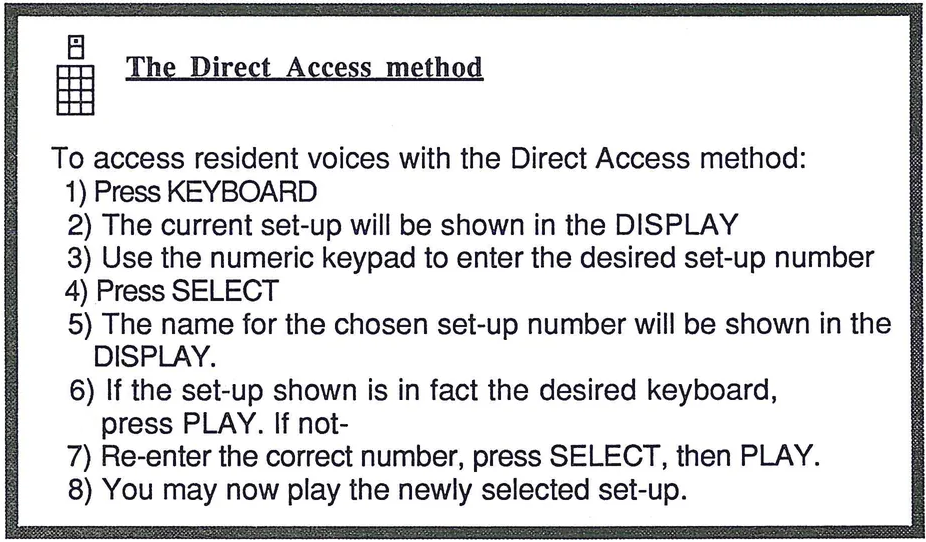
The Direct Access method
To access resident voices with the Direct Access method:
- 1) Press KEYBOARD
- 2) The current set-up will be shown in the DISPLAY
- 3) Use the numeric keypad to enter the desired set-up number
- 4) Press SELECT
- 5) The name for the chosen set-up number will be shown in the DISPLAY
- 6) If the set-up shown is in fact the desired keyboard, press PLAY. If not-
- 7) Re-enter the correct number, press SELECT, then PLAY.
- 8) You may now play the newly selected set-up.
The LIST
The list allows the user to create a personalized chain of keyboard setups. The ordering may be set with the LIST EDITOR which is detailed under the PLAY editor section. To access the resident voices using LIST:
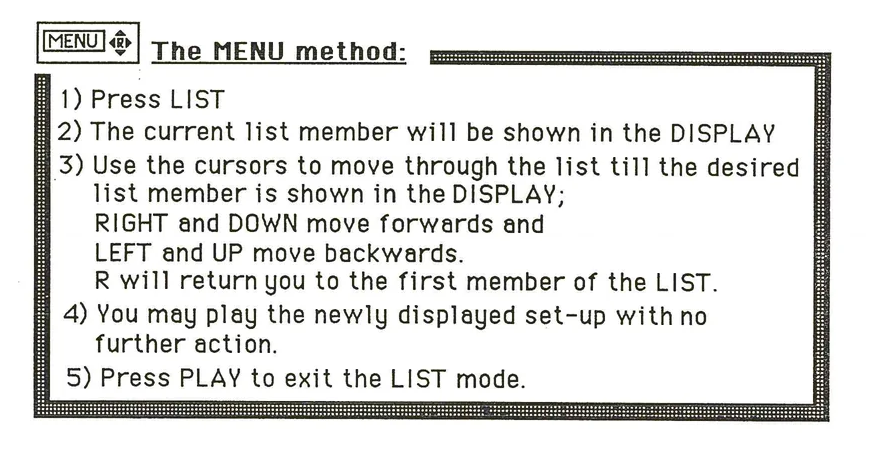
The MENU method: 1) Press LIST 2) The current list member will be shown in the DISPLAY 3) Use the cursors to move through the list till the desired list member is shown in the DISPLAY; RIGHT and DOWN move forwards and LEFT and UP move backwards. R will return you to the first member of the LIST. 4) You may play the newly displayed set-up with no further action. 5) Press PLAY to exit the LIST mode.
There is no Direct Access or Panel Page approach to the LIST.
The factory supplied LIST contains a variety of keyboard setups chosen from the base unit ROM sounds, optional soundblocks A, B, C, and D, user created setups at 250 and above, and user sampled sounds including setup positions from Superam I and II. Depending upon the configuration of your personal unit, you may or may not be able to see all the setups contained in the factory supplied LIST. In those LIST member positions calling for an option which you do not currently have installed in your unit you will see "Not found / SETUP LIST MEMBER x ", where x is the number for the LIST member calling for an optional setup. As the LIST may be customized to suit your individual needs, there should be no problem filling these "Not found" positions with setups of your own choice, or even starting over, creating a new personalized LIST from scratch. See the section under the PLAY editors for details on customizing the LIST.
A complete list of the base unit factory setups follows.
The Factory Base Unit Setups:
KEY:
Kurzweil uses the following conventions in keyboard setup names:
/ means the keyboard setup is split; see COMMENTS for split point. & means the keyboard setup is layered. - means the keyboard is a dual amplitude setup. TO means that the keyboard setup changes to another instrument depending on the velocity of the key strike. IG-A means the instrument voicing is assigned to Instrument Group A. IG-B means the instrument voicing is assigned to Instrument Group B. S indicates a stereo split between Instrument groups A and B. LNP indicates a monophonic instrument with Low Note Priority. HNP indicates a monophonic instrument with High Note Priority. HS indicates the instrument assigned to the hard strike in a dual amplitude keyboard. LS indicates the instrument assigned to the light strike in a dual amplitude keyboard. NR indicates an instrument with no release segment.
| # | NAME | COMMENTS | |
|---|---|---|---|
| 1 | KURZWEIL GRAND PIANO | An acoustic grand piano, covering up to full | |
| 88-note keyboard. IG-A. | |||
| 2 | ACOUSTIC BASS/PIANO | A combination of setups 9 and 1, split between C3 | |
| and D♭3. Piano is IG-A, Bass is IG-B. | |||
| 3 | SLOW STRINGS TO PIANO | A dual amplitude keyboard with SLOW STRINGS as the | |
| light strike (IG-B) and PIANO as the hard strike (IG-A). | |||
| 4 | BOWED STRINGS FAST | Bass, cello, viola, and violin sections blended into | |
| one another across a full keyboard, each sounding in | |||
| its correct range, and with a rapid attack. IG-A. | |||
| 5 | BOWED STRINGS SLOW | String section as above but with a slower attack. IG-B | |
| 6 | SLOW TO FAST STRINGS | A dual amplitude keyboard with SLOW STRINGS as the | |
| light strike and FAST STRINGS as the hard strike. Both | |||
| are IG-B. | |||
| 7 | ACOUSTIC BASS/STRINGS | A combination of setups 9 and 5, split between B3 and | |
| C4. Both are IG-B. | |||
| 8 | PIANO & SLOW STRINGS | A layered combination of setups 1 and 5, each covering | |
| the full keyboard. When you play any key you will | |||
| hear both sounds. Piano is IG-A, Strings are IG-B. |
9 ACOUSTIC BASS String bass; the highest note is C4, with nothing above that on the keyboard. IG-B.
10 BOWED ACOUSTIC BASS Same as above, but bowed rather than plucked. IG-B.
11 DOUBLED ACOUSTIC BASS Same as setup 9, but layered in octaves. IG-B.
12 FLUID ACOUSTIC BASS Layer of setups 9 and 10 in unison. IG-B.
13 INFINITE ACOUSTIC BASS Same as setup 9 but with no release segment. IG-B.
14 ELECTRIC ORGAN 1 Electric organ with full drawbars (volume on this setup is not velocity-sensitive). No release segment. IG-A.
15 ELECTRIC ORGAN 2 2nd organ, with different drawbar settings. Volume on this setup is not velocity-sensitive. No release segment. IG-A.
16 ELECTRIC ORGAN 3 3rd organ, with different drawbar settings. Volume on this setup is not velocity-sensitive. No release segment. IG-A.
17 ELECTRIC ORGAN 4 Electric organ percussion setting. Volume on this setup is not velocity-sensitive. IG-A.
18 VIBRATO ORGAN 1 A layer of ORGAN 3, nonvibrato IG-A with ORGAN 1 with vibrato IG-B. Volume is not velocity sensitive.
19 VIBRATO ORGAN 2 Two ORGAN 1's layered at the unison, both with vibrato. Each vibrato setting is at a different rate to create a "leslie" type of effect. ORGAN 1 with fast vibrato is IG-A and the ORGAN 2 with a slower vibrato is IG-B. Volume is not velocity sensitive.
20 DRUM KIT 1 A full kit and then some: from left to right across the keyboard you'll find tom-tom (A0-A2), kick drum (A#2-D3), snare drum (D#3-E4 with A3, A#3, and B3 at the same pitch for rolls), closed hi hat (F4-G#4), closing hi hat (A4-D5), open hi hat (D#5-G5), crash cymbal (G#5-D#6), ride cymbal (E6-G6), cowbell (G#6-b6), handclap (C7-D#7), grater stroked upward (E7), grater stroked downward (F7), sandpaper (F#7), finger snap (G7), and temple block (G#7-C8). IG-B.
21 DRUM KIT 2 Another kit, arranged differently: from left to right across the keyboard are kick drum (A0-B0), snare (C1-B1 with F1, G1,A1, and B1 at the same pitch for rolls), tom-tom (C2-B3), grater stroked upward (C4), grater stroked downward (C#4), finger snap (D4), temple block (D#4-F#4), handclap (C5-E5), crash cymbal (F5-C#6), ride cymbal (D6-F#6), closing hi hat (G6-C7), open hi hat, (C#7-F#7) and closed hi hat (G7-C8). IG-B.
23 MINI DRUMS
A basic kit in one octave; A0 through B1. Tom-tom (A0-C1), kick (C#1-D1), snare (D#1-E1), closing hi hat (F1), open hi-hat (F#1), closed hi hat (G1), ride cymbal (G#1), crash (A1), cowbell (A#1), handclap (B1). IG-B.
24 LAYERED DRUMS
Heavy sounds: a layered combination of setup 20 with a version of itself one octave lower. IG-B.
25 PERCUSSION KIT 1
Assorted percussion instruments across the entire keyboard. Ratchet (a0-F#2), guiro upstroke (G2-B2), guiro downstroke (C3-B3),sleigh bells (C4-G#5), woodblock (A5-C8). IG-B.
26 PERCUSSION KIT 2
A sweeping synth sound (A0-B3) split with a melodic woodblock (C4-C8). IG-B.
27 SPACE DRUMS
A bizarre modification of the drum kit. Space toms (A0-A2), thunderclap (A#2-G#3), space snare (A3-E4), zap hi hat (F4-D5), whoosh hi hat (D34-G5), space cymbal (G#5-G6), cow bellow (G#6-B6), laser ray (C7-C8). IG-B.
28 ALIEN PERCUSSION
Bizarre modifications of the sounds on setup 25. Alien guiro downstroke (A0-B1), Alien sleigh bells (C2-C5), alien woodblock (C#5-C8). IG-B.
29 TRUMPET
A single trumpet from A0-C7. IG-A.
30 QUICK TRUMPET
Similar to setup 29 but with faster attack and release times. IG-A.
31 FLUID TRUMPET
A layer of two setup 30's slightly out of phase. One is IG-A, the other is IG-B.
32 TROMBONE
A valve trombone from A0-C7. IG-B.
33 TRUMPET & TROMBONE
A layer of trumpet and trombone in octaves (A0-C7). The trumpet is IG-A and the trombone is IG-B.
34 HORN SECTION
A three layer setup of brass in octaves (A0-C7). All are IG-A.
35 FIFTH HORN SECTION
A four layer setup of brass in fifths, an octave apart (A0-C7). All are IG-B.
36 FIFTH TRUMPETS
A two layer setup of trumpets in open fifths (A0-C7). Both are IG-B.
42 BAR HORN SECTION Baritone horns layered at the unison (A0-C6). IG-A and IG-B.
43 BAR HORN & TRUMPET A layered unison doubling of Baritone horn (stopping at C6) and trumpet (stopping at C7). Horn is IG-A, trumpet is IG-B.
44 ACOUSTIC GUITAR A nylon-string (A0-G6). IG-B.
45 SUSTAIN ACOUSTIC GUITAR The same as 44 but with very long decay.
46 FLUID ACOUSTIC GUITAR Setup 44 layered at the unison. One is IG-A the other is IG-B.
47 DOUBLED ACOUSTIC GUITAR Setup 44 layered with a version of itself one octave lower. The high octave is IG-A , the low is IG-B.
48 TRIPLE ACOUSTIC GUITAR Setup 44 layered in three octaves. The lower two octaves are IG-A, the highest octave is IG-B.
49 SLOW ACOUSTIC GUITAR Setup 44 with a slow attack and slow release. IG-B.
SETUPS 50- 135 ARE USED FOR SOUND BLOCK A (OPTIONAL). 136-149 ARE RESERVED FOR FUTURE USE.
150 HARPSICHORD A harpsichord spanning A0-A7. Non-traditionally velocity sensitive. IG-A.
151 QUICK HARPSICHORD Same as 150 but with faster attack and release. IG-B.
152 BRIGHT HARPSICHORD Same as 150 but with the filters opened up a bit for added brightness. IG-B.
153 DOUBLED HARPSICHORD A layering of two 150's at the octave. The pitch played is IG-A and the octave below is IG-B.
154 FLUID HARPSICHORD Two harpsichords doubled at the unison for the flanged effect. One is IG-A, the other is IG-B.
155 BOWED HARPSICHORD Setup 150 with a slow attack and release envelope. IG-B.
156 ALIEN HARPSICHORD Bizarre tremolo and decay effects applied to setup 150. IG-B.
157 HARPSICHORD & PIANO A doubling of setups 1 and 150. A#7, B7, and C8 are piano only. HARPSICHORD is IG-A, and PIANO is IG-B.
158 HARPSICHORD & STRINGS Setup 4 doubled at the unison with setup 150. The HARPSICHORD is IG-A and the STRINGS are IG-B.
159 HARPSICHORD & 8VA Like setup 153, except the doubling is an octave higher. The played pitch is IG-A and the higher octave is IG-B.
160 HARPSICHORD IN SPACE After a slight delay, the notes move in contrary motion to an octave. IG-B.
161 SCI-FI HARPSICHORD A slow decaying tremolo, a tritone in depth is applied to setup 150. IG-A.
162 SINE WAVE A pure tone with hard attack, across a full keyboard. IG-A.
163 BRIGHT SINE WAVE The same as 162, but with the filters opened for a brighter effect. IG-B.
164 ENDLESS GLISSANDO A "Shepard tone" (named after the effect's discoverer, psychologist Roger Shepard). Hold a key down and you will hear the psychoacoustic illusion of an ever-rising pitch. IG-B.
165 SYNTH SWEEP 1 This is a two layer setup producing the effect of a sine wave arpeggiating through a minor chord, above and below the struck note. IG-A &B.
166 SYNTH SWEEP 2 Similar to 165 but with a faster arpeggiation. IG-A &B.
167 PING PONG PIANO A two layer setup which plays 19 decaying repetitions of the note attack. The repetitions ping pong between IG-A and IG-B. Pan the outputs hard right and left for the full stereo effect.
168 SINE DROPS An open fifth is arpeggiated through several octaves. IG-A arpeggiates the upper note and the lower is IG-B.
169 SCI-FI PIANO 1 Like setup 161 but with the PIANO sound. IG-A.
170 SCI-FI PIANO 2 Like 169 but the depth of the tremolo is an octave. IG-B.
171 PIANO CHOIR 1 Two layers of PIANO with slow attack and release, each having a slightly different vibrato rate. IG-A & B.
172 PIANO CHOIR 2 Similar to 171 but with an even slower attack. IG-A & B.
173 ORCHESTRA 1 A three layer setup of BOWED FAST STRINGS in three octaves. The outer octaves are IG-A and the inner note, the note played, is IG-B.
174 ORCHESTRA 2 A four layer setup of a diminished chord in first inversion with the fifth doubled at the octave. The key played sounds BARITONE HORN with BOWED STRINGS FAST playing the rest. IG-A & B.
175 ORCHESTRA 3 Another four layer setup of strings and trumpets. The TRUMPET sounds the note played and a fifth above on IG-B, and BOWED STRINGS FAST sounds the struck note an octave higher and lower in IG-A.
176 KLAV GUITAR A single layer envelope modification of the HARPSICHORD producing an effect somewhat in between a clavichord and a guitar. IG-A.
177 BUBBLING OIL A three layer setup which sounds like bubbling boiling oil. IG-B.
178 SLOW (STRINGS & PIANO) A two layer setup with SLOW STRINGS and the PIANO with the SLOW STRINGS envelope. Both are IG-B.
179 BELL & STRINGS BOWED FAST STRINGS layered with a SINE WAVE an octave higher. The SINE WAVE is IG-A, and the STRINGS are IG-B.
180 STEREO SPLIT PIANO The PIANO is split between B3 and C4, the lower range assigned to IG-A and the higher range to IG-B.
181 PIANO & GUITAR A layered combination of setups 1 and 44 the guitar stops at C6 on a keyboard. Piano IG-A, Guitar IG-B.
182 SLOW STRINGS & GUITAR A layered combination of setups 5 and 44; the guitar stops at C6 on a keyboard. Strings IG-A, Guitar IG-B.
183 PIANO & TRUMPET A layering of setups 1 and 29. C7-C8 is PIANO only. PIANO is IG-A and TRUMPET is IG-B.
184 PIANO & SLOW HARPSI A layering of setups 1 (IG-A) and 49 (IG-B).
185 GUITAR & BARITONE HORN A layered combination of guitar 44 and baritone horn 38. The baritone stops at C6, the guitar at G6. The guitar is IG-A, the horn is IG-B.
186 ACOUSTIC BASS/ORGAN 4 A split of setups 9 (IG-B) and 17 (IG-A &B). The split is between B2 and C3. No velocity sensing for either instrument.
187 SLOW BALLAD ORGAN 1 A vibrato version of ORGAN 1 with a slight delay before the vibrato. Not velocity sensitive. IG-A.
188 SLOW BALLAD ORGAN 2 Similar to 187, but using ORGAN 3. IG-A.
189 LAYERED ORGANS A layering of ORGAN 1 (IG-A) and ORGAN 3 (IG-B).
190 DBL HARPSI & STRINGS A four layer set up of two HARPSICHORDS an octave apart and two BOWED FAST STRINGS an octave apart. The struck pitch of both instruments is IG-A, and the octave doubling is IG-B.
191 SYNTH GAMELAN Bizarre effects applied to the sleigh bells from setup 25 produce this two layer setup.The upper layer is IG-A and the lower is IG-B.
192 SINEMENTO This SINE WAVE glides down an octave from the struck pitch. IG-A.
193 ECHO An interesting envelope and multiple echoes are applied to setup 162, the SINE WAVE. IG-A.
194 SPACELESTE Like the HARPSICHORD IN SPACE (160) this SINE WAVE moves in contrary motion to an octave. The descending portion is IG-A and the ascending one is IG-B.
195 PIANORGAN Setup 14 (ORGAN 1) has the brightness filters opened in IG-A, and is layered with a PIANO an octave above the struck pitch. The PIANO envelope has been transformed to simulate another organ. The PIANO is IG-B.
196 NOISE White noise with no decay (A0-C4) split with white noise slow decay (C#4-C6) split with white noise fast decay (C#6-C8). All are IG-B.
197 "the LANDING" Three detuned layers of BRIGHT SINE WAVES (163) descend, and descend, and descend.....IG-B.
198 NULL KEYBOARD (MIDI) Use this keyboard to turn your K250 into a MIDI keyboard controller. NOTE: This keyboard has no practical use in the K250 Expander.
KEYBOARD SETUPS FOR THE OPTIONAL SOUND BLOCKS ARE LISTED IN THE APPENDICES.
The KEYPAD BINS
To minimize the number of button presses necessary to change voices, use the KEYPAD BINS. The bins are memory positions that are called by pressing one of the numeric keypad keys. In all, there are 30 memory positions:
BANK A- (YES button switch) positions 0-9 BANK B- (SELECT button switch ) position 0-9 BANK C- (NO button switch ) positions 0-9
To access the KEYPAD BINS:
- 1) Make sure you are in the PLAY mode. (press PLAY)
- 2) Press the desired BANK key. (YES, SELECT, or NO) If the desired BANK key is already lit, proceed to the next step.
- 3) Press the desired number key, 0-9.
- 4) The name of the in the chosen memory position will be shown in the DISPLAY.
- 5) You may now play the chosen setup.
This method of access to the resident voices is the fastest, once you assign your desired sounds to the proper bins. This is accomplished with the KEYPAD BINS EDITOR, detailed under the PLAY editors section.
The factory KEYPAD BINS setups follow.
The factory KEYPAD BINS assignments:
| BIN NAME SETUP NUMBER |
| BANK 1 |
| 1 Kurzweil Grand Piano 1 |
| 2 Acoustic Bass/Piano 2 |
| 3 Drum Kit 1 20 |
| 4 Bowed Strings Fast 4 |
| 5 Bowed Strings Slow 5 |
| 6 Slow Strings 2 117 |
| 7 Baritone Horn 26 |
| 8 Acoustic Guitar 28 |
| 9 Dbl Harpsi & Strings 190 |
| 0 Harpsichord 150 |
| BANK 2 |
| 1 Acoustic Bass 9 |
| 2 Elec. Bass/Slap Bass 100 |
| 3 Acous Bass/Organ 4 186 |
| 4 Quick Trumpet 30 |
| 5 Horn Section 34 |
| 6 Electric Organ 4 17 |
| 7 Choir 50 |
| 8 Flute 73 |
| 9 Fluid Vibes 89 |
| 0 Cymbal Winds 134 |
| BANK 3 |
| 1 User Setup 250 |
| 2 User Setup 251 |
| 3 User Setup 252 |
| 4 Rock Drums 1 300 |
| 5 Rock Drums 3 302 |
| 6 Rock Drums 5 304 |
| 7 Synth 1 311 |
| 8 Electric Piano 324 |
| 9 Lead Guitar 336 |
| 0 User Digitizer Setup 501 |
As some of the setups assigned to the BINS require optional soundblocks, you may see "Not found" in positions referencing Kurzweil options not currently installed in your unit. You may of course change these using the PLAY editors, described below.
The "PLAY" editors
Editors, as you will recall, are used to alter data for various parameters of the K250. PLAY editors are used to change settings for parameters associated with real time performance—the keyboard and controllers, and the access of resident voices in Read Only Memory (ROM) in the K250. To access these editors press the EDIT button while in play mode. The display will indicate that you are in the edit mode and the K250 will wait for you to identify which editor you wish to use, i.e., which parameter to alter.
ACCESS OF VOICES
These editors change the order of the keyboard setup list and what is assigned to the keypad bins.
The LIST Editor
The LIST editor wants to know two things—which list position (member) to change, and which setup to install. Once both selections have been made, the LIST editor will move to the next position in the list and continue the process. When you are done editing, answer NO to "change list member?" and then press PLAY to exit the LIST editor mode. There are two ways to create your own LIST:
The MENU method
The Direct Access method
Kurzweil K250 Users Guide
The KEYPAD BINS editor
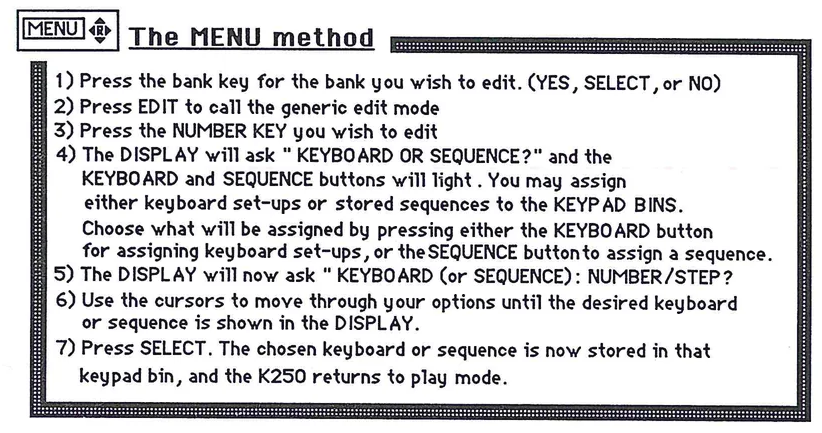
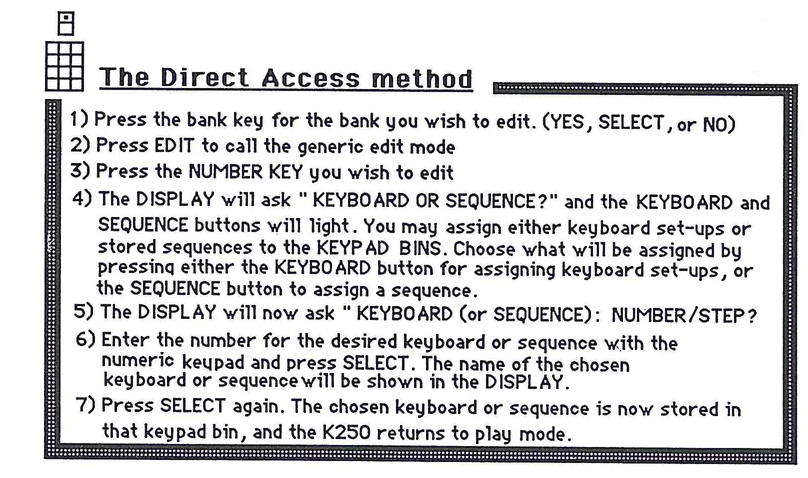
To customize the KEYPAD BINS use the KEYPAD BINS EDITOR:
The MENU method 1) Press the bank key for the bank you wish to edit. (YES, SELECT, or NO) 2) Press EDIT to call the generic edit mode 3) Press the NUMBER KEY you wish to edit 4) The DISPLAY will ask "KEYBOARD OR SEQUENCE?" and the KEYBOARD and SEQUENCE buttons will light. You may assign either keyboard set-ups or stored sequences to the KEYPAD BINS. Choose what will be assigned by pressing either the KEYBOARD button for assigning keyboard set-ups, or the SEQUENCE button to assign a sequence. 5) The DISPLAY will now ask "KEYBOARD (or SEQUENCE): NUMBER/STEP? 6) Use the cursors to move through your options until the desired keyboard or sequence is shown in the DISPLAY. 7) Press SELECT. The chosen keyboard or sequence is now stored in that keypad bin, and the K250 returns to play mode.
The Direct Access method 1) Press the bank key for the bank you wish to edit. (YES, SELECT, or NO) 2) Press EDIT to call the generic edit mode 3) Press the NUMBER KEY you wish to edit 4) The DISPLAY will ask "KEYBOARD OR SEQUENCE?" and the KEYBOARD and SEQUENCE buttons will light. You may assign either keyboard set-ups or stored sequences to the KEYPAD BINS. Choose what will be assigned by pressing either the KEYBOARD button for assigning keyboard set-ups, or the SEQUENCE button to assign a sequence. 5) The DISPLAY will now ask "KEYBOARD (or SEQUENCE): NUMBER/STEP? 6) Enter the number for the desired keyboard or sequence with the numeric keypad and press SELECT. The name of the chosen keyboard or sequence will be shown in the DISPLAY. 7) Press SELECT again. The chosen keyboard or sequence is now stored in that keypad bin, and the K250 returns to play mode.
25
KEYBOARD CONTROL
These editors change how the keyboard will control the K250 and how the keyboard will respond to your touch.
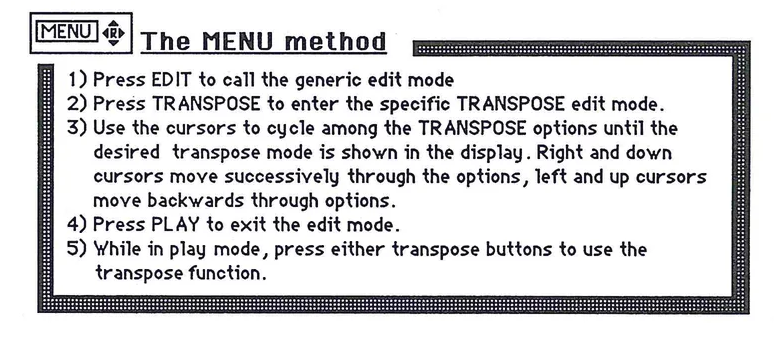
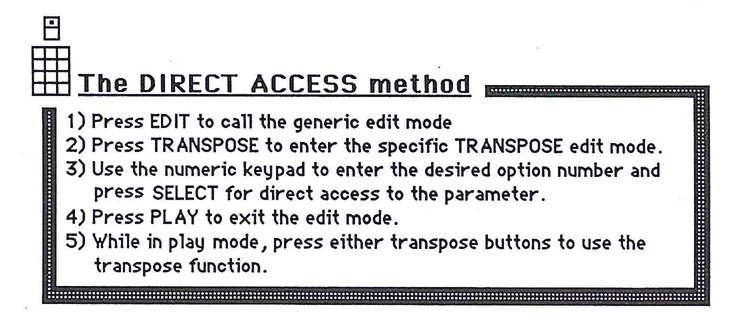
The TRANSPOSE editor
There are five types of transpose functions in the K250. Any one of these can be assigned to the transpose button, through the use of the TRANSPOSE EDITOR. Once a transpose function is assigned, it can be called into use while in play mode by pressing either transpose button (up or down.) The transpose assignment is retained in memory even if the power is turned off. The five types of transpositions are:
1- Octave Pitch Shift (TRANSPOSE Option #1)
This mode of transposition simply speeds up or slows down the data play rate. The result is an octave change in pitch as well as a noticeable timbre change.There is a limitation to how far you can transpose up due to the limitations of how fast the machine can process the sound data. The limit to how far you can transpose down is five octaves. Listen to the effect of the Octave Pitch Shift and notice the timbre change. This can be a nice effect in some contexts, but if you prefer to retain the natural timbre of sound in transposition, use the Octave Transpose mode.
2- Chromatic Pitch Shift (TRANSPOSE Option #2)
This works much like the Octave Pitch Shift, except that the transposition occurs in half steps rather than octaves, and that the maximum range of transposition is an octave, up or down. Remember that if you prefer to retain the natural timbre of sound in transposition, use the Chromatic Transpose mode.
3- Octave Transpose (TRANSPOSE Option #3)
In this mode, the sound is transposed up or down by octaves, but the natural timbre is preserved as much as possible. Transposition is limited to one octave up or five octaves down.
4-Chromatic Transpose (TRANSPOSE Option #4)
In this mode the sound is transposed up or down chromatically while preserving the natural timbre. The maximum range of transposition is an octave, up or down.
5- Timbre Shift (TRANSPOSE Option #5)
This is a very effective mode of transposition which transposes the timbre while keeping the pitch intact. The K250 in effect takes the timbre of the note transposed to, and keeps the pitch of the note you are playing. Transposing up makes the sound brighter while going down makes the sound darker, more mellow. Note that if you hold the key down while repeatedly pressing the transpose button, the pitch will change as long as you keep the key depressed. Immediately upon release of the key and for subsequent keystrikes,however, the pitch will return to the original note played with the new timbre applied. This timbre shift occurs in half steps and has a limit of one octave up or three octaves down.
The factory default for the transpose mode is Octave Pitch Shift.
The TRANSPOSE editor
To access the TRANSPOSE EDITOR, press the EDIT button while in play mode. The display will read EDIT MODE, while the K250 waits to hear which editor you want to employ. Press either of the two transpose buttons to enter the TRANSPOSE EDIT mode. Once you have entered the TRANSPOSE EDIT mode you can cycle between your options in either of two ways:
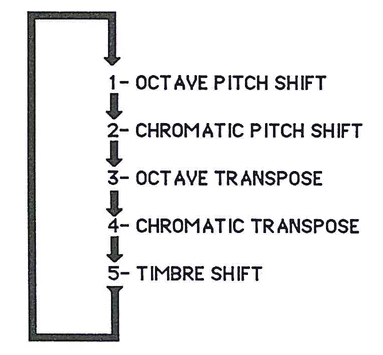
Transpose options list: 1- OCTAVE PITCH SHIFT 2- CHROMATIC PITCH SHIFT 3- OCTAVE TRANSPOSE 4- CHROMATIC TRANSPOSE 5- TIMBRE SHIFT
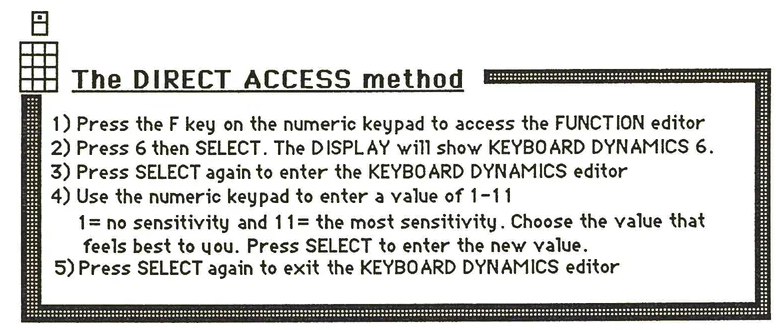
The KEYBOARD DYNAMICS editor
This editor allows the user to adjust the way the K250 responds to keyboard touch (velocity sensitivity). All of the keyboard setups, with the exception of the organs, have "touch sensitivity" and the overall amount of response is controlled with the KEYBOARD DYNAMICS editor. To Access this editor we use a slightly different approach. Rather than enter the EDIT MODE by pressing the EDIT button, we use a special editor called the FUNCTION editor, as this is a function of how the K250 will respond to the user's touch. The FUNCTION editor is accessed from the PLAY MODE by pressing the F key on the numeric keypad. As with the other editors, the KEYBOARD DYNAMICS/FUNCTION editor may be accessed in two ways:
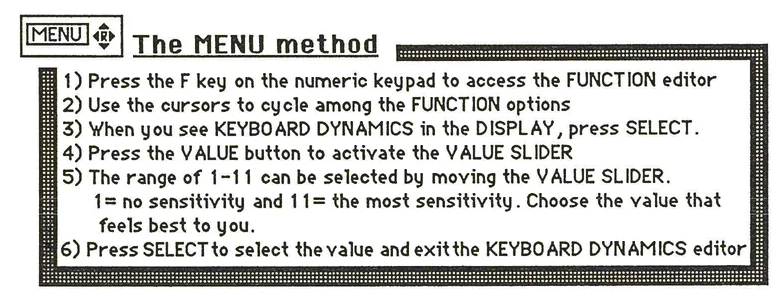
MENU icon with instructions for The MENU method: 1) Press the F key on the numeric keypad to access the FUNCTION editor 2) Use the cursors to cycle among the FUNCTION options 3) When you see KEYBOARD DYNAMICS in the DISPLAY, press SELECT. 4) Press the VALUE button to activate the VALUE SLIDER 5) The range of 1-11 can be selected by moving the VALUE SLIDER. 1= no sensitivity and 11= the most sensitivity. Choose the value that feels best to you. 6) Press SELECT to select the value and exit the KEYBOARD DYNAMICS editor
Direct access icon with instructions for The DIRECT ACCESS method: 1) Press the F key on the numeric keypad to access the FUNCTION editor 2) Press 6 then SELECT. The DISPLAY will show KEYBOARD DYNAMICS 6. 3) Press SELECT again to enter the KEYBOARD DYNAMICS editor 4) Use the numeric keypad to enter a value of 1-11 1= no sensitivity and 11= the most sensitivity. Choose the value that feels best to you. Press SELECT to enter the new value. 5) Press SELECT again to exit the KEYBOARD DYNAMICS editor
F3 - The PRESSURE ASSIGNMENT Editor
Although the K250's internal keyboard does not sense pressure (aftertouch), both the K250 and K250 EXPANDER can accept pressure commands (both channel and polyphonic) via MIDI. This is especially useful when using a master controller like the Kurzweil MIDIBOARD™. The musical effect to which MIDI pressure is routed is controlled through The PRESSURE ASSIGNMENT Editor, Function command F3. There are three major options within F3:
1 SELECT MIDI CHANNEL?
This option allows the user to select which MIDI channel the K250 will look to for pressure commands.
2 MONO PRESSURE FUNCTION?
This option allows you to direct the channel pressure command to a specific musical task. The available assignments are:
- 0 NO ASSIGNMENT
- 1 VIBRATO RATE
- 2 VIBRATO DEPTH
- 3 TREMOLO RATE
- 4 TREMOLO DEPTH
- 5 PITCH BEND
- 6 CHANNEL VOLUME
- 7 SEQUENCE VOLUME
- 8 MIDI VOLUME
- 9 SEQUENCE START
- 10 CHORUS DELAY
- 11 MUTE
- 12 SUSTAIN
- 13 BRIGHTNESS
- 14 MONO PRESSURE OUT
- 15 PUNCH IN/OUT
3 POLY PRESSURE FUNCTION?
This option allows you to direct the polyphonic pressure command to a specific musical task. The available assignments are:
- 0 NO ASSIGNMENT
- 1 NOTE VOLUME
- 2 BEND NOTE UP
- 3 BEND NOTE DOWN
Both the Menu and Direct Access methods may be used to make pressure assignments.
F3 - PRESSURE
The MENU Method
- 1) Press F to enter the FUNCTION editor.
- 2) Use the cursors to cycle through the options until the DISPLAY reads PRESSURE 3.
- 3) Press SELECT to access the PRESSURE ASSIGNMENT Editor.
- 4) Use the cursors to cycle among the three major options. Press SELECT to access the desired suboption.
- 5) Again, using the cursors find the desired choice for the assignment, and press SELECT.
- 6) Press PLAY to exit the PRESSURE ASSIGNMENT Edit mode.
Pressure Assignment Menu Structure: 1 SELECT MIDI CHANNEL? 1 - 16 2 MONO PRESSURE FUNCTION? 0 NO ASSIGNMENT 1 VIBRATO RATE 2 VIBRATO DEPTH 3 TREMOLO RATE 4 TREMOLO DEPTH 5 PITCH BEND 6 CHANNEL VOLUME 7 SEQUENCE VOLUME 8 MIDI VOLUME 9 SEQUENCE START 10 CHORUS DELAY 11 MUTE 12 SUSTAIN 13 BRIGHTNESS 14 MONO PRESSURE OUT 15 PUNCH IN/OUT 3 POLY PRESSURE FUNCTION? 0 NO ASSIGNMENT 1 NOTE VOLUME 2 BEND NOTE UP 3 BEND NOTE DOWN
The Direct Access method
- 1) Press F to enter the FUNCTION editor.
- 2) If PRESSURE 3 is not shown in the DISPLAY, press 3 and SELECT twice to access the PRESSURE ASSIGNMENT editor.
- 3) Enter the number for the desired suboption to edit and press SELECT twice.
- 4) Enter the number for the chosen assignment and press SELECT twice.
- 5) Press PLAY to exit the FUNCTION editor.
The CHANNEL STEAL algorithm editor
A channel in the K250 is equivalent to what most synthesizers refer to as voices. There are 12 channels in the K250 so you can play up to 12 notes on a single-layered keyboard (one with a single sound such as the Kurzweil Grand Piano), or 6 notes on a dual keyboard setup. Once you play more notes than the synthesizer has available channels, the instrument will "steal" a channel in order to play the new note(s). How the K250 decides which note to steal is known as the Channel Steal algorithm. With most other synthesizers, this algorithm is set at the factory and cannot be altered. Unfortunately, the choice made by other manufacturers is usually a fairly simple solution to a rather complex musical problem, and usually involves stealing the first note played—even if it might be the most important note to the musician. The K250 offers a number of options for channel stealing which can be accessed by the user through the CHANNEL STEAL ALGORITHM EDITOR. These options are not mutually exclusive, and a number of them may be used in conjunction with one another to "customize" the instrument's response to the user. This editor is once again accessed through the function editor mode.
The MENU method
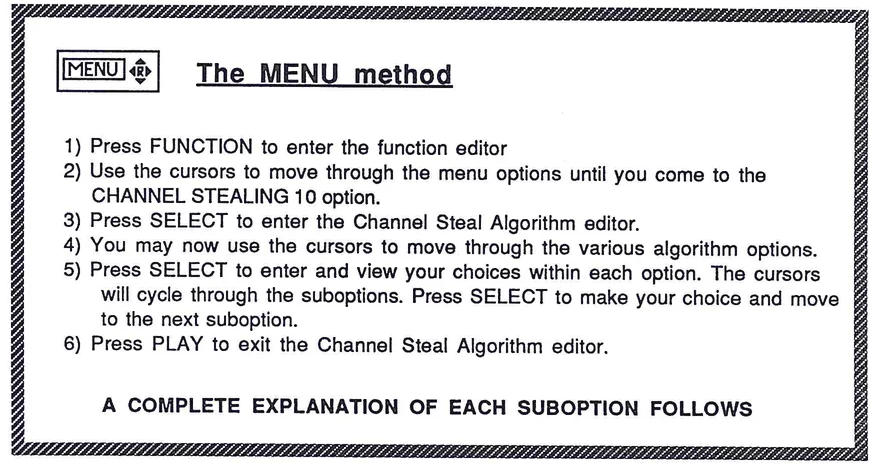
- 1) Press FUNCTION to enter the function editor
- 2) Use the cursors to move through the menu options until you come to the CHANNEL STEALING 10 option.
- 3) Press SELECT to enter the Channel Steal Algorithm editor.
- 4) You may now use the cursors to move through the various algorithm options.
- 5) Press SELECT to enter and view your choices within each option. The cursors will cycle through the suboptions. Press SELECT to make your choice and move to the next suboption.
- 6) Press PLAY to exit the Channel Steal Algorithm editor.
A COMPLETE EXPLANATION OF EACH SUBOPTION FOLLOWS
The DIRECT ACCESS method:
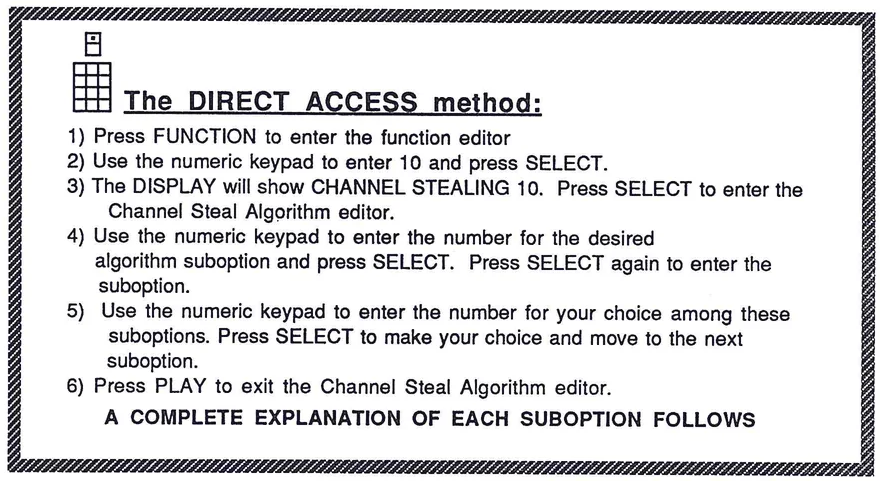
- 1) Press FUNCTION to enter the function editor
- 2) Use the numeric keypad to enter 10 and press SELECT.
- 3) The DISPLAY will show CHANNEL STEALING 10. Press SELECT to enter the Channel Steal Algorithm editor.
- 4) Use the numeric keypad to enter the number for the desired algorithm suboption and press SELECT. Press SELECT again to enter the suboption.
- 5) Use the numeric keypad to enter the number for your choice among these suboptions. Press SELECT to make your choice and move to the next suboption.
- 6) Press PLAY to exit the Channel Steal Algorithm editor.
A COMPLETE EXPLANATION OF EACH SUBOPTION FOLLOWS
E/10 CHANNEL STEALING ALGORITHMS
OPTIONS:
Press PLAY to exit Channel Steal Algorithm editor
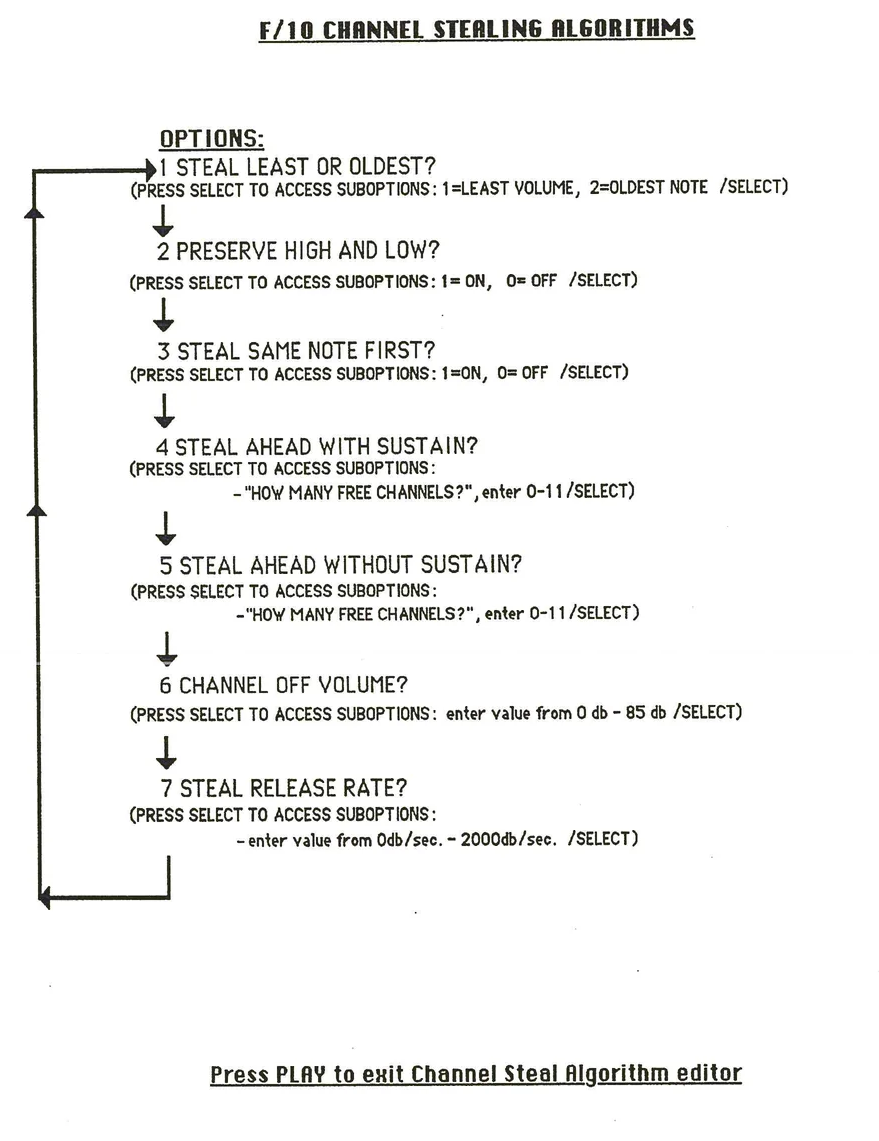
THE F10 OPTIONS EXPLAINED:
- 1 STEAL LEAST OR OLDEST?
Choosing LEAST VOLUME 1 will instruct the K250 to steal the channel playing the softest note. Choosing OLDEST NOTE 2 instructs the K250 to steal the channel which has been sounding for the longest time. LEAST VOLUME 1 is probably the most musical choice as the note stolen will be the least noticeable. LEAST VOLUME 1 is the factory default.
- 2 PRESERVE HIGH AND LOW?
There are two choices here—ON 1 and OFF 0. Choosing ON1 means the K250 will not steal from the channels playing the highest or lowest pitches, as these are the most obvious to the ear. Choosing OFF 0 defeats this option. As ON1 is the more musically useful choice, it is the factory default.
- 3 STEAL SAME NOTE FIRST?
There are two choices here again—ON 1 and OFF 0. Choosing ON1 tells the K250 to first steal channels with the same pitch as is being played, allowing a held chord to remain intact as repeated melody notes are played. This option makes the keyboard feel a little cleaner when you play fast. OFF 0 defeats this feature. As ON1 provides a more musical feel, it is the factory default.
- 4 STEAL AHEAD WITH SUSTAIN?
If you select this option (by pressing SELECT) the suboption reads HOW MANY FREE CHANNELS; and you need to enter a number from 0-11 and press SELECT. This option allows you to choose when channel stealing will begin while the sustain pedal is depressed. Choosing 0 tells the K250 not to steal any notes until all channels are used up. Choose 1 and stealing begins when there is only one channel remaining. Choosing a higher number causes stealing to occur sooner. 1 is the setting that lets the K250 best handle runs of notes while the sustain is on, so it is the factory default.
- 5 STEAL AHEAD WITHOUT SUSTAIN?
This option functions much the same as option 4, except that it tells the K250 when to steal channels when the sustain pedal is off. Selecting this option (by pressing SELECT) gives the same suboption, HOW MANY FREE CHANNELS;, and once again you must enter a value from 0-11 and press SELECT. The factory default here is 0.
- 6 CHANNEL OFF VOLUME?
Options 4 and 5 set up a framework in which the K250 will steal notes if needed. This option determines at what dynamic level notes should be at when stealing begins. The range here is 0db - 85db and the factory default is 35db. The higher the setting, the higher the volume at which stealing will begin. Note that this stealing will occur whether or not all channels are in use. If options 4 and 5 have determined that no stealing should occur, this option will have no effect.
- 7 STEAL RELEASE RATE?
When a channel is stolen, it is actually turned off, then assigned to another note. If the channel is stolen too quickly, an audible click will be produced. If it is stolen too slowly, the keyboard will feel sluggish to your playing. This option allows you to control the rate at which channels are turned off and reassigned. The rate is set in decibels per second with a range of 0-3600. The factory default is 2000db/sec.
Using the PLAY editor to modify CONTROLLER assignments
In the introduction to the User Interface, we learned about the various real time controllers available to the player of the K250. We also saw that each of these controllers' functions could be assigned by the user according to the user's needs through the PLAY editors. These levers, sliders, and pedals have a set of assignments as factory defaults, and these defaults were previously listed. In addition to these assignments, global control over how the controllers affect the instrument's sound is accessed through the FUNCTION editor. Editing techniques are essentially the same here as they were in previous PLAY editor sections.
LEVERS
The left and right levers are given assignments through the PLAY editor, and both the Menu and direct Access methods may be employed in altering these assignments.
The Menu and Direct Access numbers for the 16 assignments options that work with all controllers follows.
AVAILABLE ASSIGNMENTS FOR ALL CONTROLLERS
- 0 NO ASSIGNMENT
- 1 VIBRATO RATE
- 2 VIBRATO DEPTH
- 3 TREMOLO RATE
- 4 TREMOLO DEPTH
- 5 PITCH BEND
- 6 CHANNEL VOLUME
- 7 SEQUENCE VOLUME
- 8 MIDI VOLUME
- 9 SEQUENCE START
- 10 CHORUS DELAY
- 11 MUTE
- 12 SUSTAIN
- 13 BRIGHTNESS
- 14 MONO PRESSURE OUT
- 15 PUNCH IN/OUT
PEDALS AND SLIDERS
The pedals and sliders are given assignments in the same manner as the levers. Return to page 34 and substitute pedals or sliders for the levers in the method boxes. The general method may be recapped as follows:
- 1) Press EDIT
- 2) Press the button for the controller you wish to edit
- 3) Press SELECT
- 4) Continue with either the Menu or Direct Access methods.
The same 16 assignments listed on page 35 are available to all controllers. The menu option numbers are also a constant.
AN IMPORTANT NOTE ABOUT ASSIGNMENTS:
The K250 can have only one controller assigned to a control function at any given time; if you try to assign the same function to more than one controller, the previously assigned controller will be reassigned "NO ASSIGNMENT." Therefore, it is a good idea to plan your assignments and decide which controllers will do which functions and use the assignment editor accordingly. At any time you can look at your assignments by entering the edit assignments mode and using the cursors to examine the current assignments.
When using MIDI controllers to play the K250 (or K250 Expander) make sure that the MIDI control numbers you are sending match the receive numbers assigned to the K250 controllers mapped to the desired control function. For example, if the K250 control function VIBRATO RATE is assigned to the K250 controller SLIDER 1 (as is the factory default), and SLIDER 1 is set to receive MIDI controller #2 (again the default), and you want your controller's MOD WHEEL to control the K250's vibrato rate, it must be set to transmit on MIDI controller #2. See the chapter on MIDI for more details on control numbers and the K250 MIDI Editor.
F/4 -SUSTAIN TYPE
This editor allows you to choose how the sustain will function once SUSTAIN is assigned to a controller. There are two choices here: SUSTAINED RELEASE 0, and STANDARD 1. The first choice allows you to capture and hold the sound during the release portion of the envelope. Letting up on the pedal (or other controller) and pressing it again will catch the sound in a later section of the release stage. STANDARD 1 will not allow you to repeatedly capture successive release levels. The factory default is SUSTAINED RELEASE 0.
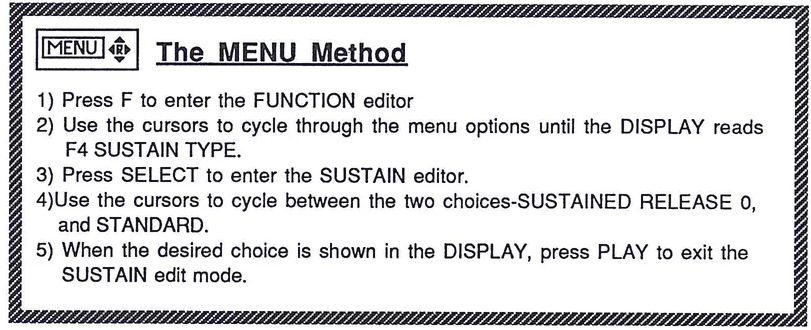
The MENU Method
- 1) Press F to enter the FUNCTION editor
- 2) Use the cursors to cycle through the menu options until the DISPLAY reads F4 SUSTAIN TYPE.
- 3) Press SELECT to enter the SUSTAIN editor.
- 4) Use the cursors to cycle between the two choices-SUSTAINED RELEASE 0, and STANDARD.
- 5) When the desired choice is shown in the DISPLAY, press PLAY to exit the SUSTAIN edit mode.
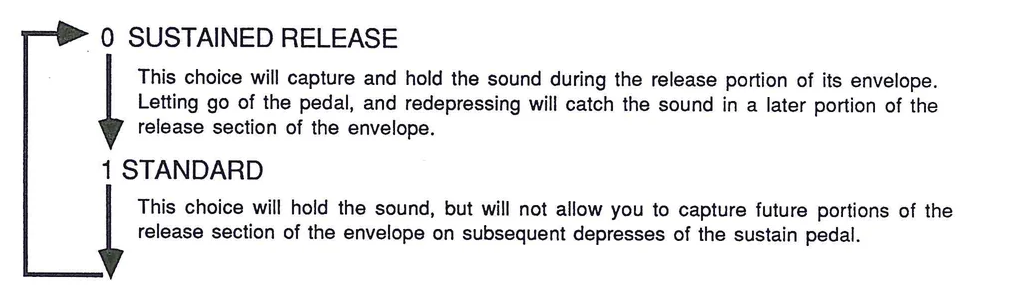
0 SUSTAINED RELEASE
This choice will capture and hold the sound during the release portion of its envelope. Letting go of the pedal, and redepressing will catch the sound in a later portion of the release section of the envelope.
1 STANDARD
This choice will hold the sound, but will not allow you to capture future portions of the release section of the envelope on subsequent depresses of the sustain pedal.
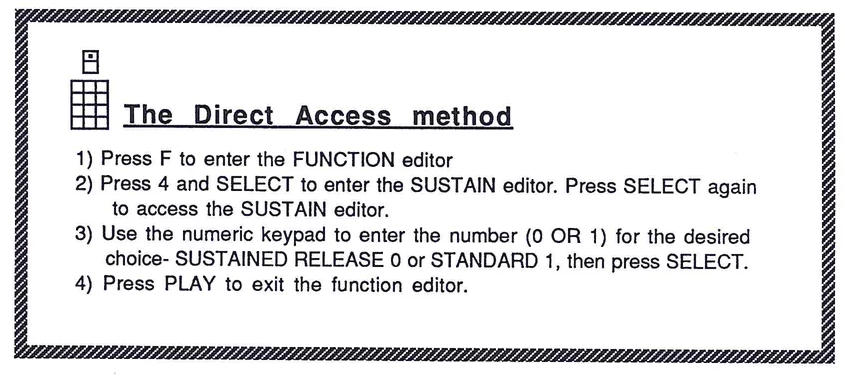
The Direct Access method
- 1) Press F to enter the FUNCTION editor
- 2) Press 4 and SELECT to enter the SUSTAIN editor. Press SELECT again to access the SUSTAIN editor.
- 3) Use the numeric keypad to enter the number (0 OR 1) for the desired choice- SUSTAINED RELEASE 0 or STANDARD 1, then press SELECT.
- 4) Press PLAY to exit the function editor.
Controllers and the K250 Function Editor:
Certain musical effect functions, like pitch bend, may be assigned to a physical K250 controller, but the way in which the pitch bend functions is edited through the function editor. These control functions (PITCH BEND, VIBRATO, and TREMOLO) may be directed to a specific effects channel in the K250, such as the performance keyboard (the current setup played from the keyboard), a specific sequence track (note that PITCH BEND is always sent to the sequencer), or assigned to a specific MIDI channel. Each of these effects channels is logically independent of the others, allowing for differing LFO shapes and speeds (or pitch bend settings) or different sequence tracks, the performance keyboard, or MIDI channel assignment. All of these functions are accessed through the specific function editor for each given control function. The following diagram illustrates the way in which controllers (physical devices) are mapped to control functions (musical effects), which are in turn routed to an effects channel (sound generating target within the K250):
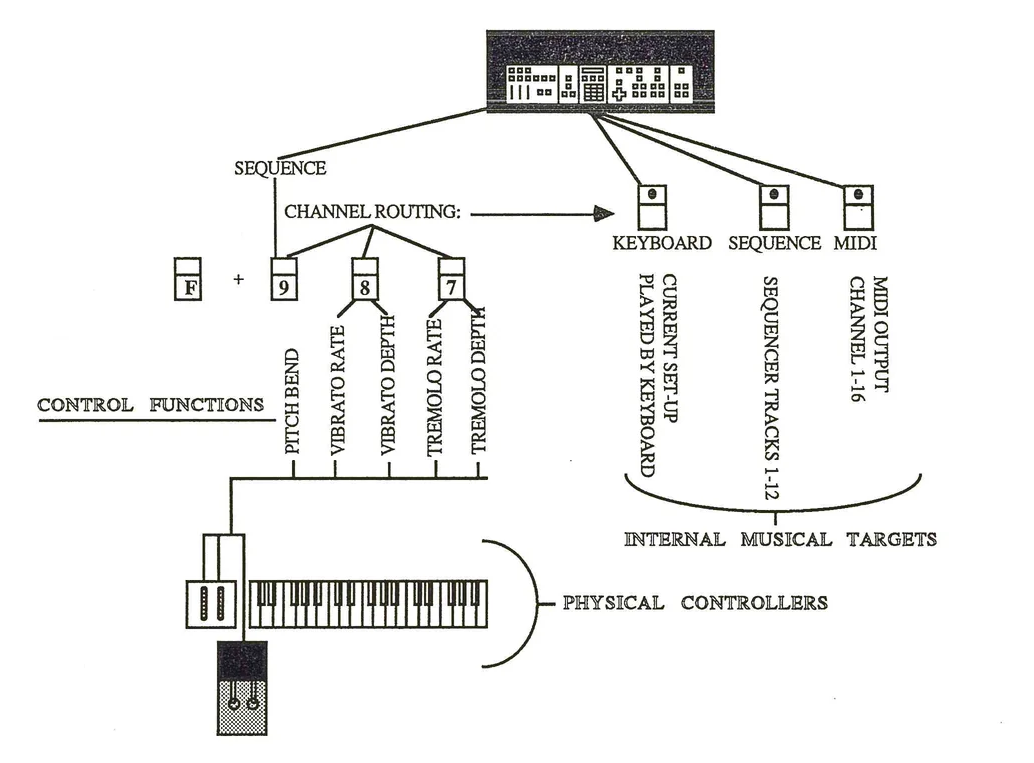
More Function Editor actions in the PLAY EDITOR
F/9 PITCH BEND
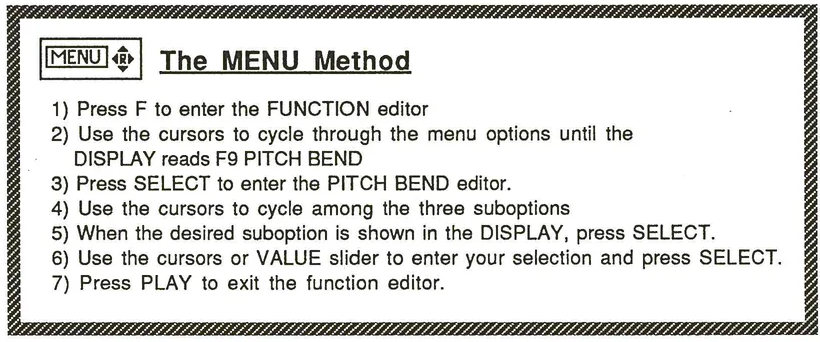
As mentioned above, the control function pitch bend (ASSIGNMENT #5) may be assigned to a physical controller with the Assignment Editor. The way in which the pitch bend functions are addressed is through the Function Editor, F9. There are three pitch bend parameters that may be edited:
1 SELECT BEND CHANNEL?
This parameter allows the user to select what the pitch bend will affect. As pitch bend is always sent to the sequencer, the options here are PERFORMANCE KBD (the current setup played by the keyboard) or MIDI output channels 1-16. You may select the bend channel by using the cursors, or by pressing the KEYBOARD button for PERFORMANCE KBD or the MODE1/MIDI button for a specified MIDI channel (use the cursors to select the channel).
2 BEND INTERVAL?
This parameter sets the amount of pitch bend applied to the effect channel. The default is 2 semitones.
3 BEND DIRECTION?
This parameter allows the user to decide whether the pitch goes up when the bender goes away from you (push) or towards you (pull). The default is PUSH TO BEND UP.
These parameters may be edited with either the Menu or Direct Access methods.
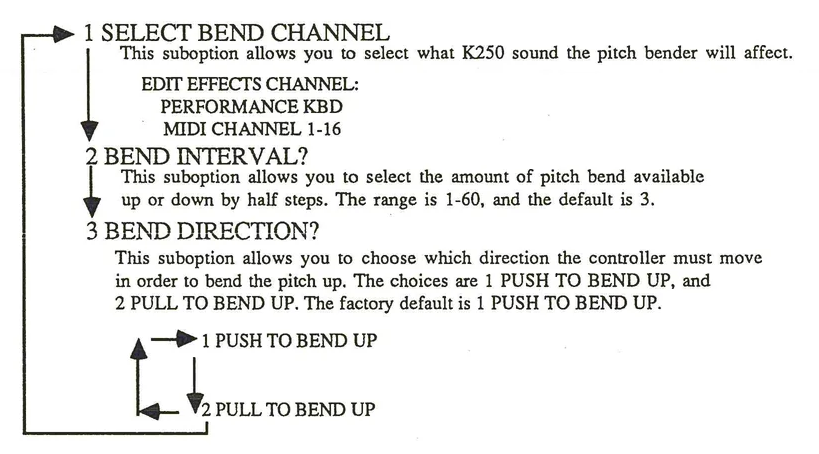
F/9 PITCH BEND
1 SELECT BEND CHANNEL This suboption allows you to select what K250 sound the pitch bender will affect. EDIT EFFECTS CHANNEL: PERFORMANCE KBD MIDI CHANNEL 1-16
2 BEND INTERVAL? This suboption allows you to select the amount of pitch bend available up or down by half steps. The range is 1-60, and the default is 3.
3 BEND DIRECTION? This suboption allows you to choose which direction the controller must move in order to bend the pitch up. The choices are 1 PUSH TO BEND UP, and 2 PULL TO BEND UP. The factory default is 1 PUSH TO BEND UP.

F7 TREMOLO
Tremolo is the continuous modulation of an audio signal's amplitude, usually accomplished by applying a Low Frequency Oscillator (LFO) to a controllable amplifier (a VCA in analog synthesizers). The K250 has 12 LFO waveshapes from which to choose. To control how the K250 will respond to TREMOLO, once a controller has the TREMOLO assignment, use the TREMOLO FUNCTION EDITOR, F7. There are six options in the TREMOLO editor:
- 1 SELECT TREMOLO CHANNEL?
- 2 LFO WAVEFORM?
- 3 LFO RATE MULTIPLIER?
- 4 LFO DEPTH MULTIPLIER?
- 5 LFO DELAY?
- 6 SYNCHRONIZE LFOS?
These options are fully explained on the next page. To hear these changes as you edit make sure that the tremolo is assigned and turned on before entering the TREMOLO editor.
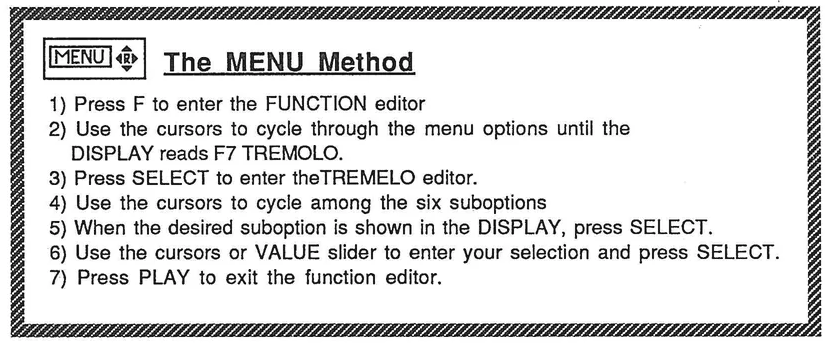
The MENU Method
- 1) Press F to enter the FUNCTION editor
- 2) Use the cursors to cycle through the menu options until the DISPLAY reads F7 TREMOLO.
- 3) Press SELECT to enter theTREMELO editor.
- 4) Use the cursors to cycle among the six suboptions
- 5) When the desired suboption is shown in the DISPLAY, press SELECT.
- 6) Use the cursors or VALUE slider to enter your selection and press SELECT.
- 7) Press PLAY to exit the function editor.
The Direct Access method
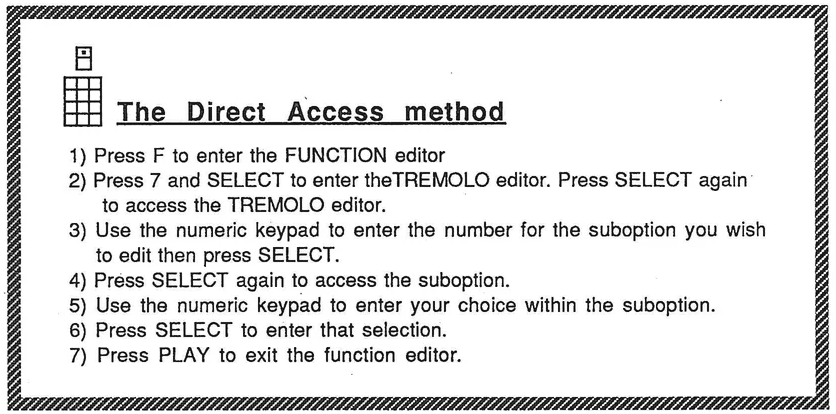
- 1) Press F to enter the FUNCTION editor
- 2) Press 7 and SELECT to enter theTREMOLO editor. Press SELECT again to access the TREMOLO editor.
- 3) Use the numeric keypad to enter the number for the suboption you wish to edit then press SELECT.
- 4) Press SELECT again to access the suboption.
- 5) Use the numeric keypad to enter your choice within the suboption.
- 6) Press SELECT to enter that selection.
- 7) Press PLAY to exit the function editor.
F7 the TREMOLO editor functions
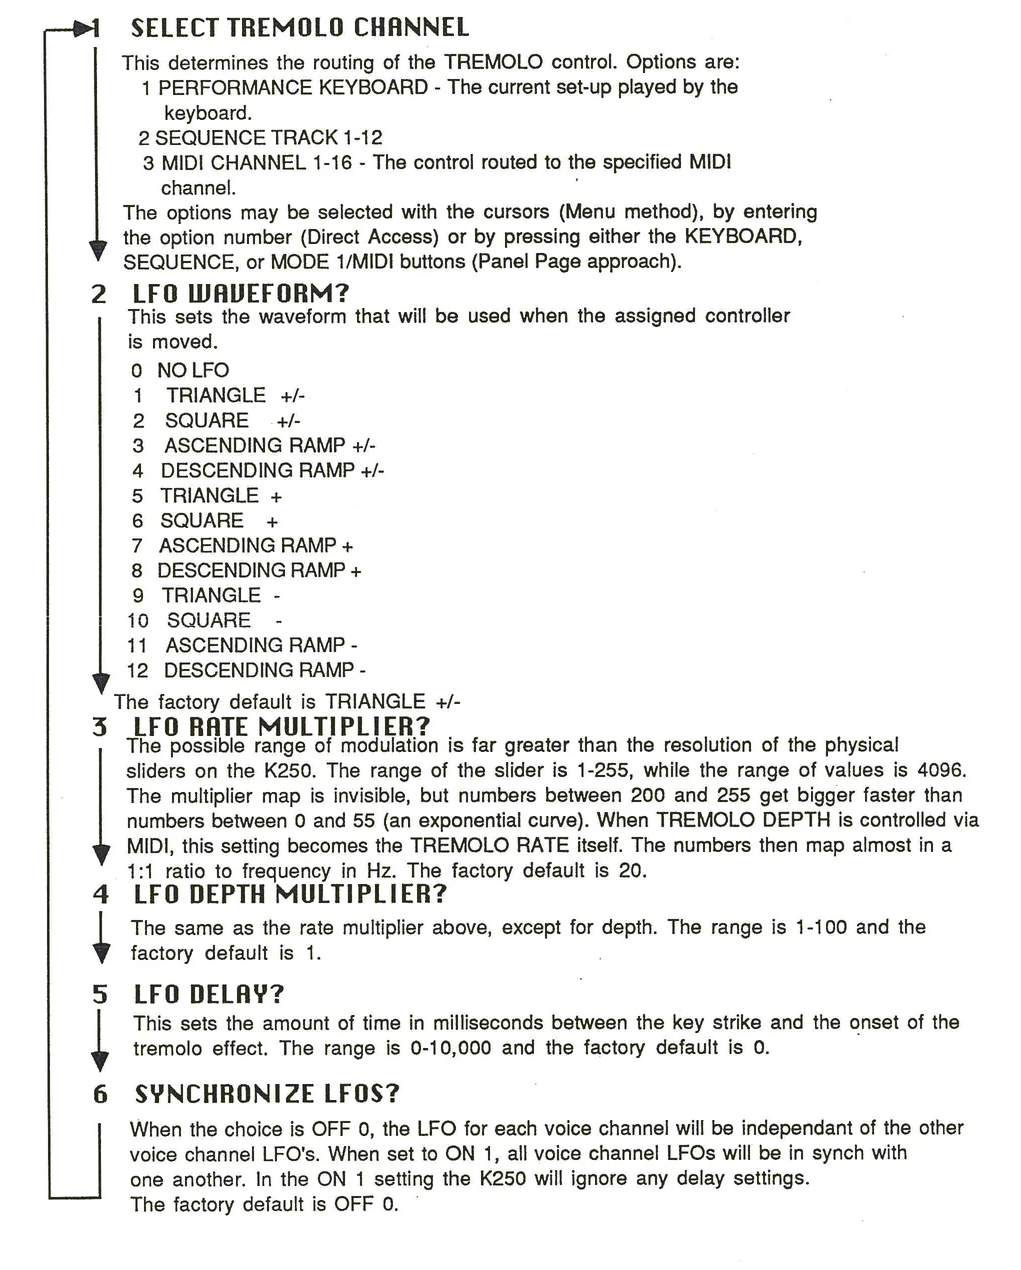
1 SELECT TREMOLO CHANNEL
This determines the routing of the TREMOLO control. Options are: 1 PERFORMANCE KEYBOARD - The current set-up played by the keyboard. 2 SEQUENCE TRACK 1-12 3 MIDI CHANNEL 1-16 - The control routed to the specified MIDI channel. The options may be selected with the cursors (Menu method), by entering the option number (Direct Access) or by pressing either the KEYBOARD, SEQUENCE, or MODE 1/MIDI buttons (Panel Page approach).
2 LFO WAVEFORM?
This sets the waveform that will be used when the assigned controller is moved.
0 NO LFO 1 TRIANGLE +/- 2 SQUARE +/- 3 ASCENDING RAMP +/- 4 DESCENDING RAMP +/- 5 TRIANGLE + 6 SQUARE + 7 ASCENDING RAMP + 8 DESCENDING RAMP + 9 TRIANGLE - 10 SQUARE - 11 ASCENDING RAMP - 12 DESCENDING RAMP -
The factory default is TRIANGLE +/-
3 LFO RATE MULTIPLIER?
The possible range of modulation is far greater than the resolution of the physical sliders on the K250. The range of the slider is 1-255, while the range of values is 4096. The multiplier map is invisible, but numbers between 200 and 255 trigger faster than numbers between 0 and 55 (an exponential curve). When TREMOLO DEPTH is controlled via MIDI, this setting becomes the TREMOLO RATE itself. The numbers then map almost in a 1:1 ratio to frequency in Hz. The factory default is 20.
4 LFO DEPTH MULTIPLIER?
The same as the rate multiplier above, except for depth. The range is 1-100 and the factory default is 1.
5 LFO DELAY?
This sets the amount of time in milliseconds between the key strike and the onset of the tremolo effect. The range is 0-10,000 and the factory default is 0.
6 SYNCHRONIZE LFOS?
When the choice is OFF 0, the LFO for each voice channel will be independent of the other voice channel LFOs. When set to ON 1, all voice channel LFOs will be in synch with one another. In the ON 1 setting the K250 will ignore any delay settings. The factory default is OFF 0.
F8 VIBRATO
Vibrato is the continuous modulation of pitch, usually accomplished by frequency modulating an audio signal generator with a Low Frequency Oscillator (LFO). The vibrato functions on the K250 are the same as the F7 TREMOLO functions except applied to pitch rather than amplitude. Review pages 39 and 40 and substitute F8 for F7. The only difference is in the LFO depth multiplier where the range is 1-255, instead of 1-100, and the default is 1.
You should be getting very familiar with the two interface approaches by now, and should begin using just one of them so as to build up speed in your approach to the instrument. The remaining function editors are accessed in the same manner as previously outlined, so we will omit the direction boxes from now on.
F5 BRIGHTNESS
The K250 has 12 low-pass filters, which are used to allow lower frequency sounds to pass through unaffected, while filtering out the higher frequency sounds. Normally these are used to remove unwanted aliasing noise from more useful musical sounds. However, the K250 gives you access to these filters, allowing you to open and close them, thereby enhancing your control over the musical use of the instrument. The F5 Brightness editor is used to access these controls. The now familiar Menu and Direct Access methods are again used through the Function editor. The four options of the BRIGHTNESS editor are:
- 1 BRIGHTNESS LEVEL?
- This is the amount of filtering there will be, set in a range of -4800 cents to +4800 cents. At -4800 the filter is totally closed and sounds will be dark and dull. At +4800 the filters will be fully open and the sound will be bright and may contain some digital aliasing noise. The factory default is 0.
- 2 THRESHOLD?
- The filters can be dynamically controlled with keyboard velocity. Threshold allows you to control how sensitive the filters are to this velocity, with 0 being no sensitivity and 7 being extremely sensitive. The factory default is 4.
The CHORUS editor
The K250 has a global chorus effect that affects all performance keyboard sounds in the same manner. There is also the possibility for individualized chorus effects for different instruments through the INSTRUMENT VOICING EDITOR, but that will be covered in the applications section under the "INSTRUMENT Editor" chapter. The global chorus may be accessed and edited through the CHORUS editor.
A chorus is a musical effect that produces the sound of more than one instrument playing at the same time. The K250 chorus does this by assigning more than one voice channel to each key strike and allowing the user to control the amount of detuning and time delay between these voice channels. There are four types of effects produced by the K250 chorus:
FLANGING
Produced by using short delay times (2-20 milliseconds) and low detunings (2-8 cents). The musical effect is a kind of whooshing sound (the "jet airplane" effect) depending on the kind of instrument sound to which you are applying the flange. FLANGING is a monaural effect. The factory default settings for Flanging are DELAY 1 and DETUNE 4.
FULL CHORUS
Produced by using many voice channels, detuning them in both positive and negative values, and alternating the sounds between the left and right stereo outputs. This can produce effects ranging from the standard chorusing sounds to radical bubbling and arpeggio effects. FULL CHORUS is a stereo effect. The factory default settings are DELAY 4 and DETUNE -4.
DOUBLING
Produced by using just two voice channels per keystrike using short delay times and small detune values and then routing each voice channel to a different output bus (left and right). DOUBLING is a stereo effect. The factory defaults are DELAY 5 and DETUNE -12.
ECHO
Produced by using many voice channels for each keystroke, delaying each channel and lowering the amplitude of each successive channel. Volume here is set by DETUNE, which does not affect the pitch, only the amplitude. The factory default settings are DELAY 60, DETUNE 2.
MICROTONAL
The CHORUS editor
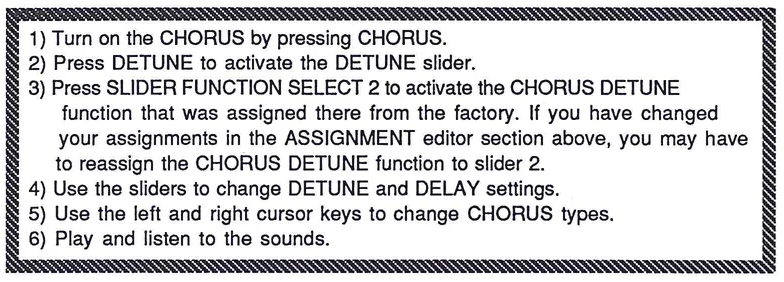
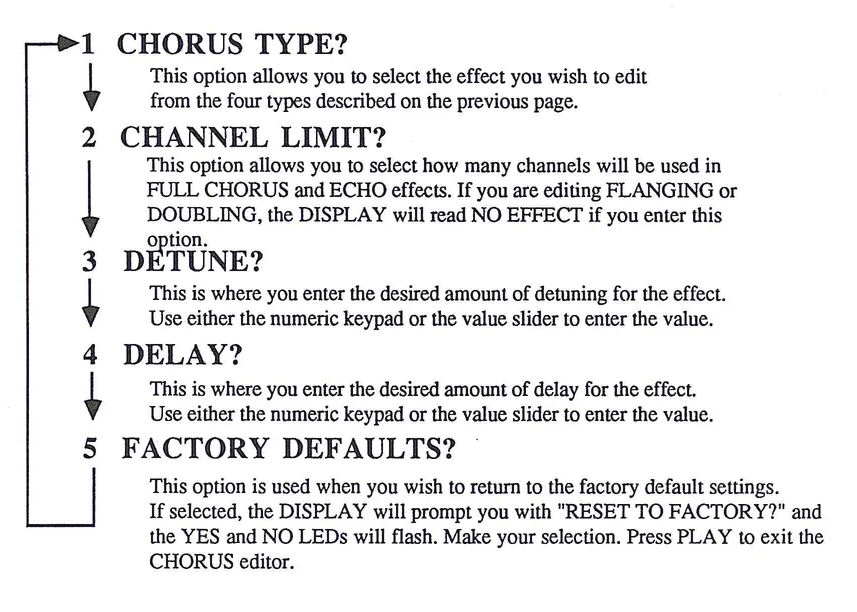
To alter the CHORUS default settings, you must use the chorus editor. Enter the CHORUS edit mode in the usual way, press EDIT then CHORUS. Using either the Menu or Direct Access method, select the parameter to edit and enter the value for that parameter. Press PLAY to exit the CHORUS editor mode. The following is a diagram of the CHORUS editor menu options:
- 1 CHORUS TYPE?
- This option allows you to select the effect you wish to edit from the four types described on the previous page.
- 2 CHANNEL LIMIT?
- This option allows you to select how many channels will be used in FULL CHORUS and ECHO effects. If you are editing FLANGING or DOUBLING, the DISPLAY will read NO EFFECT if you enter this option.
- 3 DETUNE?
- This is where you enter the desired amount of detuning for the effect. Use either the numeric keypad or the value slider to enter the value.
- 4 DELAY?
- This is where you enter the desired amount of delay for the effect. Use either the numeric keypad or the value slider to enter the value.
- 5 FACTORY DEFAULTS?
- This option is used when you wish to return to the factory default settings. If selected, the DISPLAY will prompt you with "RESET TO FACTORY?" and the YES and NO LEDs will flash. Make your selection. Press PLAY to exit the CHORUS editor.
F11 The MAINTENANCE Editor
This is the final PLAY MODE EDITOR. The MAINTENANCE editor is used to review and control the physical condition of the K250. The MAINTENANCE editor is accessed through the FUNCTION editor by pressing F, and using the cursors or numeric keypad to enter F11 MAINTENANCE, then using the Menu or Direct Access approaches to the four options within the MAINTENANCE editor. The following diagram shows the menu options and describes the functions of the MAINTENANCE editor.
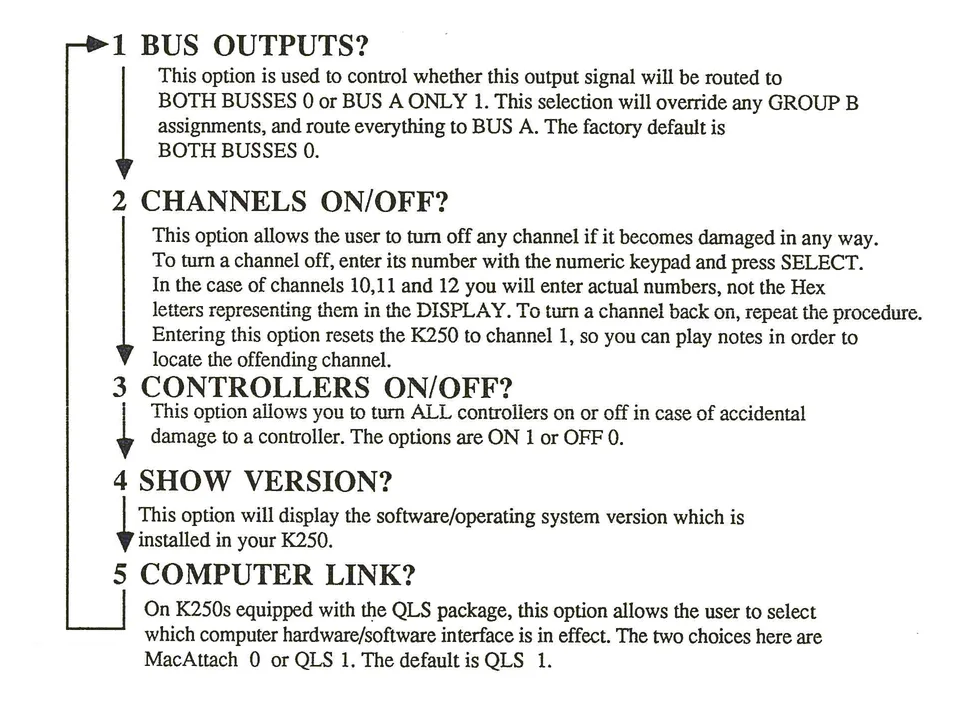
1 BUS OUTPUTS?
This option is used to control whether this output signal will be routed to BOTH BUSSES 0 or BUS A ONLY 1. This selection will override any GROUP B assignments, and route everything to BUS A. The factory default is BOTH BUSSES 0.
2 CHANNELS ON/OFF?
This option allows the user to turn off any channel if it becomes damaged in any way. To turn a channel off, enter its number with the numeric keypad and press SELECT. In the case of channels 10,11 and 12 you will enter actual numbers, not the Hex letters representing them in the DISPLAY. To turn a channel back on, repeat the procedure. Entering this option resets the K250 to channel 1, so you can play notes in order to locate the offending channel.
3 CONTROLLERS ON/OFF?
This option allows you to turn ALL controllers on or off in case of accidental damage to a controller. The options are ON 1 or OFF 0.
4 SHOW VERSION?
This option will display the software/operating system version which is installed in your K250.
5 COMPUTER LINK?
On K250s equipped with the QLS package, this option allows the user to select which computer hardware/software interface is in effect. The two choices here are MacAttach 0 or QLS 1. The default is QLS 1.
IMPORTANT NOTE
IF ANY PROBLEMS EVER OCCUR WHILE IN AN EDIT MODE, PRESS PLAY
IF THIS DOESN'T CLEAR THE PROBLEM, USE A "SOFT RESET":
WHILE HOLDING 4 AND 5, PRESS SELECT
THIS WILL RESET THE COMPUTER WITHOUT DESTROYING ANY USER WORK IN MEMORY.
IF FOR ANY REASON THE SOFT RESET DOESN'T CLEAR THE PROBLEM, A "HARD RESET" MAY BE NEEDED. USE THIS CAREFULLY, AS THE COMPUTER WILL BE RESET TO ITS ORIGINAL FACTORY DEFAULT CONDITION, DESTROYING ANY WORK THE USER HAS DONE.
TURN THE K250 OFF, WHILE HOLDING READ, SEND, AND LIST, TURN THE K250 ON.
IF THE K250 DISPLAYS ANY MESSAGE OTHER THAN "KURZWEIL GRAND PIANO, PLAY MODE", PRESS PLAY
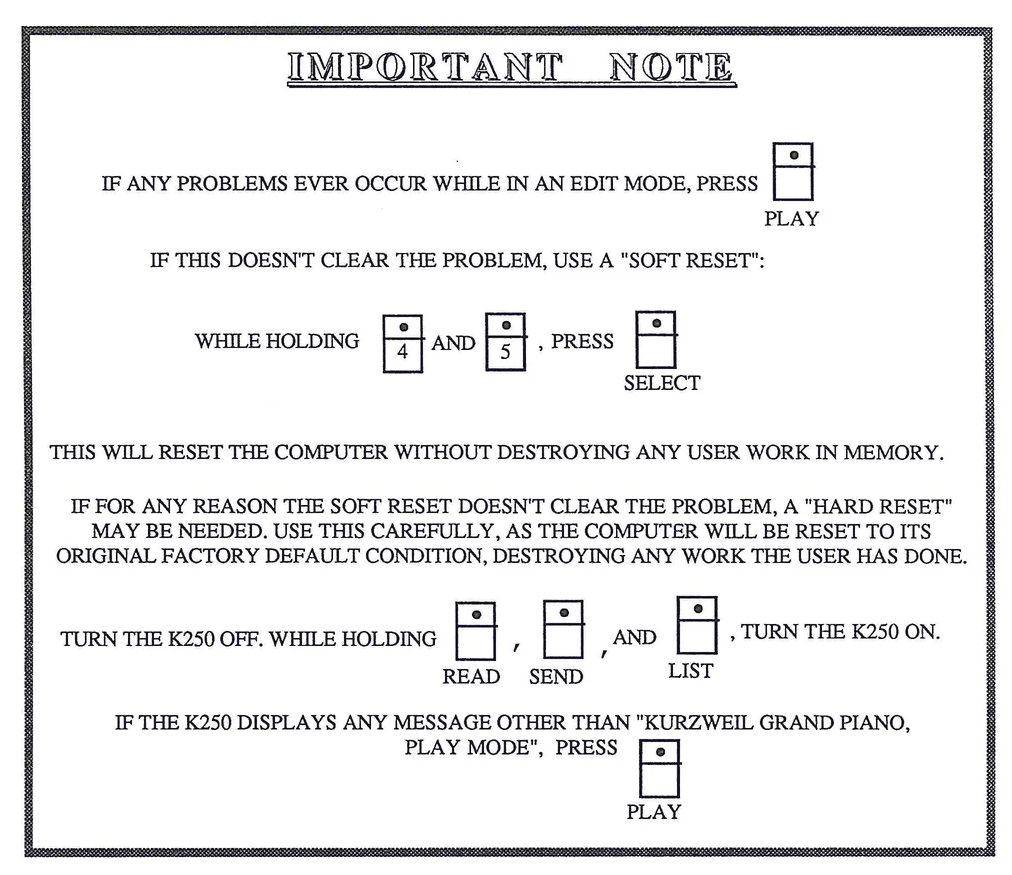
This appears to be a mostly blank or nearly empty page with minimal visible content.
PART II: Applications
| Topic | Page |
|---|---|
| Overview | KBD 1 |
| HELP Feature | KBD 3 |
| Functions | KBD 4 |
| Layering Keyboards | KBD 10 |
| Balancing Levels | KBD 11 |
| Transposing Keyboard layers | KBD 12 |
| Naming and Saving Keyboards | KBD 13 |
| Split Keyboards | KBD 15 |
The KEYBOARD EDITOR—An Overview:
The Keyboard Editor allows the user to customize keyboard setups using any combination of factory sounds residing in ROM (Read Only Memory), user-created sounds stored in RAM (Random Access Memory). See the section entitled "The Instrument Voicing Editor", or user-sampled sounds in the section entitled "The Sound Modeling Program—Sampling". When in the keyboard edit mode, the K250 creates a temporary memory position called the Keyboard Edit Buffer. This edit buffer allows the user to work on new keyboard setups without any danger of losing or damaging the setups already stored in the K250's memory. Once created, these new keyboard setups may be saved on-board in non-volatile (battery backed up) RAM, or off-loaded to Macintosh™ disk via Kurzweil's MacAttach™ or QLS™ software programs. User-created keyboards are stored in locations 250 and higher for setups consisting of resident and user sounds, and in locations 500 and higher for keyboards made with digitizer (user-sampled) sounds. Musical applications for the Keyboard Editor include:
- • Creating split keyboards, with different sounds in different areas of the keyboard. Split keyboards are created by assigning sounds to groups of keys called regions, defined by a low and a high key. The K250 can split a keyboard setup as many as 64 times, and when combined with differing layers, is capable of giving a different sound on each key.
- • Creating layered keyboards, with more than one sound per keystroke. A K250 keyboard setup can have as many as six layers, with each layer consisting of as many as 64 regions. By combining layers and regions, the user may create extremely complex split and layered keyboards.
- • Creating transposed keyboards, for playing music from transposed parts without having to sight-transpose.
The Keyboard Editor, while quite powerful, is fairly simple to use. It is, however, slightly different from the other editors explained in the first section of this guide. This editor uses the Panel Page interface described on pages 4 and 5. The Kurzweil 250 Operator's Manual refers to this approach as "button mapping," as special Keyboard Editor functions are mapped to the buttons on the front panel of the K250.
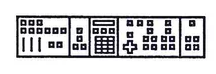
This interface is a bit harder to learn at first because the mapping of functions needs to be memorized, but in time it becomes very fast and easy to use. The Keyboard Editor has a built in "HELP" function to remind you which functions are assigned to which buttons. We will use this HELP feature as an overview of the options available within the Keyboard Editor.
The Keyboard Editor is accessed in much the same way as the other editors we have seen. Pressing the EDIT button calls up the generic edit mode, and pressing KEYBOARD calls the specific Keyboard Editor. At this point the K250 asks the user to respond to as many as three questions:
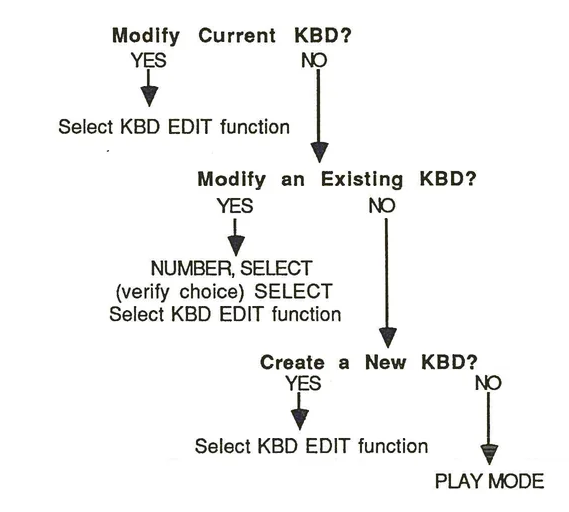
- • Answering YES to "Modify Current KBD?" places a copy of the current keyboard in the Keyboard Edit Buffer and places the K250 in edit mode.
- • Answering NO brings the prompt: "Modify an Existing KBD?"
- • Answering YES here brings a prompt to enter the number for the desired keyboard setup to edit. A copy of the desired keyboard is then placed in the Keyboard Edit Buffer, and the K250 enters edit mode. A NO answer brings the final question, "Create a New KBD?"
- • Answering YES here creates a blank scratchpad in the Keyboard Edit Buffer and puts the K250 in edit mode, while a NO response returns the K250 to play mode.
Once in the keyboard edit mode, pressing the F key accesses the Keyboard Editor HELP feature. For a quick overview of the keyboard edit functions, let's take a look at this HELP feature, as it basically outlines what the keyboard editor does.
Flowchart showing keyboard editor access process with decision points for Modify Current KBD?, Modify an Existing KBD?, and Create a New KBD?
Accessing the HELP Feature of the Keyboard Editor:
THE PANEL PAGE APPROACH
- 1) Press EDIT to enter the generic edit mode.
- 2) Press KEYBOARD to call the specific Keyboard Editor.
- 3) Answer YES to "Modify Current KBD?" A copy of the current keyboard is placed in the Keyboard Edit Buffer, and the K250 enters keyboard edit mode.
- 4) Press the F key to access the Keyboard Editor HELP feature.
- 5) Use the right and left cursors to cycle through the HELP menu and read which edit functions are assigned to which panel buttons.
The following is a summary of the Keyboard Editor HELP menu:
F key functions diagram showing keyboard editing functions menu
A detailed explanation of each of these functions follows.
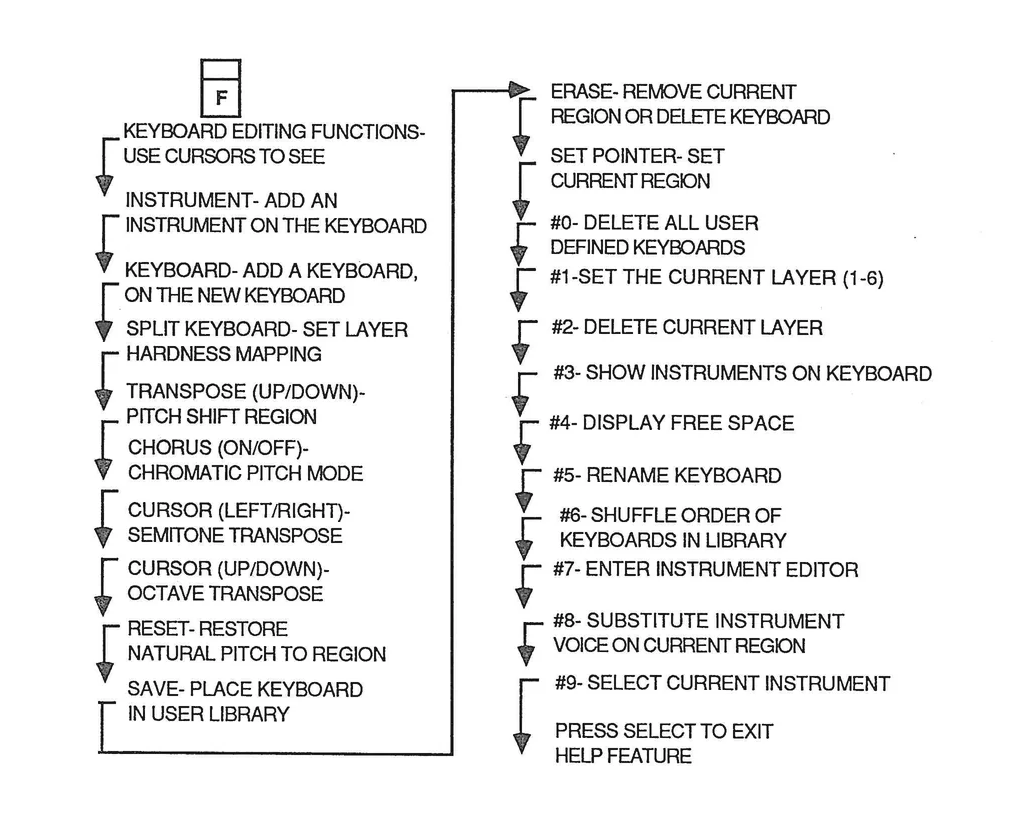
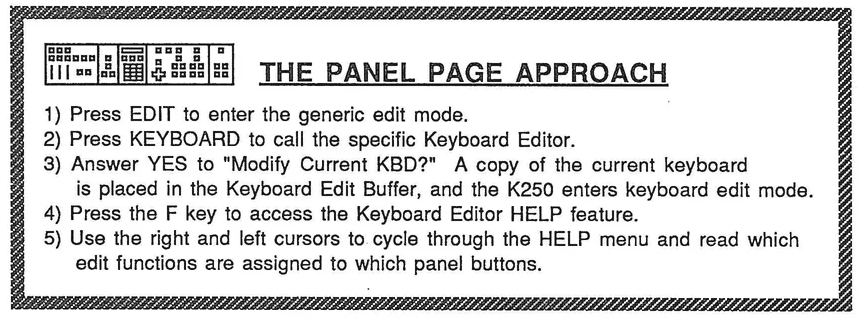
The KEYBOARD EDITOR Functions Explained:
KEYBOARD
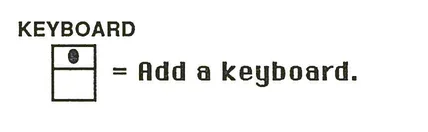
= Add a keyboard.
Pressing this button while in the keyboard edit mode instructs the K250 to place the first layer of a keyboard setup stored in either ROM or RAM onto the setup currently in the Keyboard Edit Buffer. The K250 will prompt the user to select the desired keyboard by entering its number followed by SELECT, or by using the cursors to move through the choices until the desired setup is found. After verifying the choice in the DISPLAY, press SELECT again to assign the keyboard. The K250 will then ask for the low and high keys defining the region to contain the assigned keyboard. If there is already a keyboard setup in the Keyboard Edit Buffer, the K250 will ask if this new region is to be a split (YES) or a layer (NO), after which the K250 returns to keyboard edit mode.
INSTRUMENT
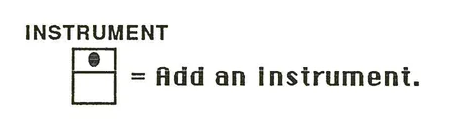
= Add an Instrument.
Pressing this button while in the keyboard edit mode instructs the K250 to assign an instrument stored in either ROM or RAM to a region of the setup currently in the Keyboard Edit Buffer. The procedures here are almost exactly the same as with "Add a KEYBOARD" except with regards to the low and high keys defining the region. When adding a KEYBOARD, the K250 assigns pitches to the keys in the new region as they were originally assigned in the stored setup. When adding an INSTRUMENT however, the K250 will assign the highest pitch that instrument to the high key defining the region. This means that the assigned pitch may not be the "correct" concert pitch for that key. If the concert pitch is desired, transposition functions can be used to correct the situation. When using this function, be sure to consult the list of factory supplied instruments in the appendix, which lists the high note for each instrument voicing.
TRANSPOSE
Two square buttons with up and down arrows labeled as PITCH SHIFT Region
These two buttons perform the transpose function OCTAVE PITCH SHIFT as explained on page 26 of the first section of this guide. The UP button shifts pitch up by octave while the DOWN button shifts down by octave. If CHROMATIC PITCH SHIFT mode is desired (see page 26), the same UP and DOWN buttons may be used after switching their function by pressing the CHORUS button.
CHORUS
Single square button labeled as PITCH SHIFT Toggle
Pressing CHORUS toggles the function of the TRANSPOSE buttons between OCTAVE PITCH SHIFT (CHORUS OFF) and CHROMATIC PITCH SHIFT (CHORUS ON).
Directional arrow keys with R in center labeled as OCTAVE/CHROMATIC TRANSPOSE Mode
The cursor keys perform the OCTAVE and CHROMATIC TRANSPOSE functions described on page 26. The UP and DOWN keys transpose up and down respectively by octave, while the RIGHT and LEFT keys transpose up and down respectively by semitone. The R key restores the region to it's "natural" (pretransposed) pitch.
SAVE
Single square button labeled as Place Current Keyboard in User Library
The SAVE button instructs the K250 to store the current state of the keyboard setup present in the Keyboard Edit Buffer in the User Library section of RAM. The K250 will assign the next available number to the keyboard, and ask the user to name the keyboard by using the ALPHA slider. See "Naming Keyboard Setups" on page KBD 13.
ERASE
Square button icon
= Remove current region, or delete keyboard.
The ERASE button offers two choices, "ERASE CURRENT SECTION?" and "ERASE CURRENT KEYBOARD?" Answering "YES" to the first question removes the active region (the section currently being edited) from the Keyboard Edit Buffer. Answering "NO" brings the second question. A "YES" response here clears the edit buffer completely. Remember that only the Keyboard Edit Buffer is erased. No setups in RAM or ROM are affected by this command.
SET POINTER
Square button icon with dot
= Select Active Region
Pressing this button allows the user to select the region of the current layer that the Keyboard Editor commands will affect. The K250 will prompt the user to play the low and high keys that define the region. This is a very powerful command that allows very precise editing for complex keyboard setups.
SPLIT KEYBOARD
Square button icon with number 8
= Set Layer Dynamics and Volume.
This button allows the user to control the dynamics of the current layer in two ways, LAYER HARDNESS MAP and LAYER VOLUME ADJUST. The hardness map allows the user to set how the current layer will respond to keyboard velocity. A setting of "0" instructs the K250 to use the keyboard velocity response values stored in the K250's memory. Settings of "1-10" instruct the K250 to use a new velocity response map, where "1" is minimum sensitivity and "10" is maximum sensitivity. Layer Volume Adjust is like a master level control for the current layer. The VALUE slider is used to set the volume level with a scale from -127 (softest) to +127 (loudest).
The KEYPAD functions in the keyboard edit mode:
3x3 grid keypad with 'F' in bottom right
= HELP Display.
As we have seen, pressing this button gives a listing of all Keyboard Editor commands, and to which panel buttons they have been assigned. This is helpful for remembering button assignments while learning to use the Keyboard Editor.


This button allows the user to select the current layer, 1-6, useful for moving up or down between layers in a multi-layer keyboard setup before setting the active region with SET POINTER.
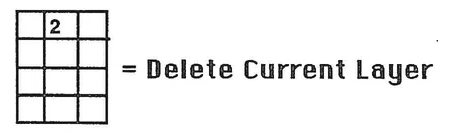
This command removes the current layer from the setup in the Keyboard Edit Buffer. If there are layers above the layer that is removed, they will drop down to replace the erased layer.
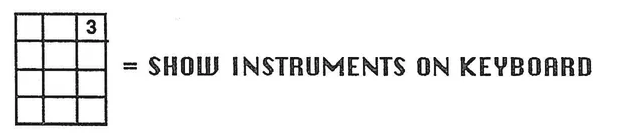
This command allows the user to view what instruments are assigned to the setup in the Keyboard Edit Buffer. The K250 will display the Instrument name, number, the region assigned, and the layer number. This is most useful in keeping track of complex setups while editing.
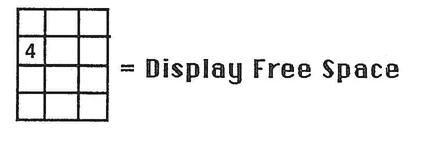
This command instructs the K250 to look at the available RAM and estimate the number of keyboards that may be created and stored in that space.
Keypad diagram with key 5 highlighted
Rename Keyboard
This command allows the user to change the name of any user created keyboard setup. The renaming procedure is the same as for naming keyboards. See the section "Naming and Saving Keyboard Setups" on page KBD 13.
Keypad diagram with key 6 highlighted
Shuffle Order of Keyboards in Library
This command allows the user to change the order of keyboards in the User Library section of RAM. This action takes the form of swapping positions of pairs of keyboard setups. Pressing key #6 brings the prompt: FIRST ITEM TO SWAP. Enter the number for the keyboard to move and press SELECT. The K250 will prompt for the SECOND ITEM TO SWAP. Enter the number for the other keyboard to move and press SELECT. The K250 will display ITEMS SWAPPED to confirm that the position of the two keyboards have been shuffled.
Keypad diagram with key 7 highlighted
Enter Instrument Voicing Editor.
Pressing key #7 takes the user down into the Instrument Voicing Editor. See the section entitled "The Instrument Voicing Editor" for more details on the use of this command.
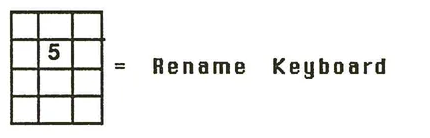

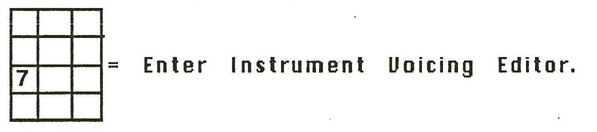
Keypad grid showing position 8
= Substitute Instrument Voice on Current Region.
This is an extremely powerful command when used with command number 9, Select Current Instrument. Pressing key #8 instructs the K250 to apply the voicing characteristics of the current instrument to the sound on the current region. This will become more clear with additional understanding of the concepts of Instrument Voicings—see the section on the Instrument Voicing Editor. A brief example might help to show the power of this command:
With the Kurzweil Grand Piano keyboard in the Keyboard Edit Buffer, and the current instrument being Bowed Strings Slow (selected by using command number 9), pressing key #8 and answering "YES" to the prompt will result in a keyboard setup that has the timbre of the grand piano with the attack characteristics of slowly bowed strings.
Keypad grid showing position 9
= Select Current Instrument.
As mentioned above, this button allows the user to select the current Instrument for assignment into the current region with command #8. For more details about Instrument Voicings see the section entitled "The Instrument Voicing Editor."
Keypad grid showing position 0
= Delete all User Defined Keyboards.
This command will completely clear all keyboard setups in the User Library and return the K250 to PLAY mode. As the potential for accidentally erasing all your keyboards exists with this command, the K250 will ask "DO YOU REALLY WANT TO ERASE ALL KEYBOARDS?" and flash the YES and NO buttons. This Command is useful after off-loading a set of keyboards to the Macintosh™ computer via MacAttach™ or QLS™, allowing the user to initialize the memory before starting to create new keyboards.

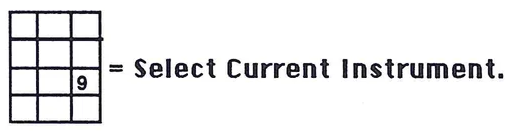

The KEYBOARD EDITOR: Musical Applications:
Now that we have seen all the Keyboard Editor functions let us explore some of the musical applications for these commands. This section will be divided into three sections: Layering keyboards, Splitting keyboards, and Advanced applications.
1) LAYERING KEYBOARDS
There are two basic ways to create layered keyboards: from existing keyboard setups and from scratch. It is easier to use existing keyboards. However, starting from scratch gives the user greater control for customizing complex keyboards. Contained in this section are commands for layering, dynamically balancing, transposing, naming, and saving keyboard setups.
Adding a Layer to an Existing Keyboard Setup:
For this example we will start with the KURZWEIL GRAND PIANO and add as a new layer the BOWED STRINGS SLOW.
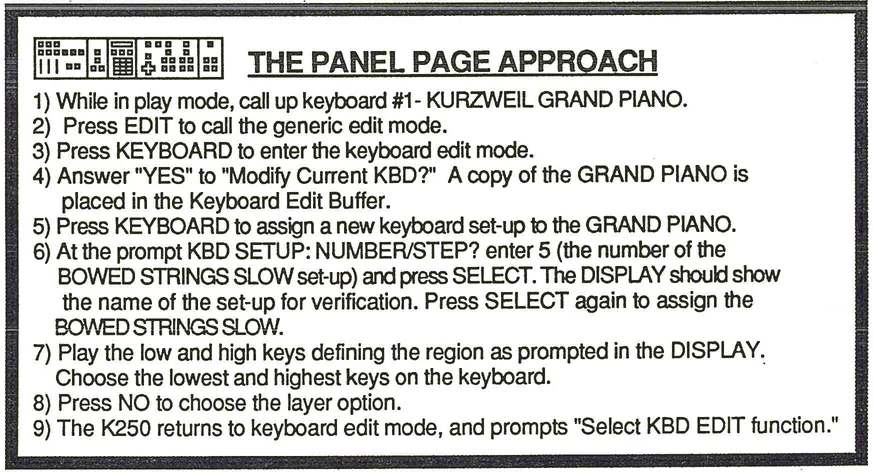
Play the keyboard now. You should here two sounds for each key depressed, the piano and strings. The maximum number of notes that can be played at one time is now 6, as two channels are required to play each note.
THE PANEL PAGE APPROACH 1) While in play mode, call up keyboard #1- KURZWEIL GRAND PIANO. 2) Press EDIT to call the generic edit mode. 3) Press KEYBOARD to enter the keyboard edit mode. 4) Answer "YES" to "Modify Current KBD?" A copy of the GRAND PIANO is placed in the Keyboard Edit Buffer. 5) Press KEYBOARD to assign a new keyboard set-up to the GRAND PIANO. 6) At the prompt KBD SETUP: NUMBER/STEP? enter 5 (the number of the BOWED STRINGS SLOW set-up) and press SELECT. The DISPLAY should show the name of the set-up for verification. Press SELECT again to assign the BOWED STRINGS SLOW. 7) Play the low and high keys defining the region as prompted in the DISPLAY. Choose the lowest and highest keys on the keyboard. 8) Press NO to choose the layer option. 9) The K250 returns to keyboard edit mode, and prompts "Select KBD EDIT function."
Kurzweil K250 Users Guide
Balancing Keyboard Levels:
Once a new layer has been assigned to the keyboard, it may be desirable to adjust the dynamic level of the newly added layer. There are two options for adjusting the level of the new (current) layer: LAYER HARDNESS MAP and LAYER VOLUME ADJUST. The hardness map refers to the way the current layer responds to keyboard velocity values. The range of choices is 0, meaning that the stored velocity sensitivity for that keyboard setup is used, and 1-10 where 1 is minimum sensitivity and 10 is maximum sensitivity. Layer volume adjust is like a master volume control for the current layer, using the velocity range set by the hardness map within the overall volume set here in the range of -127 to +127. Both involve the use of the LEVEL or SPLIT KEYBOARD (on older units) button.
THE PANEL PAGE APPROACH 1) Continuing from the last step, press SPLIT KEYBOARD. The first option here is LAYER HARDNESS MAP. Choose 0, SELECT to use the stored velocity sensitivity settings, or 1-10 to alter the velocity sensitivity. Press SELECT again to enter the value. The K250 will move on to the next option, LAYER VOLUME ADJUST. 2) Turn on the VALUE slider by pressing its button. 3) Use the value slider to adjust the total volume from -127 to +127. 4) When the volume is adjusted to taste, press SELECT. The K250 will verify that a new hardness level has been set and return to keyboard edit mode.
Experiment first with LAYER HARDNESS MAP by trying the different sensitivity amounts:
- • See what minimum sensitivity (1) feels and sounds like, then contrast that with maximum sensitivity (10).
- • Try the values 2-9 to see what their responses are like compared to the extremes.
- • Find out if there are certain settings that feel best to you, and remember them for future, personal use.
Once you feel comfortable with the use of LAYER HARDNESS MAP, experiment with LAYER VOLUME ADJUST:
- • Experiment with various VALUE slider settings, making note of relative volume levels.
- • Try entering value settings with the numeric keypad and SELECT.
- • Note the relationship between the keyboard sensitivity set with LAYER HARDNESS MAP and the overall volume control of LAYER VOLUME ADJUST.
KBD 11
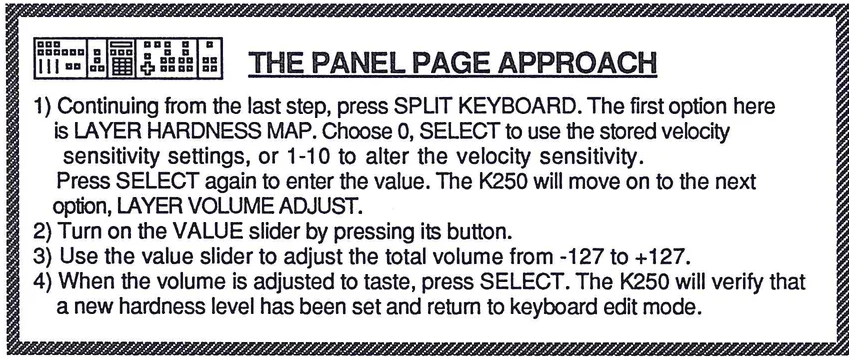
Transposing the Current Layer:
Once the new layer has been added and it's volume adjusted, it might be desirable to transpose the layer. There are two transposition options in the Keyboard Editor, octave/semitone Transpose, and octave/semitone Pitch Shift. These two major types of transposition were discussed on pages 26-27 of Part One of this guide.
Transposition is accessed through the cursors, where UP and DOWN transpose by octaves respectively, and RIGHT and LEFT transpose up and down respectively by semitone.
Pitch Shift is accessed through the TRANSPOSE buttons and the CHORUS button. TRANSPOSE UP and DOWN shift the pitch up one octave or down by as much as five octaves. To Pitch Shift chromatically, switch the mode of the TRANSPOSE buttons from octave to chromatic by pressing the CHORUS button. Repeated depressions of the CHORUS button toggles back and forth between octave and chromatic Pitch Shift.
Experiment with both types of transposition modes, taking note of the differences between their effects.
- • Try using combinations of octave and semitone Pitch Shift or Transpose to obtain compound intervals.
- • Try mixing Transpose and Pitch Shift on the same region to alter both the pitch and the timbre of the the sound, or to achieve the effect of Timbre Shift available within the Transpose Editor and detailed on pages 26 and 27 of the first section of this guide.
- • Remember that at any time the R key may be used to restore the layer to natural pitch.
Once you fully understand the interactions of all the above Keyboard Editor commands (layering, dynamically balancing, and transposing), proceed to the next section on naming and saving user keyboard setups.
Naming and Saving Keyboard Setups:
These two functions share a single command and offer the user the ability to save and recall customized setups, both by number and by name and by an original user-assigned name. Access to these functions is through the SAVE BUTTON.
Characters available for naming keyboard setups with the ALPHA slider:
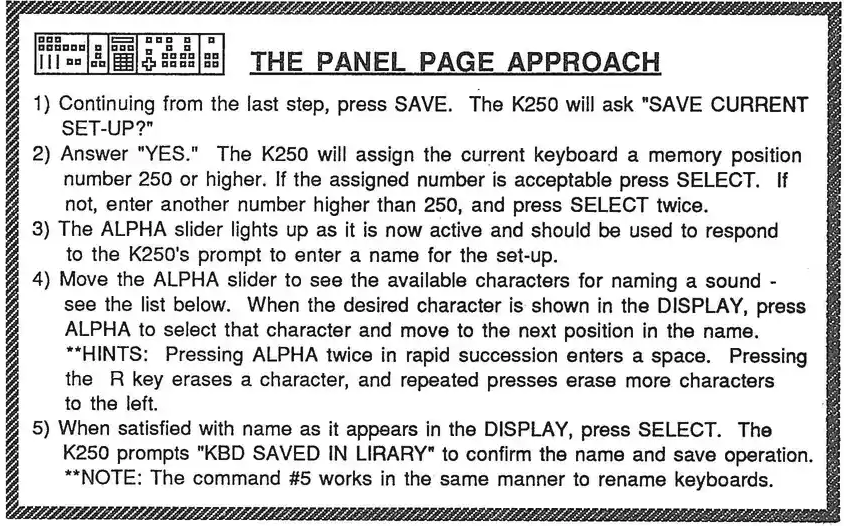
ALPHA slider position diagram
A B C D E F G H I J K L M N O P Q R S T U V W X Y Z (BLANK) 0 1 2 3 4 5 6 7 8 9 . & + - * / ? $ # ( ) _
This save and name procedure applies to many K250 functions such as Sequences, Instruments, and Samples, so make sure to learn it well.
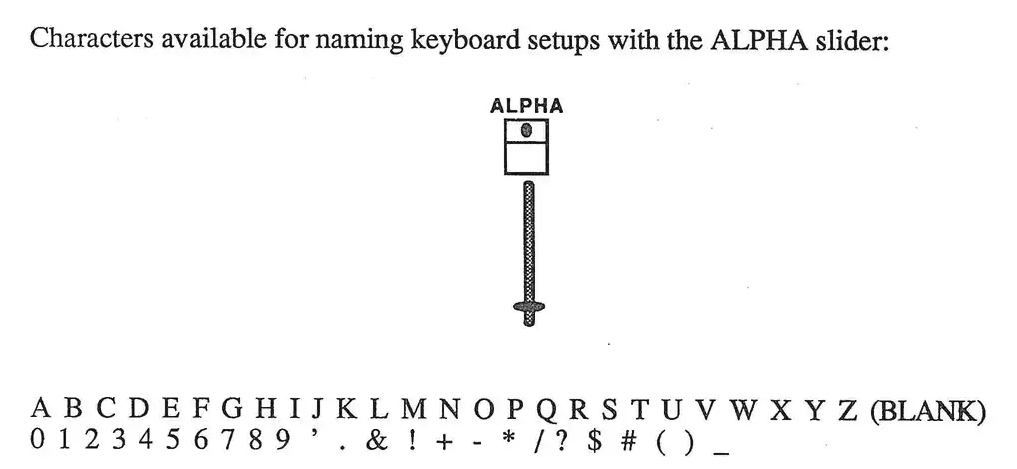
THE PANEL PAGE APPROACH
Try reconstructing the BOWLED STRINGS SLOW and BOWLED STRINGS SLOW as Instruments rather than as Keyboards. Refer to page KBD 4 for details. What differences should you expect to encounter and how will you resolve them? Be sure to refer to the Instrument list in the appendix to find the high notes for each Instrument.
Try creating a few keyboard setups with three or more layers, using the steps outlined above.
At this point you could continue with the same operations of dynamic balancing, transposition, naming, and saving as you did for adding a new keyboard to an existing keyboard setup. Review pages KBD 11-13.
For this example we will create the same setup as we did for the exercise in adding a Keyboard to an existing Keyboard, a layering of BOWLED STRINGS SLOW on the KURZWEIL GRAND PIANO.
Creating a Layered Keyboard Setup from Scratch:
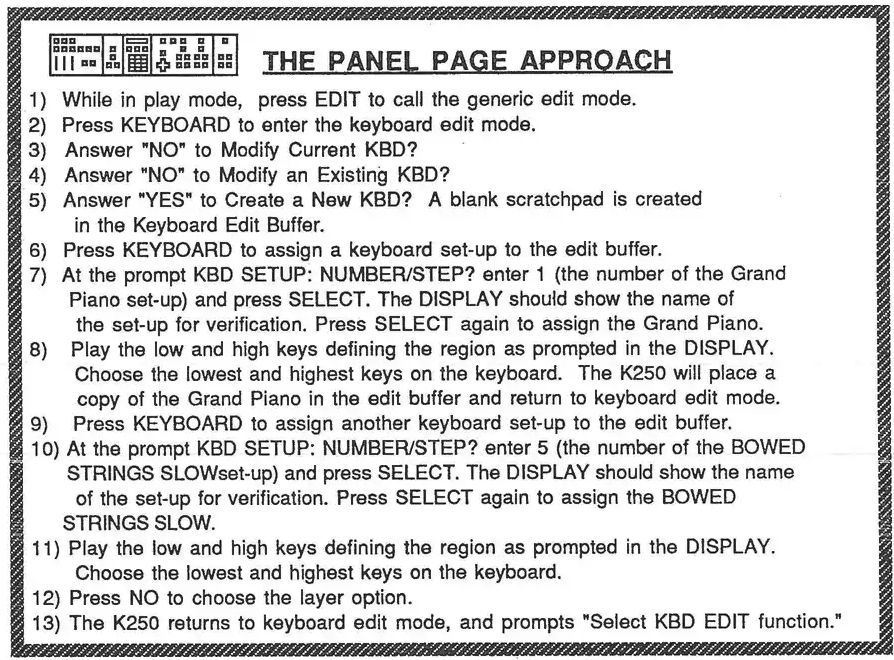
2) CREATING SPLIT KEYBOARDS
There are two basic ways to create split keyboards, from existing keyboard setups and from scratch. It is easier to use existing keyboards. However, starting from scratch gives the user greater control for customizing complex keyboards.
Creating a Split Keyboard Setup from Scratch:
For this example, we will create a split keyboard consisting of the Kurzweil Grand Piano from AU to B5, and the STINGS SLOW strings from C6 to C8.
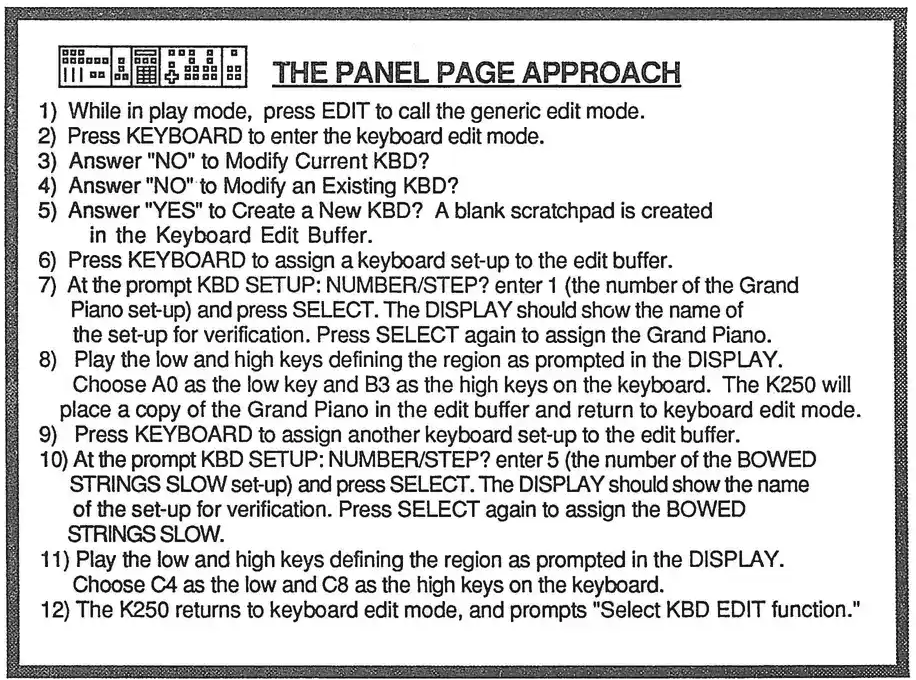
At this point you could continue with the same operations of dynamic balancing, transposition, naming, and saving as you did for adding a new keyboard to an existing keyboard setup in the layering example. If necessary, review pages KBD 11-13.
Adding a Split to an Existing Keyboard Setup:
At this point you could continue with the same operations of dynamic balancing, transposition, naming, and saving as you did in the previous examples. If necessary, review pages KBD 11-13.
In this example, the K250 seems to erase the piano sound from keys C4 through C8, replacing them with the slow string sound in layer one of the keyboard setup. In most cases, that is exactly what happens. When creating a split, the K250 can assign up to 64 sounds into regions on a single layer. In this example, however, the K250 must first clear the appropriate region from layer one and then assign the slow strings terminal or layer two, because the KURZWEIL GRAND PIANO layer on layer one has six layers all with up to six layers with up to sixty four regions on each layer for extremely complex keyboard setups. In order to gain control over this massive amount of power, it is necessary to master the commands that set the current layer, define the active region for editing, assign instruments and keyboards, as well as find musical uses for transposition and dynamic balancing of sounds in creating and storing original keyboard setups. Please review pages KBD 4 through KBD 9. The next section gives examples of working with more of these commands.
THE PANEL PAGE APPROACH
- 1) Write in play mode, call up keyboard #1 - KURZWEIL GRAND PIANO.
- 2) Press EDIT to call the generic edit mode.
- 3) Press KEYBOARD to enter the keyboard edit mode.
- 4) Answer "YES" to "Modify Current KBD?" A copy of the GRAND PIANO is placed in the keyboard Edit Buffer.
- 5) Press KEYBOARD to assign a new keyboard set-up to the GRAND PIANO. At the prompt KBD SETUP: NUMBER/STEP? enter 5 (the number of the BOWEDSTRINGSLOW set-up) and press SELECT. The DISPLAY should show the name of the set-up for verification. Press SELECT again to assign the BOWEDSTRINGSLOW.
- 6) Play the low and high keys defining the region as prompted in the DISPLAY. Choose C4 as the low key and C8 as the high keys on the keyboard.
- 7) Press YES to choose the split option.
- 8) The K250 returns to keyboard edit mode, and prompts "Select KBD EDIT function."
The KEYBOARD EDITOR: Musical Applications:
3) ADVANCED APPLICATIONS:
The following example is intended to guide the user through steps in creating a complex keyboard setup involving splits and layers, as well as using many of the commands for setting active regions and moving between layers before making any saving the setup. For best results, follow along step by step with your K250, making sure that you understand each procedure before going on to the next. If necessary, refer to earlier sections for more detailed explanations of each command.
STEP 1:
Starting with a blank scratchpad in the Keyboard Edit Buffer, create a split with acoustic bass and acoustic guitar on layer one of the setup.
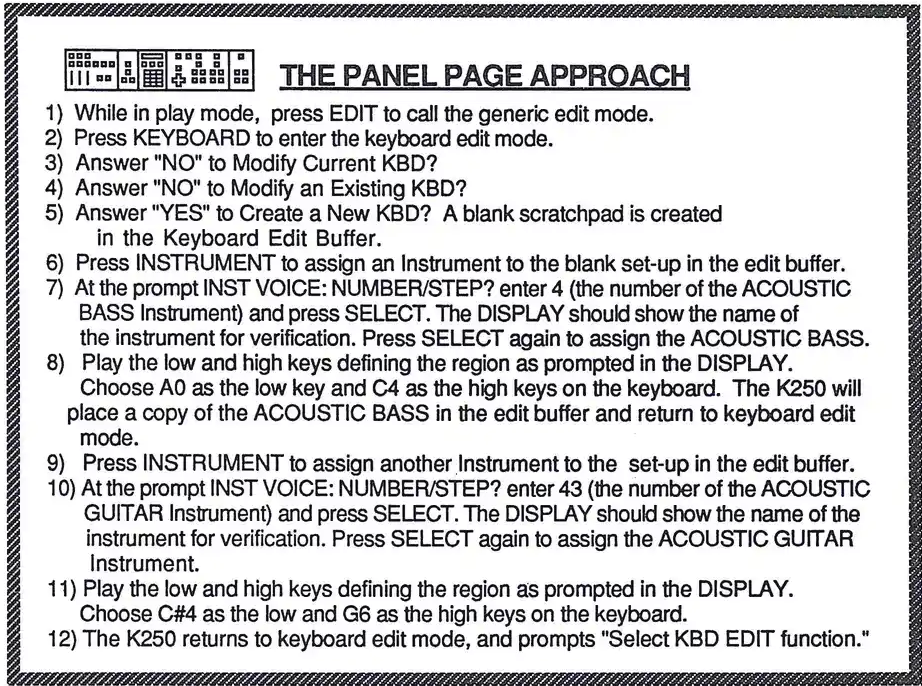
THE PANEL PAGE APPROACH
The setup now has two sounds on the lower half, and three on the upper half of the keyboard. The next step might be to dynamically balance all the sounds.
STEP 2:
Add the BOWED STRINGS SLOW keyboard setup as a new layer across the entire 88 keys.
Play the keyboard. You should hear the slow string sound over the entire keyboard plus the acoustic guitar on the bottom half and acoustic guitar on the top half of the keyboard. Because there are two layers now, and two sounds per keystroke, only six keys may be played at once. Six keys times two sounds per key uses up all twelve channels of the K250. Review page KBD 4 for more details on assigning Keyboards to a setup.
STEP 3:
Let's add another layer of strings to the upper half of the setup and transpose this new layer up a perfect fifth.
STEP FOUR:
Now let's move back down to layer two and balance the volume of the first slow strings layer. Let's make the strings slightly softer than both the bass and the guitar.
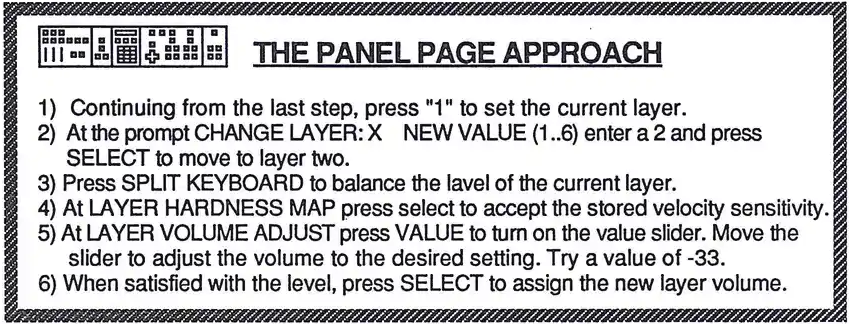
- 1) Continuing from the last step, press "1" to set the current layer. 2) At the prompt CHANGE LAYER-X NEW VALUE (1..6) enter a 3 and press SELECT to move up to layer three. 3) Press SPLIT KEYBOARD to balance the level of the current layer. 4) At LAYER HARDNESS MAP press select to accept the stored velocity sensitivity. 5) At LAYER VOLUME ADJUST press VALUE to turn on the value slider. Move the slider to adjust the volume to the desired setting. Try a value of -35. 6) When satisfied with the level, press SELECT to assign the new layer volume.
STEP FIVE:
Now we need to move back up to layer three to adjust the volume of the transposed strings. Perhaps we'll make those a bit softer than the first layer of strings, so that their effect will be simply one of coloring.
The Keyboard Editor: Summary
We could continue on with even more applications, including naming and saving. By now, however, you should be getting familiar with the keyboard Editor and its commands. Try creating your own keyboard set-ups both from existing set-ups and from scratch. Make sure to try every command during this learning period. You will find that some fit your own working processes and others won't immediately present their usefulness, but they are all very powerful commands that will come in handy at some point. Now is the time to at least try them all out. Experiment, learn, and most importantly...have fun.
THE PANEL PAGE APPROACH
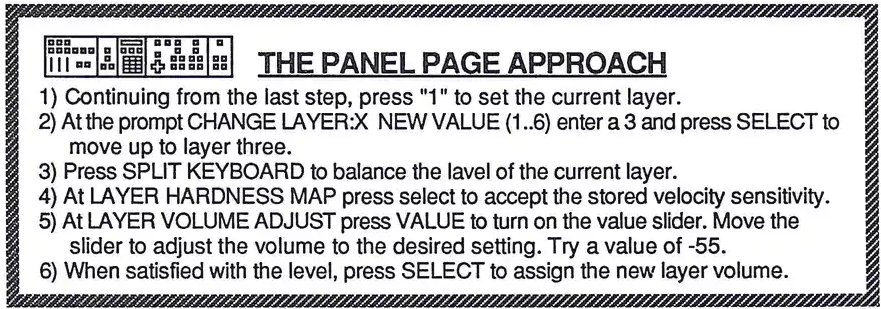
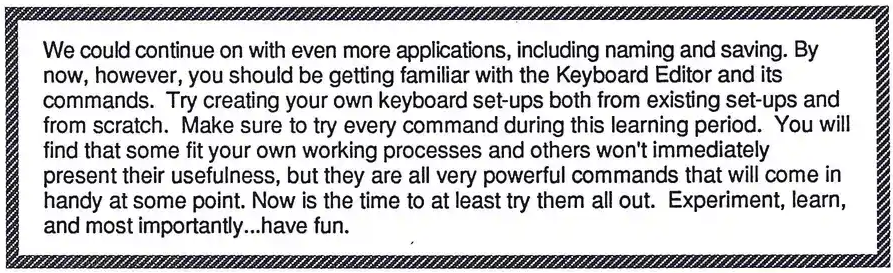
INSTRUMENT EDITOR
PART II: Applications
| Topic | Page |
|---|---|
| Background | INST 1 |
| Parameters | INST 5 |
| Voicing options | INST 6 |
| Chorus options | INST 7 |
| Vibrato | INST 8 |
| Tremolo | INST 9 |
| Envelope Generator | INST 10 |
| Miscellaneous Effects | INST 14 |
| Library options | INST 16 |
The INSTRUMENT VOICING EDITOR—Background:
The Instrument Voicing Editor allows the user to create new, digitally synthesized sounds from either the factory resident sounds stored in ROM (Read Only Memory) or user-sampled sounds stored in RAM (Random Access Memory). Only the section entitled "The Sound Modeling Program"—Sampling" is perhaps the most powerful synthesis tool within the K250, offering the user 12 LFO's, a 256 step envelope generator, a programmable stereo chorus, velocity sensitive VCF, and numerous other signal processing controls. Obviously, all this power takes some time to master. There are new concepts to learn here, even if you are already an experienced synthesist, but the time and effort is worth it, as we are about to see.
This editor allows the user to select and work with either the Menu Method or the Direct Access Method, and occasionally with the Panel Page Method for special quick access to limited functions. All methods will be presented, accompanied by their respective identifying icons. Please refer back to the first section, pages 4 through 6, for complete details on interface specifics.
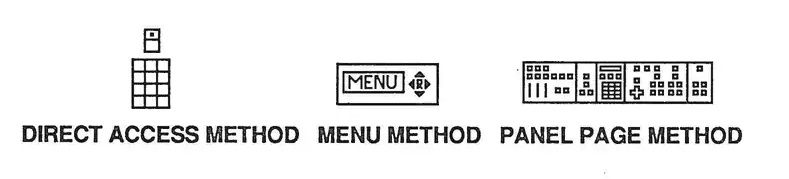
DIRECT ACCESS METHOD MENU METHOD PANEL PAGE METHOD
As a review, a K250 instrument consists of two parts: a soundfile and a voicing, which when assigned to a keyboard may be played by the user.
Soundfile
A soundfile is the raw data that represents the basic sound source for eventual performance. On its own, the soundfile is useless and inaudible. To use a soundfile, it must first be attached to an INSTRUMENT VOICING and then be assigned to a KEYBOARD SETUP. These parameters are what we will be working with through the INSTRUMENT VOICING EDITOR to synthesize new sounds.
Voicing
A K250 voicing is a collection of parameters which are applied to a soundfile and define how it will sound when assigned to a KEYBOARD SETUP. These parameters are what we will be working with through the INSTRUMENT VOICING EDITOR to synthesize new sounds.
INST
Three interface method icons showing grid layouts
The same Violcing may be applied to different soundfiles, to color our perception of those samples as well. This concept of instrument Violcing applied to soundfiles is much like using a colored filter on a camera lens, in that the filter will impart a new color on anything that is viewed through it.
AN ANALOGY FOR EXPERIENCED SYNTHESISTS:
If you are familiar with the terms and actions of an analog subtractive synthesist, you might envision the soundfile as the raw sound of an audio signal generator such as a VCO. The Instrument Violcing is like a series of audio signal processors (VCF's, Choruses, VCA's), control signal generators (LFO's and Envelope Generators), and control signal processors (lag processors and Inverters). You might picture the K250 as an analog synthesizer with the following configuration of modules:
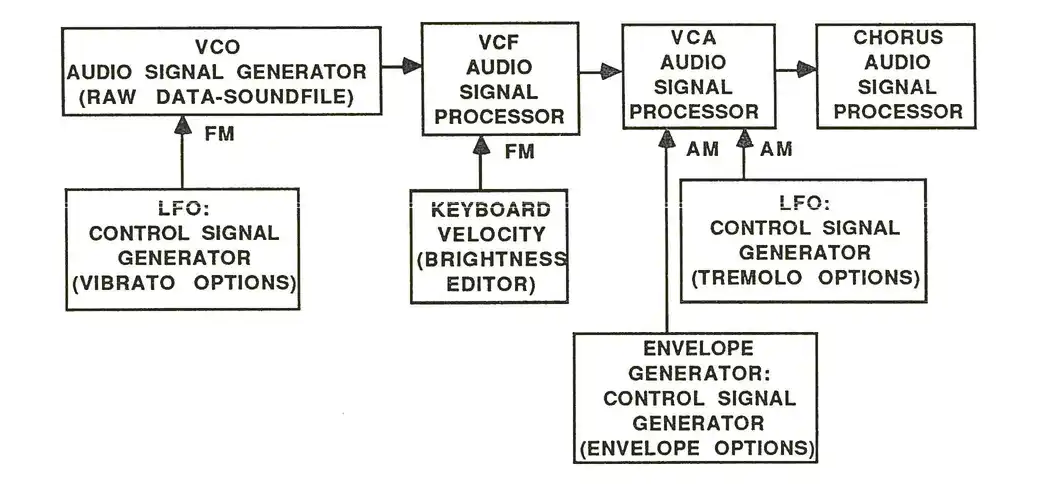
While this illustration may help to visualize the actions of the Instrument Violcing Editor, keep in mind that in fact, this is NOT what is going on inside the K250. All these functions are digital manipulations of soundfile data, and none of the above listed hardware exists. The VIBRATO and TREMOLO OPTIONS are likened to LFO functions like a Low Frequency Oscillator of an analog synthesizer is likened to the BRIGHTNESS EDITOR functions like a VCF. The BRIGHTNESS EDITOR controls like a VCF passes through filtered waveforms like a VCF. A AMPLITUDE ENVELOPE controls the volume over time. For controlling the amplitude of the audio signal. The FOCUSING OPTIONS give the user a programmable delay device capable of chorus, flange, doubling, and echo effects. Use these analogies to help understand the Instrument Violcing Editor's operation while keeping in mind that all of these actions are computations of the very fast microprocessor inside the K250.
ACCESSING THE INSTRUMENT VOICING EDITOR:
The Instrument Voicing Editor has two means of access: one way being preferable over the other depending on musical needs.
- • Because an instrument is only audible when assigned to a keyboard setup, it is advisable to enter the Instrument Voicing Editor via command #7 of the Keyboard Editor. This way it is possible to be certain that the desired instrument is assigned to the current keyboard in the Keyboard Editor, answer "YES" to edit, and it is assigned to the keyboard in the edit buffer, answer "YES" to edit, and it is assigned to the keyboard in the edit buffer in real time as they are being made. For more details on the Keyboard Editor and it's commands, please refer to the section entitled "The Keyboard Editor."
- • Another way to access the Instrument Voicing Editor is by pressing EDIT to call the generic edit mode, then pressing INSTRUMENT to access the specific Instrument Voicing Editor. This is not the recommended method because although it works well enough, there is no guarantee that you WILL be able to hear changes as you make them, because the desired instrument may not be assigned to the current keyboard in the buffer, answer "YES" to edit, and it is assigned to the keyboard in the Keyboard Editor in the edit buffer, answer "YES" to edit, and it is assigned to the keyboard in the Keyboard Editor in real time as they are being made.
It is very important to make sure that the keyboard setup in the Keyboard Edit Buffer contains the Instrument Voicing to be edited. To be sure of this, the K250 asks three questions upon receiving command #7;
MODIFY CURRENT INSTRUMENT?
This prompt lists the active Instrument Voicing. If this is the one you want to edit, and it is assigned to the keyboard in the edit buffer, answer "YES" to edit, and the current instrument into the Voicing Edit Buffer. A "NO" answer here will bring the current instrument into the Voicing Edit Buffer. A "NO" answer here will bring a second question:
MODIFY EXISTING INSTRUMENT?
Answer "YES" here and the K250 will prompt you to enter the INSTRUMENT VOICE: NUMBER/STEP of the desired voicing. Enter a number and press SELECT, verify the selection and press SELECT again to load a copy of the desired instrument into the Voicing Edit Buffer. A "NO" response brings a third question:
EDIT INSTRUMENT IN BUFFER?
This refers to the above mentioned Voicing Edit Buffer, and this choice is for that situation when you wish to retrieve the last changes made in the case of accidentally returning to Play mode. This action is much like the "EDIT RECALL" feature found in many other popular synthesizers.
As it is our concern here to provide the user with a clear, concise approach to the K250, we will advise the use of the first approach, and all directions will refer to this method for accessing the Instrument Voicing Editor. As a review:
THE PANEL PAGE APPROACH
- 1) Press EDIT to call the generate edit mode.
- 2) Press KEYBOARD to access the Keyboard Edit Buffer.
- 3) Answer the questions appropriately to load the keyboard set-up containing the desired Instrument. See the section on the Keyboard Editor for more details. See the Instrument list in the appendix to find the SOURCE KEYBOARD for the chosen Instrument Voicing.
- 4a) Select MODIFY CURRENT KEYBOARD if the setup listed in the display contains the desired Instrument Voicing.
- 4b) Select MODIFY EXISTING KEYBOARD if the current setup does not contain the desired Instrument Voicing.
- 5) Press "7" to access the Instrument Voicing Editor.
- 6a) The K250 will ask: MODIFY CURRENT INSTRUMENT? If the Instrument shown in the DISPLAY is the one you wish to edit, press YES to load a copy of the Instrument Voicing into the Voicing Edit Buffer.
- 6b) Press "0" to call the Voicing Edit Buffer List for instance if you had accidentally left the Instrument Voicing Editor by pressing PLAY, returning to play mode. This option is similar to the EDIT RECALL feature of many popular synthesizers.
- 6C) Choose EDIT INSTRUMENT IN BUFFER if the Instrument you want to edit is already in the Voicing Edit Buffer- for instance if you had accidentally left the Instrument Voicing Editor by pressing PLAY, returning to play mode. This option is similar to the EDIT RECALL feature of many popular synthesizers.
- 7) After choosing option 6a, 6b, or 6c, you will enter the Instrument Voicing Options on the major option level and the DISPLAY will show 1 VOICING OPTIONS.
Now that we have an idea of what the Instrument Voicing Editor does, and a method for accessing that editor, we will examine each function in greater detail.
THE INSTRUMENT VOICING EDITOR—Parameters:
The following is a "menu" of the options (parameters) available within the Instrument Voicing Editor. Each major option (those in bold face) has subparameters which may in turn have subparameters. When the instrument Editor is first accessed, the display shows that you are on the major option level, starting with option 1, VOICING OPTIONS. From this point, other major options may be accessed either by using the up or down cursor (the UP/DOWN arrows) or by entering the option number and pressing SELECT (the SELECT key). To enter the subparameters for a given major option, simply press SELECT or down cursor (the MENU method), or enter the subparameter number and press SELECT (the DIRECT ACCESS method). Once on the subparameter level, cursoring both ALL around through ALL of the major option's subparameters, you return to the major option level by pressing the up cursor. This will keep you from getting lost among the many possible subparameters.
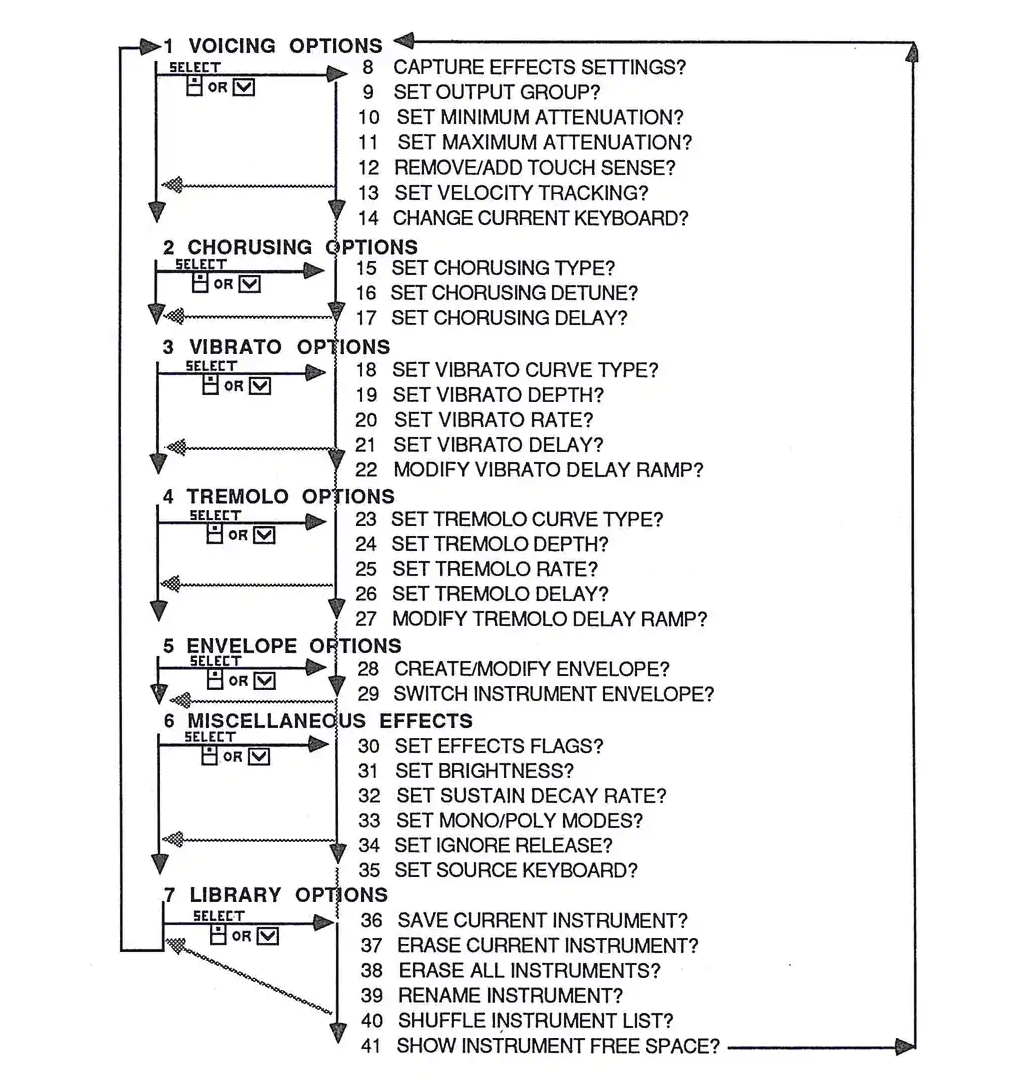
Command #1: The Voicing Options
- 1 VOICING OPTIONS
- 8 CAPTURE EFFECTS SETTINGS
- 9 SET OUTPUT GROUP
- 10 SET MINIMUM ATTENUATION
- 11 SET MAXIMUM ATTENUATION
- 12 REMOVE/ADD TOUCH SENSE
- 13 SET VELOCITY TRACKING
- 14 CHANGE CURRENT KEYBOARD
These options control the "macro" or global qualities of an instrument's sound. The settings of overall volume and dynamic range, velocity sensitivity, and the output group are functions of these commands.
8 CAPTURE EFFECTS SETTINGS
This subprogram freezes the current settings of ALL of the K250's assignable controllers that relate to processing available within the Instrument Voicing Editor's commands. While in PLAY mode, use the Output Buffer controllers. When the controllers are set to taste, access the Instrument Voicing Editor and this subprogram. Press SELECT at the CAPTURE EFFECTS SETTINGS subprogram, and the K250 will display the prompt "EFFECTS CAPTURED." Those settings from the PLAY mode are now part of this Instrument Voicing.
9 SET OUTPUT GROUP
A Voicing can be assigned to either of the two instrument busses, GROUP A or GROUP B. This subprogram allows user to control which bus the current voicing will be routed to, thereby allowing two-channel stereo images. Entering 0 assigns the instrument to GROUP A, while a value of 1 assigns the instrument to GROUP B.
10 SET MINIMUM ATTENUATION
This subprogram allows the user to set the minimum level for this Instrument Voicing. The range of choices is 0-255, where 0 is the loudest (no attenuation), and 255 is no sound at all (maximum attenuation). The factory default is 0.
Command #2: The Chorusing options
2 CHORUSING OPTIONS 15 SET CHORUSING TYPE? 16 SET CHORUSING DETUNE? 17 SET CHORUSING DELAY?
These commands set the chorus effects for a specific Instrument. Remember that the term chorus here refers to a delay type of effect; and may actually produce a number of musical and special effects (including chorusing, doubling, flanging, and echo), according to the chosen Chorusing type. These parameters are very much set the chorus parameters explained in the first section of this guide under the PLAY Editors. Because the play editors make it so that only the specific Instrument Voicing and will be present whenever it is called, whereas the others were global, affecting any current keyboard, but only when the CHORUS button is on. The following is an explanation of the CHORUS suboptions:
The MENU Method
- 1) Access the Instrument Voicing Editor according to the method previously outlined.
- 2) To enter the suboptions of the CHORUSING OPTIONS, use the numeric keypad to enter 15, 16, or 17, according to which suboption is desired.
- 3) Press SELECT.
The Direct Access Method
- 1) Access the Instrument Voicing Editor according to the method previously outlined.
- 2) To enter the suboptions of the CHORUSING OPTIONS, use the numeric keypad to enter 15, 16, or 17, according to which suboption is desired.
- 3) Press SELECT.
15- SET CHORUSING TYPE? This suboption allows you to select from five types of effects: 0-NO CHORUS, 1-DOUBLING, 2-FULL CHORUS, 3-FLANGING, 4-ECHO, and 5-MICROTONAL. These were described in greater detail on page 44. If FULL CHORUS or ECHO is chosen, the K250 will prompt for the number of channels desired.
16- SET CHORUS DETUNE? This is where you enter the desired amount of detuning for the effect. Use either the numeric keypad or the value slider to enter the value.
17- SET CHORUS DELAY? This is where you enter the desired amount of delay for the effect. Use either the numeric keypad or the value slider to enter the value.
(TO VIBRATO SUBOPTIONS
TINST 7
Command #3: The Vibrato Options
3 VIBRATO OPTIONS 18 SET VIBRATO CUTETYPE? 19 SET VIBRATO DEPTH? 20 SET VIBRATO RATE? 21 SET VIBRATO DELAY? 22 MODIFY VIBRATO DELAY RAMP?
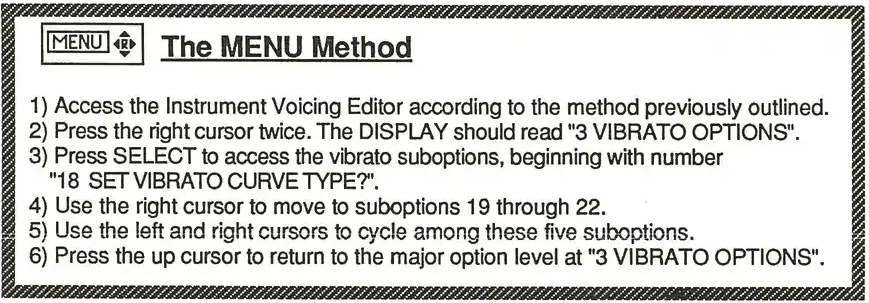
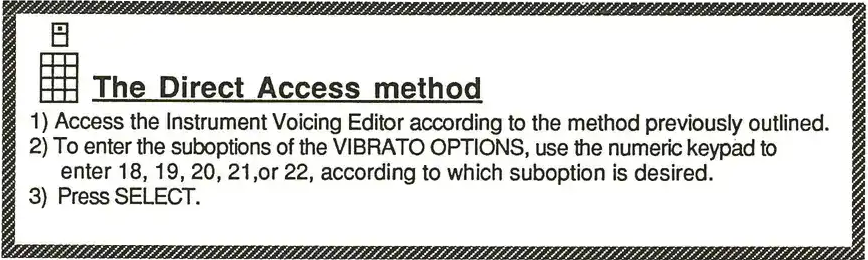
These commands are similar to the Vibrato parameters set with the FUNCTION editors within the PLAY Editor. See pages 41, 42, and 43. Again the primary difference here is that these parameters are global settings set with the Function Editor.
ACCESS:
Kurzweil K250 Users Guide
Command #4: The Tremolo Options
- 4 TREMOLO OPTIONS
- 23 SET TREMOLO CURVE TYPE?
- 24 SET TREMOLO DEPTH?
- 25 SET TREMOLO RATE?
- 26 SET TREMOLO DELAY?
- 27 MODIFY TREMOLO DELAY RAMP?
Tremolo refers to an amplitude modulation (volume change) and may produce a variety of musical and special effects according to the chosen waveshape. A triangle wave will produce a continuous smooth rise and fall of the standard tremolo. A square wave will produce a pulsing on/off type of effect. The ascending ramp wave will give volume swells. The descending ramp wave will create a repeatedly decaying effect. Try all of these effects on typical sounds to see what you will create with each type. The effects can also be combined with those seen in the function editor, but are local settings only and override any global settings. Please refer to pages 41 and 42. Suboptions 23 through 27 work exactly like the VIBRATO OPTIONS suboptions numbered 18 through 22. Review page JUST 8 for details.
ACCESS:
42. Suboptions 23 through 27 work exactly like the VIBRATO OPTIONS suboptions numbered 18 through 22. Review page JUST 8 for details.
The MENU Method 1) Access the Instrument Violating Editor according to the method previously outlined. 2) Press the right cursor three times. The DISPLAY should read "4 TREMOLO OPTIONS." 3) Press SELECT to access the vibrato suboptions, beginning with number "23 SET TREMOLO CURVE TYPE?" 4) Use the right cursor to move to suboptions 24 through 27. 5) Use the left and right cursors to cycle among these five suboptions. 6) Use the UP cursor to return to the major option level at "4 TREMOLO OPTIONS."
The Direct Access method 1) Access the Instrument Violating Editor according to the method previously outlined. 2) To enter the suboptions of the VIBRATO OPTIONS, use the numeric keypad to enter 23, 24, 25, 26, or 27, according to which suboption is desired. 3) Press SELECT.
| The MENU Method |
| 1) Access the Instrument Voicing Editor according to the method previously outlined. |
| 2) Press the right cursor four times. The DISPLAY should read "5 ENVELOPE OPTIONS". |
| 3) Press SELECT to access the envelope suboptions, beginning with number 28 "28 CREATE/MODIFY ENVELOPE 2". |
| 4) Use the right cursor to move to suboption 29. |
| 5) Use the left and right cursors to cycle among these two suboptions. |
| 6) Once the suboption has been accessed by pressing SELECT at suboption 28, you must press PLAY in order to exit and return to the suboptions at "28 CREATE/MODIFY AN ENVELOPE". |
| 7) Press the up cursor to return to the major option level at "5 ENVELOPE OPTIONS". |
| The Direct Access Method |
| 1) Access the Instrument Voicing Editor according to the method previously outlined. |
| 2) To enter the suboptions of the ENVELOPE OPTIONS, use the numeric keypad to enter 50 or 29, according to which suboption is desired. |
| 3) Press SELECT. |
| 4) Once the suboption has been accessed by pressing SELECT at suboption 28, you must press PLAY in order to exit and return to the suboptions at "28 CREATE/MODIFY AN ENVELOPE". |
Command #5: The Envelope Options Kurzweil K250 Users Guide 5 ENVELOPE OPTIONS 28 CREATE/MODIFY ENVELOPE 2 29 SWITCH INSTRUMENT ENVELOPE 3 Access: An amplitude envelope gives the user control over how a sound begins and ends, and what happens in between in respect to loudness. The Envelope Options commands allow users to control over the very powerful amplitude envelope generator housed within the K250. Most synthesizer envelope generators have four or perhaps even six stages. The K250 not only gives you up to 256 stages, but each stage has its own settings for type, rate, and limit. This is more powerful than desired in most musical situations, but it is more to have the option for control. When the Envelope Generator is first activated, it creates a simple three stage envelope, so the user won't need to work with more stages than necessary. If more stages are desired, the user may easily add more, as needed, up to the limit of 256. This allows the potential for more complex effects, while maintaining ease for less involved work. ACCESS:
5 ENVELOPE SUBROUTINES/SUBREDITOR:
28 CREATE/MODIFY AN ENVELOPE? does two different things depending on whether or not the Instrument Voicing in the Voicing Edit Buffer already has an envelope assigned to it. Most of the Factory Instruments in ROM do not have envelopes assigned. The Bowed Strings Slow and some of the Sine Waves do, but most others simply have the natural envelopes that are contained in their soundfile (sample) data.
- • If the Instrument in the Buffer has an envelope, command #28 opens that envelope up, unaffected, for user examination and editing.
- • If the Instrument in the Buffer has no envelope, command #28 creates a simple three stage envelope for the user to begin editing. The parameters for this envelope are:
SEGMENT 1: LOGARITHMIC ATTACK, END LIMIT 0, RATE 1000 SEGMENT 2: EXPONENTIAL DECAY, END LIMIT 255, RATE 500 SEGMENT 3: EXPONENTIAL DECAY, END LIMIT 255, RATE 600
We will explore the meanings of these parameters in greater detail on the next page, but first let's examine the other Envelope Subreditor command.
29 SWITCH INSTRUMENT ENVELOPE? allows the user to examine what the current Voicing would sound like without its envelope. This works like an A/B comparison test with command #29 logging back and forth between user envelope and soundfile envelope data. Storing an Instrument Voicing without logging its envelope back on in essence will turn command #29 into a "remove envelope" command.
Once you have entered the envelope subreditor through command #28, you may view the settings for each parameter by pressing SELECT. This will continuously cycle among the segments and their settings. To add segments to the envelope, simply press the INSERT button. This will add a new segment after the segment shown in the DISPLAY. To remove a segment from an envelope with more than three segments (all envelopes must have at least the three segments the K250 assigns) simply press the ERASE button. This will delete the segment shown in the DISPLAY.
ENVELOPE OPTIONS—Parameters Explained:
Remember that the K250 gives you up to 256 stages in the envelope generator, and that each stage is referred to as a segment. There is fundamentally no difference between one segment and another, except in how you program the settings! These parameters are SEGMENT TYPE, END LIMIT, and RATE.
SEGMENT TYPE:
The segment type refers to the direction and shape of amplitude change over time. There are four types to choose from, and these types are available for every segment. The four types are:
- • LOGARITHMIC ATTACK
- • EXPONENTIAL GROWTH
- • DELAY SEGMENT
- • EXPONENTIAL DECAY
END LIMIT:
This parameter sets the amplitude level which the segment will attain at the end of its movement. The range of values is 0-255, where 0 is the loudest level (no attenuation) and 255 is the softest (maximum attenuation). This will be a positive or negative change dependant on the segment type.
RATE:
This parameter sets the amount of time the segment takes to complete its movement, and is relative to the beginning and end limits. Low numbers will give slow rates, higher numbers give faster rates (like speedometer readings).
With these three controls for each segment, and as many as 256 segments in an envelope, it is possible to create extremely complex amplitude changes over time. Combinations of different segment types, rates, and end limits may be strung together to make a single complex attack characteristic. Multiple attacks for single keystrokes, Sforzando and crescendo effects are just a few of the many musical and special effects that may be created with the envelope subeditor. Before exploring these applications, let's take a more detailed look at the envelope parameters in graphic form.
If we remember that envelopes are expressions of amplitude changes over time we can picture these four types as graphs.
LOGARITHMIC ATTACK:
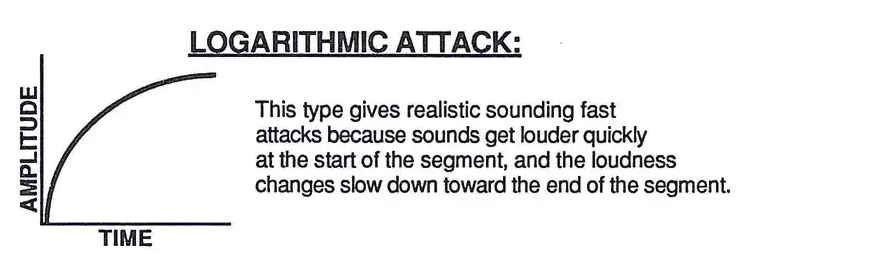
This type gives realistic sounding fast attacks because sounds get louder quickly at the start of the segment, and the loudness changes slow down toward the end of the segment.
EXPONENTIAL GROWTH:
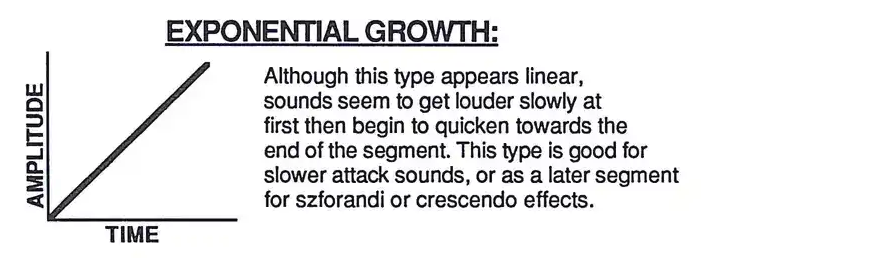
Although this type appears linear, sounds seem to get louder slowly at first then begin to quicken towards the end of the segment. This type is good for slower attack sounds, or as a later segment for sizzlerand or crescendo effects.
DELAY SEGMENT:
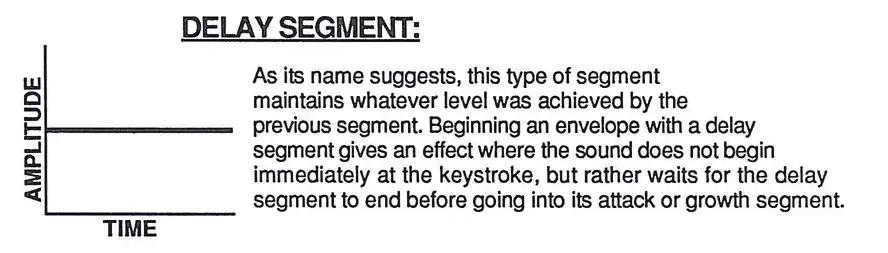
As its name suggests, this type of segment maintains whatever level was achieved by the previous segment. Beginning an envelope with a delay segment gives an effect where the sound does not begin immediately at the keystroke, but rather waits for the delay segment to end before going into its attack or growth segment.
EXPONENTIAL DECAY:
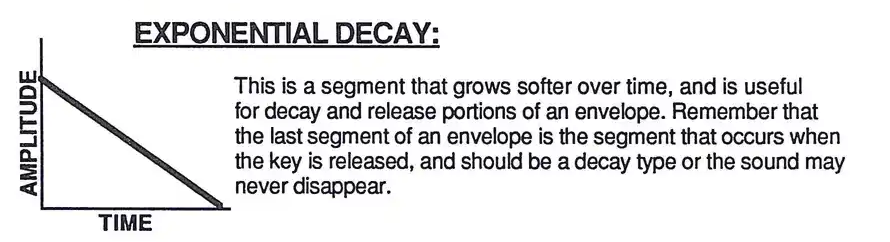
This is a segment that grows softer over time, and is useful for decay and release portions of an envelope. Remember that the last segment of an envelope is the segment that occurs when the key is released, and should be a decay type or the sound may never disappear.
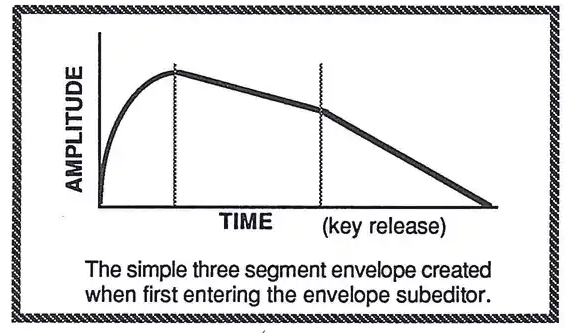
INST 14
Command #6: Miscellaneous Effects Options
These commands control various parameters of a sound's response to controllers, the way the sound responds to notes on the keyboard either monophonically or polyphonically, and further contains yet another subcollection, the brightness Editor.
ACCESS:
- 6 MISCELLANEOUS EFFECTS
- 30 SET EFFECTS FLAGS?
- 31 SET BRIGHTNESS?
- 32 SET SUSTAIN DECAY RATE?
- 33 SET MONO/POLY MODES?
- 34 SET IGNORE RELEASE?
- 35 SET SOURCE KEYBOARD?
The MENU Method
- 1) Access the Instrument Voicing Editor according to the method previously outlined.
- 2) Press the right cursor five times. The DISPLAY should read:
- "6 MISCELLANEOUS EFFECTS".
- 3) Press SELECT to access the suboptions, beginning with number "30 SET EFFECTS FLAGS?".
- 4) Use the right cursor to move to the next suboptions #1, #2, #3, #4, and #5.
- 5) Use the left and right cursors to cycle among these six suboptions.
- 6) To enter the brightness subcollection, press SELECT at subcollection #1, cursoring left and right will cycle among the four options of this subcollection.
- 7) To exit the brightness subcollection, press PLAY to return to the subcollection level at "31 SET BRIGHTNESS?".
- 8) Press the right cursor to return to the major option level at "6 MISCELLANEOUS EFFECTS".
The Direct Access method
- 1) Access the Instrument Voicing Editor according to the method previously outlined.
- 2) To enter the subcollections of MISCELLANEOUS EFFECTS, use the numeric keypad to enter 30,31,32,33,34,35, according to which subcollection is desired.
- 3) Press SELECT.
- 4) To access the brightness subcollection, use the numeric keypad to enter 31, then press SELECT. Press PLAY to exit the subcollection. Use the keypad to enter the number for the desired option and press SELECT. Press PLAY to exit the brightness subcollection.
Kurzweil K250 Users Guide
6 MISCELLANEOUS EFFECTS SUBROUTINES:
SET EFFECTS FLAGS Use the K250 whether to use local settings (those set within the Instrument Voicing Editor) or global settings for the function commands in the Play Mode. Play Mode prompts, tremolo, vibrato, chorus and brightness effects. Pressing SELECT resets a series of prompts:
- • USE LOCAL VIBRATO SETTINGS WITH INSTRUMENT?
- • USE LOCAL TREMOLO SETTINGS WITH INSTRUMENT?
- • USE LOCAL BRIGHTNESS SETTINGS WITH INSTRUMENT?
- • USE LOCAL CHORUS SETTINGS WITH INSTRUMENT?
- • USE PEDAL WITH INSTRUMENT?
Answering "YES" to the first four questions means that the instrument will use its own settings instead of global. Answering "NO" to the last two questions tells the instrument to ignore the respective controllers, allowing the user to construct a keyboard setup with one layer that listens to pitch bend and another that doesn't.
SET BRIGHTNESS is actually a subreditor which allows the user to set low pass filtering controls for individual instruments. The commands for this subreditor are exactly the same as found within the function controls in the Voicing Editor.
Please refer to page 43 for details. As this is a subrediting mode, you must press PLAY in order to return to the Instrument Voicing Editor.
SET SUSTAIN DECAY RATE? Gives the user an alternate entrance rate that comes on effect when the sustain pedal is depressed. The range of values for this parameter is 0-32000, where the faster the release time. The default setting is 0 which instructs the K250 to use the factory set sustain rate.
SET MONO/POLY MODES: Allows the user to specify that an Instrument should respond monophonically to notes played on the keyboard. The type of keyboard algorithm to employ. The options for monophonic response are:
- • 1 HIGHEST NOTE
- • 2 LOWEST NOTE
- • 3 FIRST NOTE
- • 4 LAST NOTE
To return to polyphonic performance just answer "NO" at the prompt SET MONOPHONIC INSTRUMENT?
SET IGNORE RELEASE? tells the K250 to play its full envelope regardless of when you take your finger off the key. This can be very effective for some sounds with long release times, however, also care with looped sounds (like BOWED STRINGS FAST) as they have no decays at all. These sounds will ring forever or until the K250 is reset (by powering down then back up again, up through a 4, 5, SELECT action).
SET SOURCE KEYBOARD allows use of switch soundfiles the way Keyboard Editor commands 8 and 9 allow the user to switch Voicing (Refer to page 68 etc. AFD 9.)
Command #7: The Library Options
| Topic | Page |
|---|---|
| 36 SAVE CURRENT INSTRUMENT? | None |
| 37 ERASE CURRENT INSTRUMENT? | None |
| 38 ERASE ALL INSTRUMENTS? | None |
| 39 RENAME INSTRUMENT? | None |
| 40 SHUFFLE INSTRUMENT LIST? | None |
| 41 SHOW INSTRUMENT FREE SPACE? | None |
7 LIBRARY SUBROUTINES:
SAVE CURRENT INSTRUMENT places the current state of the Instrument in the Volking Edit Buffer into the user library in RAM. This works exactly the same as in the keyboard Editor (refer to page KBD17). This function may be accessed at any time by using the Panel Page Method and simply pressing the SAVE button. You will be asked to verify the number for the Instrument. If it's one of your own that you are editing, you'll be asked to REPLACE EXISTING. A "YES" answer wipes out the old version as well. You will also be asked to name the instrument using the technique learned in the Keyboard Editor chapter (on page KBD 13.
ERASE CURRENT INSTRUMENT allows the user to delete the current instrument from the user library in RAM. This is useful if you run out of memory and can afford to lose the sound in order to make more room for new sounds. Remember that if there are keyboards that depend on this instrument, they will still appear in the editing list, but with be silent. This can be remedied by substituting another instrument into the setup, or storing a new instrument with the number of the old instrument.
ERASE ALL INSTRUMENTS completely clears the Instrument Violking library of all user-created Instrument Voicings in RAM. This is useful to initialize the memory for new sounds after off-loading your sounds to Macintosh™ disk via MacEnhance™ or QLSTM. As this is something you never want to do by accident, when the K250 will ask, "DO YOU REALLY WANT TO ERASE ALL INSTRUMENTS?", If you don't answer "NO".
RENAME INSTRUMENT allows the user to change the name of your own instruments. Refer to the section on naming objects in the Keyboard Editor chapter on page KBD 13.
SHUFFLE INSTRUMENT LIST? allows you to change the order of instruments in the library. This works exactly like the shuffle keyboard command of the Keyboard Editor. Please refer to page KBD 15 for more details. Since the K250 does everything with numbers (digital) be careful when shifting instruments. Keyboard setups do use an Instrument NUMBERS when creating sounds, and when the numbers change-you see why it's important to be careful with this command.
SHOW INSTRUMENT FREE SPACE? gives an estimate of how many more instruments may be stored in the K250's RAM.
The INSTRUMENT VOICING EDITOR—SUMMARY:
The instrument Voicing Editor is a very powerful synthesis tool, especially when used in conjunction with the Keyboard Editor. The most powerful tools however, are your ears and your imagination, and your imagination. With ALL the commands on these editors, stretching the limits of your creativity. The K250 was designed to provide you with not only the finest sounding factory setups, but with powerful means to create your own great sounds. The editors may seem complex and confusing at first, but if you understand the concepts explained in the first section of this guide, and carefully follow through these chapters, experimenting as you go, in no time at all you should be able to navigate through the options, suboptions, and suboptions with ease. For further background, consult ALL Reference Guide to the Kurzweil 250 which came with your instrument.
SAMPLING
PART II: Applications
| Topic | Page |
|---|---|
| Background | SKIP 1 |
| Recording Sounds | SKIP 7 |
| Processing Sounds | SKIP 12 |
| Tuning | SKIP 12 |
| Trimming | SKIP 14 |
| Looping | SKIP 15 |
| Reversing | SKIP 17 |
| Keyboard Editing options | SKIP 17 |
| Delete options | SKIP 19 |
| Duplicate options | SKIP 20 |
| Display options | SKIP 20 |
| Saving samples | SKIP 21 |
| Complete Menu | SKIP 22 |
| Hints | SKIP 23 |
THE SOUND MODELING PROGRAM—SAMPLING: BACKGROUND
What is sampling?
The K250 user sampling option is called "The SOUND MODELING PROGRAM" or SMP for short. This option consists of two parts, hardware and software. The hardware is the physical chip and associated wiring that allows the K250 to sample or digitize audio sounds. The software is the set of instructions that tell the K250 how to use the sampling, and present you with the menus and prompts that help you use your job in controlling the K250. The software is referred to as the digitizer, and the whole package is the SMP. The Sound Modeling Program allows users to create their own soundfiles, which may be used in their original form, or may be modified through the Instrument Voicing Editor (remember that Instruments are soundfiles attached to Voicings). There also are two hardware upgrades available (SUPERLAVI and II) which expand the user sample memory by two and four-fold respectively. These upgrades are available up to four banks of soundfile memory available at any time. If you have either of those two upgrades installed, the digitizer will ask you to select the desired bank, where appropriate.
Sampling is the process of capturing and storing a continuously changing signal through Analog-to-Digital conversion. Sound (continuous changes in air pressure) may be expressed as changes in voltage, hence the form analog - an analogy between changes in air pressure and changes in voltage. Sampling is the digital equivalent of analog recording. In digitizing (sampling) a sound, an analog voltage from a microphone (or other source) is sent to an Analog-to-Digital converter, which is very much like a digital voltmeter. At a very rapid rate, usually between 5,000 and 50,000 times per second, the Analog-to-Digital converter powers the voltage of the signal at that given moment, and assigns a numeric value. Those numeric values are stored as binary numbers in the computer memory. On playback, the computer sends the samples to a Digital-to-Analog converter which recreates the original voltage. This voltage is then sent to an external amplifier and speaker to reproduce the changes in air pressure. The fidelity of reproduction is dependant on the various factors involved (microphone and microphone preamp, processing on the Analog-to-Digital and Digital-to-Analog converters). Also important is the method and rate of sampling and the resolution of storage.
Sample rate and fidelity of reproduction:
The K250 "takes pictures of" a signal between 5,000 and 50,000 times per second, converting each "picture" or sample into a binary number. The number of times per second that these pictures are taken is referred to as the sample rate. This sample rate is largely responsible for the frequency bandwidth that may be captured. In general, the highest frequency component of a sound that can be captured by sampling will be 2/5 of the sample rate. For example, if the sample rate is set to 50,000 Hz, the highest frequency captured will be 20,000 Hz. As the range of our hearing is optimally 20-20,000 Hz, at this rate we can see that the K250 is capable of reproducing the full audio bandwidth. In practice, however, it is not usually necessary to sample at that rate, as most musical sounds have very little energy in frequency components above 12000 Hz. As there is a direct relationship between the amount of memory consumed by a sample (the more samples taken the more samples to store), there must be some trade-off between sample rate and length of sample time. Very high quality samples can be made at rates of 25,000 and even less.
The following graphs represent the relationship of sample rate to fidelity of sound reproduction.
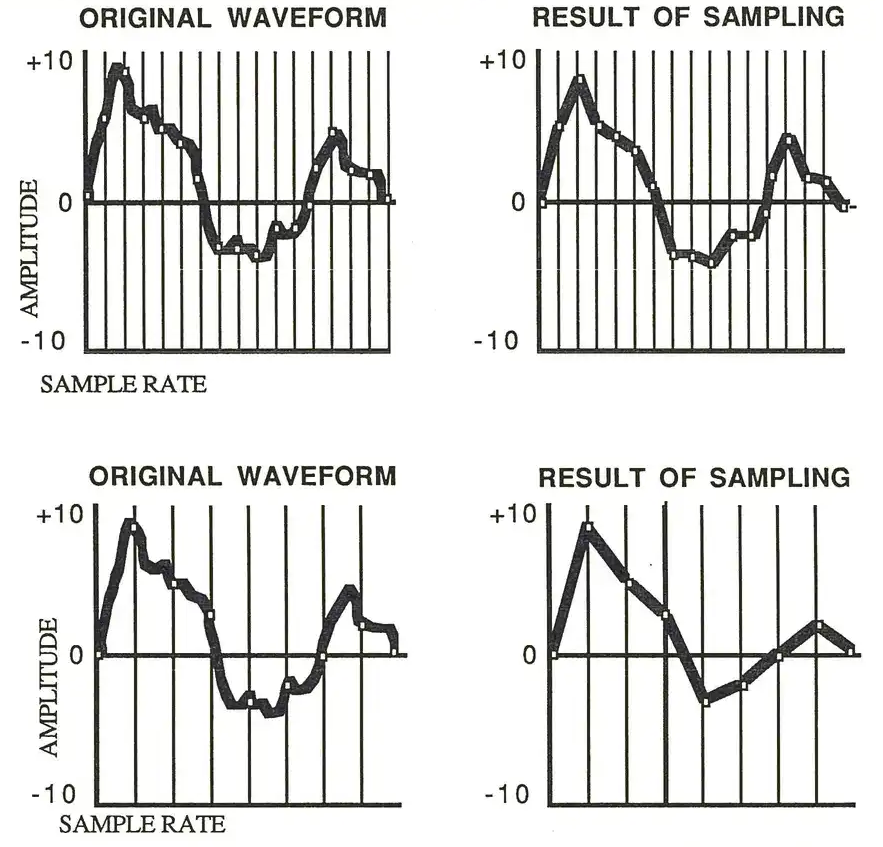
Note the effect the slower sample rate has on the resultant waveshape. The first example shows fairly high fidelity to the original, while the second example bears little resemblance to the original signal. This loss in fidelity may also be compounded by resolution factors.
Kurzweil K250 Users Guide
Sample resolution and fidelity of reproduction:
As analog voltages are continuous and digital numbers are discrete steps, the Analog-to-Digital converter must divide the total range of voltage into as many numbers as it has available to accurately reproduce changes in amplitude. This division is referred to as the sample resolution and is measured in bits. A sampler with eight bits of sample resolution divides the amplitude range into 256 parts. A resolution of twelve bits divides it into 4,096 parts. The 256 parts obviously are of larger amplitude than 4,096 parts -- so an eight bit resolution is between two divisions of the sample resolution. The sixteen bit resolution has a S/N ratio of 96dB and sixteen bits is over 100dB (the highest number of bits in commercial use) and can measure small changes -- an outstanding dynamic range of over 100dB. The following graphs show the relationship of sample rate and resolution on reproduction quality. As with most technical matters, there is a balance that must be found between storage space and sample resolution.
The A to D converter must quantize (round off) the value to the nearest division, and this will result in the waveform. As with sample rate, a higher resolution produces a higher fidelity sound. The more division that are possible, the closer the reproduction will be to the original.
Four waveform comparison charts showing original waveform and result of sampling at high and low resolution, demonstrating high fidelity reproduction of waveform versus poor quality reproduction of original sound.
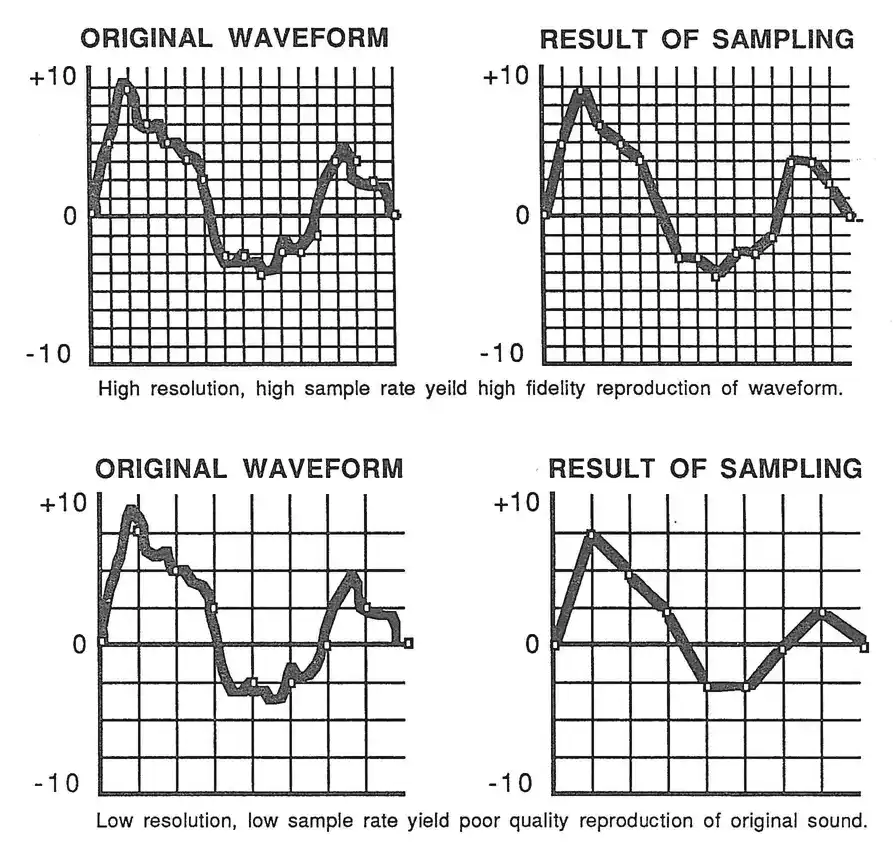

Procedures—file menus and prompts:
When the Digitizer is first accessed, the K250 shows "RECORD SOUND" in the DISPLAY. This is the main level of Digitizer options. Before continuing with procedures for specific tasks, here is a complete list of the major Digitizer options:
SAMPLING—Recording Sounds:
Once you have determined what kind of sound you are going to record, and have made the necessary physical connections to the back panel, access the digitizer by pressing INSTRUMENT. The first option on the major option level will be "RECORD SOUND". Press SELECT to tell the K250 that you wish to sample a sound. You will now be presented with a series of questions and prompts which will lead you through the sampling process. The following is a listing of these prompts in the order that they appear, and with a detailed explanation of how to respond.
Sound Type (1-6)
This option allows the user to select the method the K250 will use for sampling and processing the input signal. There are six modes to choose from:
- 1 QUICK TAKE
- This mode is the fastest recording type as all of its efforts on processing. Recording a signal with QUICK TAKE will take only a few types of K250 recording modes all do the above emphasis/de-emphasis processing, but do a proprietary form of dynamic compression so well, their dynamic compression so will multiply the sample rate by the sample time, and take the result and multiply by 1.5. That will give you the milliseconds will take two and one half MINUTES to process (25,000 x 4 = 100,000 x1.5 = 150,000 milliseconds of 150 seconds or 2 1/2 minutes). Go get a cup of coffee, the wait is worth it!
- 3 SLOW DECAY
- This mode instructs the K250 to remove the manual amplitude envelope of the sound and compress the dynamic range of the signal. On playback, the K250 reconstitutes the envelope with the player amplitudes, and outputs the dynamic range back to its original level. The resulting sound has an improved signal to noise ratio and better overall quality of sound. The SLOW DECAY refers to sounds that have a long decay time such as middle register piano, marimba, and some synthesizer sounds.
- 4 NORMAL DECAY
- This is much like the SLOW DECAY mode but tailored for sounds with a bit shorter decay time such as middle register piano, marimba, and some synthesizer sounds.
- 5 FAST DECAY
- Again, the same kind of processing but for sounds with a faster decay time. Use this one for percussive sounds like piano drum, cowbell, and high piano notes.
- 6 SPEECH
- This mode uses compression but is best suited for sounds that have some silence in them, like speech (with space between words). On playback, quiet portions of the sound are made quieter, to improve the signal to noise response.
2 DE-EMPHASIS This mode instructs the K250 to do the high frequency de-emphasis mentioned above, after the sound has been sampled. The result of this emphasis/de-emphasis is a better quality overall sound. This de-emphasis processing does take some time, once the recorded sound has been accepted.
Use the left and right cursors, or use the numeric keypad to key in the subportion number and press SELECT. When the desired rate is shown in the DISPLAY, press SELECT to confirm your choice. Once you have selected the desired rate, the K250 will prompt for the desired recording time:
Time to record:
Here the K250 will display the total time (in seconds) remaining at the chosen sample rate, and prompt you to enter the amount of time you wish to use for the current sample. You may use the entire remaining time or any portion of it. As a general rule, use a bit more time than you need, as you can always trim any excess off after the sample has been accepted and stored. The remaining time will be replaced in the main memory for additional samples. As stated earlier, it is easier to turn a bit of excess silence from a sample than to replace a clipped decay time because you turn off will be replaced in the main memory for additional samples. As stated earlier, it is easier to turn a bit of excess silence from a sample than to replace a clipped decay time because you turn
processing, so you may notice shorter times available with the compression modes faster the desired length for the sample in seconds (no fractions) and press SELECT.
Sampling rate (1.14)
There are fourteen sample rates to choose from. Remember that the sample rate will determine the highest frequency that may be captured (the corner frequency. Ziharmonic frequency, etc.) and the sample rate. Also important is that the higher the sample rate, the lower the amount of upward transposition ranges, since the K250 must playback the samples at a faster speed to transpose up. At a line is limit to the speed that can be achieved. The following table shows the available sample rates, their subportion number, recording time, corner frequencies, and transposition ranges:
| K250 SAMPLE RATES AND RELATED FACTORS |
| SUBOPTION # | SAMPLE RATE | TIME (sec) | CORNER FREQ (Hz) | RANGE (semitones) |
| 1 | 5000 | 100 | 2000 | 42 |
| 2 | 6250 | 80 | 2500 | 38 |
| 3 | 7500 | 65 | 3000 | 35 |
| 4 | 10000 | 50 | 4000 | 30 |
| 5 | 12500 | 40 | 5000 | 26 |
| 6 | 15000 | 33 | 6000 | 23 |
| 7 | 17500 | 28 | 7000 | 20 |
| 8 | 20000 | 25 | 8000 | 18 |
| 9 | 22500 | 22 | 9000 | 16 |
| 10 | 25000 | 20 | 10000 | 14 |
| 11 | 31250 | 16 | 12500 | 10 |
| 12 | 35714 | 14 | 14282 | 8 |
| 13 | 41667 | 11 | 16667 | 5 |
| 14 | 50000 | 10 | 20000 | 2 |
These sample rates do not offer any of the compression modes, only QUICK TAKE and DELIBERATES are available.
Kurzweil K250 Users Guide
Trigger level (0-6):
This trigger function is like a threshold gate, in that is, recording will not begin until a signal exceeds a chosen dynamic level (expressed in decibels–dB). This feature helps prevent the recording of low level background noise or unwanted silence at the beginning of a sound. There are six choices of trigger levels:
| Suboption number | Trigger level |
| 0 | NO TRIGGER |
| 1 | 12dB |
| 2 | 18dB |
| 3 | 24dB |
| 4 | 30dB |
| 5 | 36dB |
| 6 | 42dB |
Pre-trigger recording?
To avoid loosing any attack transients caused by too large a trigger level, the K250 offers a pre-trigger record buffer. This allows the desirable feature of triggered record start without the usual drawbacks of loss of attack characteristics. This pre-trigger recording is measured in milliseconds and works with all recording modes and sample rates. Available choices are as follows:
| Suboption number | Pre-trigger recording |
| 0 | NONE |
| 1 | 10 msec |
| 2 | 20 msec |
| 3 | 30 msec |
| 4 | 40 msec |
| 5 | 50 msec |
You may cycle through the suboptions with the left and right cursors, or either the suboption number using the keypad and pressing SELECT. Selecting the suboption No. TRIGGER means that recording begins as soon as you press record. Select the trigger level based on the type of input you are using (mic or line) and if using the microphone input, the type of some environment in which you are recording. If you choose a trigger, the K250 will prompt for trigger level:
As before, either cursors or numeric keypad may be used to make the selection. At this point the K250 is set and ready, and will ask:
Check Level (Y/N)?
Choosing NO as a response here will move you directly into record-ready mode and the K250 will prompt "HIT RECORD TO START", A YES response turns the DISPLAY into a peak-hold level meter much like those on popular cassette tape recorders. The following diagram illustrates this display:
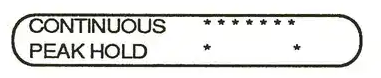
To set the gain control when using the level meters, first make sure the master volume slider is fully set off (right (maximum volume)). If you are using one of the compression modes, slide the gain adjustment external to the K250. While in the meter mode, pressing CHORDS while send the input signal to the K250 output jacks so that the signal may be monitored through the K250.
HIT RECORD TO START
The LED on the RECORD button flashes indicating the record-ready state. Press RECORD when you are ready to begin recording. The LED on the RECORD button will stay on and the K250 will display:
RECORDING... If you have selected a logger, the K250 will wait for the input signal to exceed the trigger level. Otherwise the K250 begins recording immediately. When the selected time has been recorded the K250 will compute the level of the samples and display the result.
CONTINUOUS ......... PEAK HOLD + .........+++

Continue (Y/N)?
Answering NO will bring prompts to retrieve (see below). A YES answer instructs the K250 to process the sound. The K250 will display an approximation of the expected processing time in minutes and seconds. The K250 will be unavailable to perform any other musical functions while processing is underway. You may abort the processing by doing a soft reset (4.5.SELECT).
PROCESSING SOUND...
When processing is complete (or if no processing was selected) the K250 will prompt:
Hi: SELECT to continue
Preview Foot at C4
You may now preview the sound on a special temporary keyboard called the DIG PREVIEW KBD. This keyboard contains a single root of the current sample, located at C4. PRESET to your sample, evaluating its acceptability. Once you have done this, press SELECT. The K250 will now ask:
Use same setup (Y/N)?
A YES here tells the K250 that the previously selected rates, times, and trigger settings should still be in effect. The K250 will then ask the "Check Level (Y/N)?" question and will continue again from this point.
Input sound file name:
If you had answered YES to "save this sound?", the K250 will ask you to name the sound. If you do not wish to name the file, the digitizer will assign it a default name of DIG SIF 1. It is strongly suggested that you choose a descriptive name for your soundfiles, as you will need to recall the sound by name or number in order to edit it, or to create new keyboards. After naming the sound file, the K250 will ask:
Assign to a KBD (Y/N)?
If you want to assign this sound to a digitizer keyboard other than the DIG PREVIEW KBD (numbered upwards from 501), answer YES here. This will bring a set of prompts which will be detailed later under the ASSIGN TO KBD functions (see page KBD SKIP 11). You may assign saved sound files to keyboards at any time by using this ASSIGN TO KBD feature, so there is no real reason to do it right now. If you want to, answer YES and follow the instructions listed under ASSIGN TO KEYS. If not, answer NO and the K250 will return to the main options menu. Now that you have recorded a sound, auditioned the sample using the digitizer preview keyboard, and named and saved the sound file, you have a number of options:
- • You may create or modify digitizer keyboard setups.
- • You may edit and process any stored soundfile.
- • You may create or modify digitizer keyboard setups.
- • You may update your library by naming, saving, or deleting sounds or keyboards.
- • You may off-load your digitizer memory to 14anostic" disks using the Kurzweil MacAttach™.
- • You may leave the SKIP and return to PLAY mode.
MISCELLANEOUS OPTIONS—for reversing the sample.
Let's examine the available options for modifying your samples using the digitizer processing options:
TUNE SOUND—for affecting the pitch and volume characteristics of the sample.
TRIM SOUND—for removing sections of time from the beginning and/or end of the sample.
LOOP SOUND—for creating sustain sections in the sample or for repeating a section of the sample.
SAMPLING - Processing the Sample:
The first step in successfully processing a sample is having a good idea in mind about what you want to do. As stated earlier, understanding the sound you are recording is fundamental to selecting the proper sampling parameters. In processing, understanding the positive and negative attributes of the sample is the key to success. Knowing when to create a sustain section by looping rather than by taking long samples will save memory. Envisioning a complex keyboard setup will help in tuning the dynamics of each sample. Understanding a particular instrument's intonation characteristics will help in tuning the pitch of samples. Try to get as good an initial take as you can, and the job of post-processing will be made easier.
TUNE SOUND?
Selecting TUNE SOUND causes the K250 to prompt for the sound file name to be tuned and the keyboard to which the sound file is attached, to hear the effects of the tuning commands. Once the sound file and the keyboard are selected, the K250 begins the TUNE subroutine, beginning with:
VOLUME adjust (dB):
The volume adjustment, given in decibels is nn. The default is 0. Use the VALUE slider or the keypad and SELECT to enter the desired volume adjustment. Reaction the note to hear each change. The range of adjustment is from -62dB to +42dB. Values of greater than +/-10dB may result in some loss of touch sensitivity. When you have arrived at the desired volume adjustment, press SELECT to confirm the setting and move to the next suboption.
PITCH step size (0-2): 1
There are three choices for tuning the pitch of the soundtrack:
- 0 No PITCH adjust
- 1 cents
- 2 semitones
Enter the desired format for tuning by using the cursors of the numeric keypad and SELECT. No PITCH adjust is just that, and the K250 will proceed to the next suboption. Cents yields a tuning range of -100 to +100 cents (remember that there are 100 cents to a semitone). Semitones gives a range of from -48 semitones (down four octaves) to +12 octaves (up one octave). Choosing semitones would bring the following prompts:
PITCH adjust (semitones): The default here is 0. After tuning in semitones (or if the initial choice had been cents), the K250 will automatically prompt for adjustment in cents.
PITCH adjust (cents): Once the pitch has been adjusted, the K250 will proceed to the next suboption:
DECAY RATE (dB/sec): This suboption only applies to sound files that have loops. If the sound has no loop, or once the decay rate has been selected, the K250 proceeds to:
RELEASE RATE (dB/sec): The release time refers to the time to go from the current volume level to silence once the key has been physically released. The default is 1000 dB/sec. The range is from 1 to 2000 dB/sec. Once the release time is selected, the K250 proceeds to:
Filter tracking (ON): Here the choices are 1 (ON, filter tracking) or 0 (OFF, filter anti-tracking). This refers to the anti-imaging (although it is referred to as an anti-aliasing) filter that tracks at 2/3 the sample rate. If you sample the sound at 25,000 times per second, the filter would be set at 10,000 Hz when the root pitch is played. As the sound is transposed, the filter cut-off frequency is transposed as well (filter tracking). Thus when the sample is played up one octave the filter moves to 20,000, and to 5,000 when the sample is transposed down one octave. This becomes important when you are creating a multi-root instrumental sound. In order to assure the smoothest transitions possible, it may be necessary to set the filter to anti-track in order to more closely match the filter settings of two different roots as you play up or down the keyboard.
For example, suppose you have sampled two piano notes at C4 and C6, both sampled at 25,000 Hz. Playing C5 will have the C4 root transposed up one octave and the filter tracking at 20,000Hz. Playing C#5 will play the C6 root transposed down a major 7th, with the filter tracking at about 5,000Hz. The movement of the cutoff frequency of about 3KHz, making for a smoother transition. Some trial and error is usually necessary, using your ears as the final guide. After the filter setting has been entered, the K250 returns to the major options menu.
TRIM SOUND?
This option allows the user to trim the beginning and/or end of a sound file, useful for trimming away unwanted silence or removing undesirable sections of sound. The display shows the beginning and end of the sound file in seconds and milliseconds. The assignable sliders are used to set the trim points: SLIDER 1 sets the start and SLIDER 2 sets the end. The sliders may be used in two ways:
COARSE MODE: The usual setting, no LED lit. Each tick in the slider's movement is equal to 1/200 the total length of the sound.
FINE MODE: Press the slider select button above the slider. The LED lights up indicating the FINE MODE. In this mode, each tick is equal to 1/10,000 of the length of the sound.
Remember, to hear changes, feedback the note each time a slider is moved. If at any time the start point is moved so that it is equal to or later than the end point, the display will show NO SPAN. You may abort the TRIM process at any time by pressing PLAY X. Once the sound has been trimmed to the desired points, press SOFTKEY. The K250 will ask if you want to replace the existing sound with the trimmed sound. Pressing NO will return to the main menu without no changes made. Answering YES will turn the sound, store the changes, and replace the trimmed sample time back to the main memory for additional recording time.
LOOP SOUND?
Looping is the artificial extending of the length of a sound file without using additional memory space. There are basically two uses for looping a sound: the first is to create an infinite sustain segment for "instrumental-type" sounds. The second is to create repetitive sections in a sound, like a skipping record. The various types of the start and end points of the loop, and the duration of the "crossfade" between these points. Here again, the assignable sliders are used for these operations.
SLIDER 1 is used to set the start point, SLIDER 2 is used to set the end point, and SLIDER 3 is used to set the duration of the crossfade. Again there are several modes for slider operation:
COARSE MODE: the usual setting, no LED lit.
FINE MODE: Press the slider select button above the slider. The LED lights up indicating the FINE MODE.
STEP MODE: This mode allows the user still finer control by instructing the K250 to step from one zero crossing point to the next (from one time step UP to the next), as the computer must search for zero crossing points within the sample. The SFLFLECT LED will go out as this search takes place, and will relight when the point has been found. It is a good idea to avoid large movements of the sliders during the looping process, and to wait for the LED to light before making the next move. Note also that the loop duration is related to sample rate and available memory and the K250 will make the necessary computations each time the start or end points are changed.
Zero Crossings—the key to successful loops:
Analog waveforms are both positive and negative going. At some points, either during a single cycle or between cycles depending on the type or sound, the wave will cross the zero voltage point. The most convenient point to create a subtle loop will be at these zero crossings because the amplitudes (zero) will match. These points are not displayed graphically. The K250 finds them automatically for you. Your job is to select the zero crossings that make the best musical sense for your sample. Your ears are the best tool for this.
The following illustration shows a sample and its zero crossings:
The next graph shows a loop created by repeating the section of the sample between the first two zero crossings:
This next graph shows the same sample, this time with a loop created by repeating the section of the sample between the first and third zero crossing points:
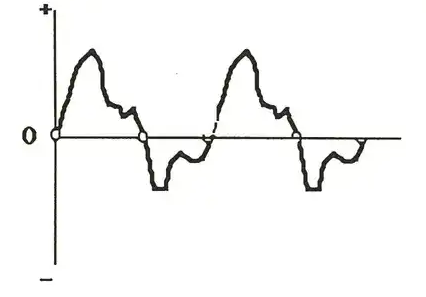
The loop in the first looped example would be slightly more noticeable than the one in the second example, because the transition is more abrupt. There are obviously more possibilities to be explored and each one should be auditioned and evaluated. Once a desirable loop has been found, the menu choice press SELECT to confirm the choice. K250 will ask if you want to replace the existing sound with the looped sound. Pressing NO will return you to the main options menu with no changes made. Answering YES will loop the sound, store the changes, and replace any discarded sample time back to the main memory for additional recording time.
Waveform diagram showing a sample with zero crossings marked at points where the waveform crosses the zero line
Waveform diagram showing a repeating loop created from the section between zero crossings
Waveform diagram showing a loop created from a larger section between first and third zero crossings
MISCELLANEOUS OPTIONS—REVERSE SOUND?
This suboption does exactly what the name implies, it plays the samples in the reverse order than they were recorded. This is useful for special effects. The operation is simple. Simply press SELECT to reverse the sound. A reversed sound may be unreversed by pressing SELECT a second time. Note that looped sounds may not be reversed unless their loops are deleted (see DELETE options).
KBD EDIT OPTIONS:
This group of suboptions are used to create and modify digitizer keyboard setups. Sound files can be placed onto existing keyboards or new keyboards may be created from scratch. Once a sound file is assigned to a root note on the keyboard, playing up or down on the keyboard causes the K250 to transpose the sound file accordingly. If more than one sound file is placed on a given keyboard, the K250 will need to know at which point to "cross over" from one sound file to the next. This is called the split point, and the K250 can select that point automatically by selecting the regions for each root (low and high keys). Alternatively, two soundtracks can be assigned to the same root note, with key velocity determining which sound file is played (multiple hardness keyboards). These are all functions of the keyboard Edit options.
ASSIGN SOUND TO KBD?
This instructs the K250 to place a sound file onto a keyboard. The K250 will ask which sound file to assign. Enter the desired sound file using either the cursors or the numeric keypad and SELECT. Once the K250 knows which sound file you wish to assign, it needs to know which keyboard to assign it to and will ask the following series of questions:
Assign to existing KBD (Y/N)?
Answering NO here means you intend to create a new keyboard from scratch. The K250 will prompt you to enter the name and number for this new keyboard. Remember that keyboards created with the digitizer are numbered from 501 and magnet.
Kurzweil K250 Users Guide
A YES response to "Assign to existing KBD SP?" indicates that you have already created at least one other digitizer keyboard. The K250 will prompt for the keyboard you wish to add to. Use the cursors or keypad to respond. At this point, the K250 allows you to review the selected keyboard to determine where to assign the chosen sound file.
Assign to multi hardness (Y/N)?
If you want to create a dual hardness keyboard, one that allows velocities to control which sound is played, YES is the response here. It is important to make sure that if you answer YES there is already sound file assigned to the root key to which you wish to assign the current sound file. The K250 will then prompt for whether this sound file is to be played on hard or soft strikes. YES chooses HARD, NO selects SOFT.
If you wish to create a single amplitude keyboard, answer NO to "Assign to multi hardness?", and proceed with the sound assignment. The K250 will prompt you to play a key to assign the root note for this sample.
Strike key to assign
Next the K250 will ask if you want it to choose the split points (Automatic split points). A YES response tells the K250 to make the assignment and compute the appropriate split points. A NO response tells the K250 that you want to set the region for this sound file. The K250 will prompt you to play the low and high keys which define the desired region. The K250 will allow you to define the region which exceeds the transposition limits for chosen sample rates. After this assignment is made the K250 returns to the main options menu.
REMOVE SP FROM KBD?
This suboption allows the user to remove a sound file from a keyboard without deleting the sample from memory. If you answer YES here the K250 will ask if you want it to extend the range of adjacent sounds to fill in the gap created by removing the sample.
Extend the range of adjacent sounds (YES)?
The default in this situation is YES. Answering NO will leave silence on the keys in the region previously occupied by the removed sound. This is useful if you plan to assign a new sound file in the old sound's place.
SET KBD CROSSOVER LEVEL?
If you have created a multiple hardness keyboard, this is where you would instruct the K250 at which velocity point to switch sound files. The range is 0-255, where 0 plays only the hard strike sound, and 255 assigns only the soft strike sound. The default value is 253, and the most useful range is above 200. Play the keyboard as you try different values, choosing one that "feels right".
DELETE OPTIONS:
These options deal with "memory housekeeping", and are targeted at removing objects from RAM.
DELETE SOUND?
This suboption removes a sound file from the digitizer RAM. Unlike REMOVE SOUND in the keyboard edit options, this command erases the sample completely. The K250 will ask which sound you wish to delete, and whether you want to extend adjacent roots in ALL keyboards that use this sound file. Once selected, the K250 proceeds to delete the sound file and reshuffle the memory to reallocate space for additional samples.
DELETE KBD?
This suboption removes an entire keyboard from the digitizer keyboard library without affecting the related sound files, which remain in RAM ready for use.
UNLOOP SOUND?
This suboption will remove a loop from a previously looped sound. As several functions can not be performed on looped sounds (trimming, looping, and reversing), this option allows the user to delete the loop, perform the desired function, and then reloop the sound.
INITIALIZE BANK?
This completely erases a bank of digitizer memory. If your unit does not have one of the RAM upgrades, this is the same as erasing the entire digitizer memory. This can be useful after off-loading the digitizer memory to Macintosh or QLST™, to resume sampling with a clean slate. However, this is not something you want to do accidentally! Use this carefully!!! If you do have one of the RAM upgrades, you should select the bank number you wish to initialize, leaving the other banks unaffected. To erase the entire memory you must initialize each bank separately (or power down and restart).
MISCELLANEOUS OPTIONS:
REVERSE SOUND?
This subcption was listed under the section on processing the sample. See page SMP 17.
RENAME OBJECT?
This allows the user to rename existing keyboards and sound files. The K250 first asks whether you want to rename a sound file (SF) or keyboard (KBD). The K250 will then prompt for the chosen object to rename. Enter the existing name or number using the cursors or numeric keypad and press SELECT. The K250 will then prompt to enter the new name. Use the naming technique described earlier in this manual.
SAVING YOUR WORK
Remember that the digitizer RAM is VOLATILE, not battery backed. Therefore, all your hard work will disappear once the power is shut down. The only way to save your work at this time, is via the MacAttach™ or OLS™ programs for the MacIntosh™ computer. Use these programs to off-load your work to 3.5" Macintosh diskettes, to be recalled at a later time. Refer to the Macintosh software utilities chapter for information on these and other software programs, and read the manuals that come with these software packages for detailed information on their use and applications.
SAMPLING—Summary
For reference, here is the complete digitizer menu:
| Opt. | MENU ITEM (NAME) | Subopt | # |
|---|---|---|---|
| 1 | RECORD SOUND | None | PANEL BUTTON, RECORD |
| 2 | DETUNE | None | VOLUME adjust, PITCH step size, PITCH adjust, DECAY rate, RELEASE rate, Filter tracking |
| 3 | SET POINTER LOOP | None | TRIM SOUND |
| 4 | LOOP SOUND | None | KBD EDIT OPTIONS |
| 5 | ASSIGN SOUND TO KBD | None | ASSIGN_TO_KEY/CONTINUE, MODE #/ MIDI |
| 6 | SET KBD CROSSOVER LEVEL EDIT | None | REMOVE SOUND FROM KBD, MODE #/ MIDI |
| 7 | DELETE SOUND | None | ERASE, INSERT, MODE #/ SAVE, LIST |
| 8 | DELETE OPTIONS | None | DELETE KBD, DELETE RED, UNLOCK SOUND, INITIALIZE BANK, REMOVE SOUND FROM KBD CROSSOVER, DELETE, MODE #/ MIDI |
| 10 | DELETE SOUND | 11 | DELETE KBD |
| 12 | UNLOCK SOUND | 13 | MODE #/ SAVE, LIST |
| 14 | REMOVE SOUND FROM KBD CROSSOVER LEVEL | None | MODE #/ MIDI |
| 16 | DUPLICATE SOUND | 17 | READ, SEND |
| 19 | SHOW FREQ SAMPLES | None | SEARCH, UP, VALUE |
| 20 | SHOW ROOTS | 21 | SHOW SOUND FILE INFO |
| 22 | MISCELLANEOUS OPTIONS | None | REVERSE SOUND, REMAKE OBJECT |
| 23 | REVERSE SOUND | 24 | REMAKE OBJECT |
SAMPLING - Summary:
Some Useful Hints:
- 1) Do as much analysis of the sound as possible. BEFORE actually doing the sample.
- 2) Use your ears in determining harmonic content for selecting sample rates. Remember that the A above middle C (A4) has 440Hz as its fundamental frequency. Its 32nd harmonic will be 32 times the fundamental = 14,080Hz. This is a fairly high harmonic, so sampling at a rate of 7 1/2 times 14,080Hz, or 35,200 times per second, should result in very high fidelity and a slightly lower rate may even suffice for most situations. Use this example as a reference point. Do some trial and error using your ears as the final guide.
- 3) Do a series of samples as a test/learning experience. Use the same sample rate for each sample and use the same setup for each. Vary only the recording type. Assign all the samples to adjacent keys on a single digitizer keyboard. You can then addition each sample type in direct comparison to the others. This will be an invaluable learning experience for deciding which recording type to use for a given sound.
- 4) Do the experiment in number 3 above, except this time keep the recording type constant, varying only the sample rate. Listen to the effect of raising and lowering the sample rate on the resultant fidelity or the sample. You will probably be surprised at how good the fidelity can be at relatively low sample rates.
- 5) Plan ahead of time for memory management when doing multisampled keyboards.
- 6) For library purposes, it is helpful to record the sound with a digital recorder before sampling with the K250. A Sony PCM VCR, or a suitable machine for this task. This will allow combining samples in varying ways before adding to keyboards in the K250.
- 7) External processing devices, such as parametric equalizers, steep slope filters, reverberators, delays, etc., are useful for processing the live or recorded sound prior to sampling with the K250.
- 8) It is helpful to keep a log of sample setups when you are just learning to sample sounds, as a reference point for future sampling.
- 9) Avoid using soft resets (4,5,SELECT) while having unsampled samples in RAM. Chances are good that nothing bad will happen, but for safety sake use PLAY as an abort method. 10) Have fun sampling!
MIDI
PART II: Applications
| Topic | Page |
|---|---|
| Software | MIDI 1 |
| Binary, Decimal, and Hexadecimals | MIDI 2 |
| Language Structure | MIDI 5 |
| Message Types | MIDI 7 |
| CHANNEL Messages | MIDI 7 |
| SYSTEM Messages | MIDI 9 |
| Hardware | MIDI 10 |
| Configurations | MIDI 12 |
| The MIDI Editor | MIDI 14 |
| Typical System Setups | MIDI 18 |
MIDI
Background:
The Musical Instrument Digital Interface is a standard protocol of hardware and software connections between various electronic music devices. The hardware section consists of physical connectors with five pin DIN plugs and jacks. The software part is basically a communications language which converts musical actions into binary code to which computers can respond. This language is transmitted in a serial fashion over a single line at a very high rate of speed, allowing most musical actions to be communicated in real time. This standard allows users to customize their electronic music set-up to their own individual needs and desires, providing that all devices are complete in their implementation of the MIDI protocol. The K250 has a very complete and extremely flexible MIDI implementation, allowing it to interface successfully with most currently available equipment, and in many cases make up for deficiencies in other instruments' implementations.
The Software:
Basically, MIDI is a language for communication between electronic music instruments. As with all languages, MIDI translates actions into words. These words can be sent in real time (analog: speak) or stored for later retrieval (analog: writing). Those words are made up of letters (actually numbers) and can be strung together with other words to make commands (analog: sentences). The more of this language that you understand, the more success you will have in using a complex instrument like the K250 with other MIDI devices.
If our musical instruments are going to communicate effectively, they must share the same definitions of language. They must have the same alphabet, the same words and definitions, and share the same concepts of syntax. This is precisely what MIDI is all about. All MIDI instruments must use the same alphabet, and that alphabet is limited to the characters that computers can process—zeros and ones, translated as off and on messages. Because there are only two digits in this alphabet, it is called Binary Code. These zeros and ones (bits) are then organized into groups (bytes). bytes are further grouped into complete sentences (commands). MIDI is a serial communications language just like English. In a serial language, the words are sent out one at a time, as opposed to all at the same time on many lines (parallel communications). This occurs at a very fast rate (31,250 bytes/second), called the Baud rate. The words are then received one at a time and interpreted by the receiver as a coherent message.

BINARY, DECIMAL, AND HEXADECIMALS
Before we look at the structure of the MIDI language, let us examine the binary system of counting in greater detail. Read this number aloud:
193
Most likely you said "one hundred ninety three". How did you know that? Probably at some point in your life you learned to identify numbers such as these by using a ones column, tens column, hundreds column, and so forth. This example then has a one in the hundreds column, nine in the tens column, and three in the ones column.
100+ 90+ 3= 193
You do this so fast that you probably don't realize the process you are going through. As this counting is based on digits from 0-9 in each column, and each column represents a power of ten, it is known as the decimal system. Binary counting is done much the same way, except there are just two digits, 0 and 1.
The number 193 can be expressed in binary as well. It looks like this:
11000001
(This is a rather lengthy way to express it. 8 digits as opposed to 3. But computers can deal with these digits quite quickly.)
Each column (digit) in binary is referred to as a bit. Eight bits (a word) make up a byte. Half a byte (4 bits) is often called a nibble. Bytes are strung together into commands or sentences. The way bytes are ordered is the syntax which accounts for the meaning of the command.

Binary digit place value diagram showing bit positions
A simple way to think of binary in relation to decimal counting is to think of each column (bit) as a power of 2 instead of 10:
Binary position diagram showing bit positions 128, 64, 32, 16, 8, 4, 2, 1 with corresponding binary values 0 0 0 0 1 0 0 0
The number 00111000 would then translate as follows:
- • a one in the 32 column = 32+
- • a one in the 16 column = 16+
- • a one in the 8 column = 8+
- • a one in the 4 column = 4
- ___
- 60
Zeros are used here as "place holders" or "blank values. Try translating a few numbers from binary to decimal and vice-versa.
As a review, lets count from 0 to 16 in binary:
| BINARY DECIMAL |
| 0000 0000 0 |
| 1000 0000 1 |
| 0100 0000 2 |
| 1100 0000 3 |
| 0010 0000 4 |
| 1010 0000 5 |
| 0110 0000 6 |
| 1110 0000 7 |
| 0001 0000 8 |
| 1001 0000 9 |
| 0101 0000 10 |
| 1101 0000 11 |
| 0011 0000 12 |
| 1011 0000 13 |
| 0111 0000 14 |
| 1111 0000 15 |
| 0000 0001 16 |
Notice that one nibble of an eight bit byte can give sixteen values (0-15). To simplify counting those long streams of binary commands, it may be desirable for us to translate them into a shorter format. Since we can see that each nibble can represent sixteen values, we can simplify the eight digit representation of each byte into a shorter format. Since we can see that each nibble of eight digits into just two digits, each digit representing one nibble. This is a system of base sixteen or HEXADECIMAL (HEX=10 + DEC/10 = 16). However, if we try to express sixteen values in one digit, numbers alone will not suffice. since zero to nine gives us only ten numbers, we will need to represent sixteen numbers. To remedy this in order to maintain a single digit, The letters A-F are then used to represent the numbers 10-15.
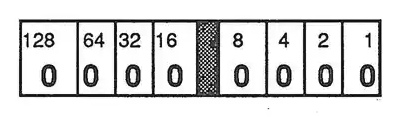
MIDI
When you understand these three systems of counting proceed to the next section, where we will explore the structure of the MIDI language.
HEXADECIMAL
$C1 or CH
DECIMAL BINARY HEXADECIMAL
193 11000001
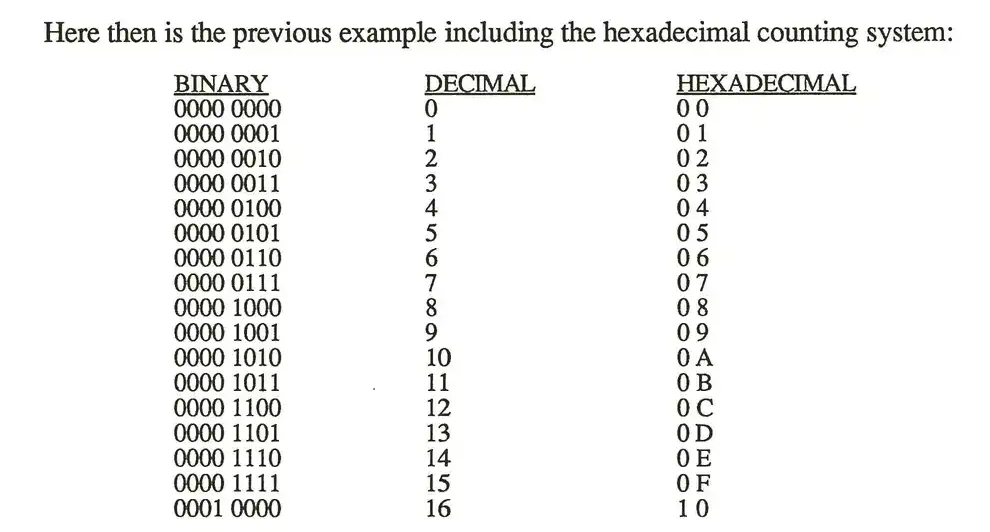
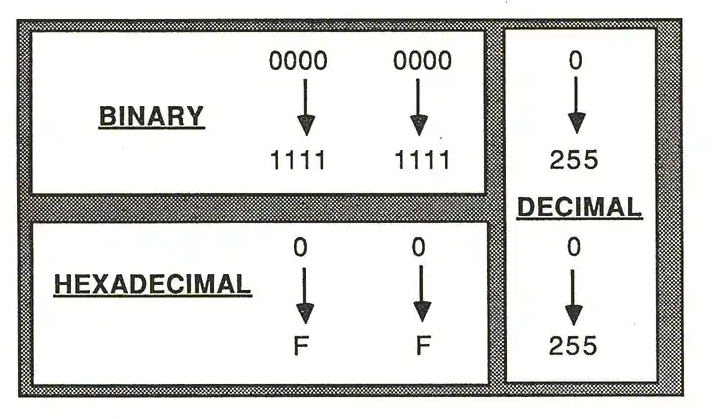
understand binary, hexadecimal, and decimal conversions.
Effectively set up a music synthesis system are given in hexadecimal, so it is important to understand these three systems of counting proceed to the next section, where we will explore the structure of the MIDI language.
MIDI Language Structure: COMMANDS
Much as English words are divided into nouns, verbs, and the like, MIDI words (bytes) can be classified into groups called status bytes and data bytes. A status byte indicates action and data bytes describe that action. Let us say for example that we are trying to communicate the fact that we played middle "C" on the keyboard at a mezzotone dynamic level. The MIDI translation would be as follows:
1001 1001 0011 1100 0000 1001
You can see that this musical action was described in a three word sentence. The first word 10010001 ($90) is a status byte that indicates the action "Note on". The following two words are data bytes that further describe the note on action. The second word, 00111100 ($3C) translates into the number of the key that was depressed. The range of possibilities is 0-127, where middle "C" is key number 60. If you translate 00111100 into decimal you will see that it in fact is the number 60, middle "C". The final word, 01000110 ($46), refers to the velocity which the key was depressed which most synthesizers translate into dynamics. The range here again is 0-127, 01000000 translates into a decimal value of 64 or about mid way between the extreme ranges, hence the relative dynamic level of mf.
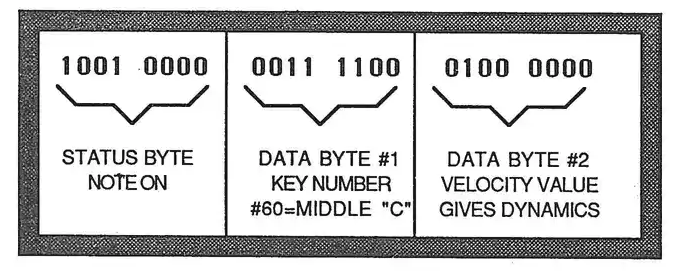
This sentence only describes the note-on action, it doesn't specify the duration or the end of the note. This is expressed as another sentence, a "note-off" command. Simply the clock time (real-time) between the note-on and note-off events.
0000 1001 0011 1100 0000 0000
A note-off command can be expressed in either of two ways. The first is simply a note-on command with a velocity of zero (no volume).
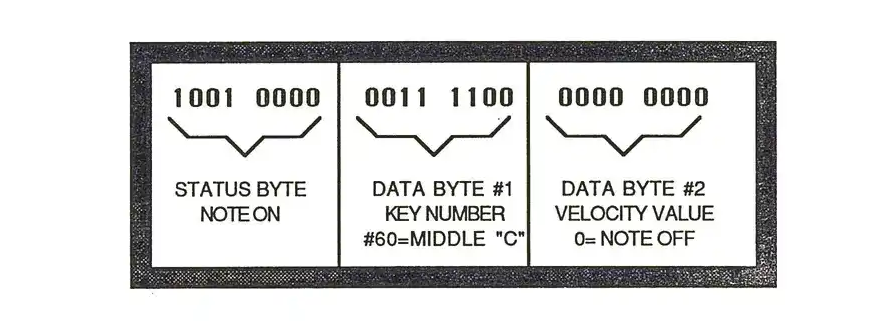
The second is the one the K250 uses, and is a special note-off command with its own velocity value. This allows the K250 keyboard which sends both attack and release velocities to send separate commands, so that synthesizers so equipped could interpret the note-off command with some special effect. Possible musical uses for this might be having notes with slow release velocities to have longer release time than notes with faster velocity values. Completely new performance techniques may need to be developed in order to take advantage of these new possibilities! But the capability is there for those musicians willing to experiment.
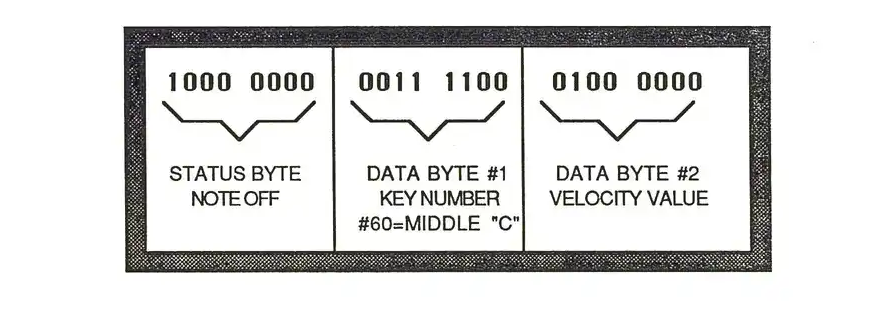
Notice that both status bytes for note-on and note-off start with ones while all the data bytes begin with zeros. This is a MIDI language standard which helps the computer distinguish between actions and descriptions (status and data bytes).
MIDI MESSAGE TYPES
Each musical action has its own status byte and predetermined number of data bytes, according to the syntax of the MIDI language. So far we have seen the simplest of MIDI commands, those that turn notes on and off. MIDI commands may be broken down into two major groups: Channel Messages and System Messages.
CHANNEL MESSAGES
Channel messages are those meant for specific instruments in a musical system. For example, a polyphonic multi-timbral composition might have the following orchestration:
- • synthesizer number one playing the bass line with a certain timbre.
- • synthesizer number two playing a melody line with a different timbre.
- • synthesizer number three playing a chordal accompaniment with still another timbre.
Since MIDI, like English, is a serial communications language, all this information is travelling out one word after another, on a single line. In order to send all these synthesizers their individual parts and maintain their independence, they must have some kind of special encoding that says, "This note-on command is for synthesizer number one only." Each synthesizer must be able to discern which notes to perform. This is accomplished with channel encryption.
The MIDI language supports sixteen separate channels, much like television channels. When you watch television, all the possible channels are simultaneously available to you through your antenna or cable connection. Your television, however, can receive only one channel at a time. You simply choose which channel to watch and set your receiver accordingly. You may then watch just that one program until you decide to change channels. The same is generally true with MIDI. The receiver is set to "listen" to one of the sixteen possible channels and "tune out" the rest. This channel assignment is located in the status byte. The Note-on in the status byte has a value on in which channel to turn on and in which channel to turn it on. The last four bits (second nibble) of the status byte is the channel number. So 1001 0000 is a note-on in channel one. 1001 0110 would be a note-on in channel seven. To convert the MIDI channel number from binary to decimal, the equation is:
Channel = n+1.
CHANNEL VOICE MESSAGES
These messages are encoded with a channel number and pertain to performance data. These include the Note-on and Off commands discussed above as well as the following channel voice status bytes.
Real time controller change:
These break down into two categories: specific and general controllers.
Specific controllers:
Pitch bend (Status 1110 nnnn) Channel pressure (Status 1101 nnnn) Polyphonic pressure (Status 1010 nnnn)
General controllers: (Status 1011 nnnn) Any of a possible 122 unspecified controllers (0-121) which may include: wheels, sliders, buttons, pedals, footswitches, breath controllers and so forth. These are simply assigned to a controller number, and then output value changes. For continuous controllers such as wheels and pedals, these values may range from 0-127. For switches the values are generally 127 for ON, and 0 for OFF. As an example, a Yamaha DX7 sends its breath controller as controller #3, (1011 nnnn 0000 0011 dddd dddd) where the status byte (1011nnnn) indicates a controller change in channel n, the first data byte identifies the controller as breath control, and the final byte is the value (v) of the controller change.
Program change: (Status 1100 nnnn)
This command tells an instrument to change its internal program setting to another stored program number. On a synthesizer this may be the patch number (a K250 keyboard set-up or LIST member), or on a drum machine it may be a pattern number. There are 128 (0-127) possible program numbers.
CHANNEL MODE MESSAGES
These messages affect how a synthesizer will interpret the above channel voice messages. OMNI ON POLY— Often called OMNI mode, this tells a device to listen to all channels, and assign notes to voices according to a monophonic keyboard algorithm. OMNI OFF POLY— Often called POLY mode, this tells a device to listen to only a single MIDI channel (usually set on the front panel of the device), and assign notes to voices according to its internal polyphonic keyboard algorithm. OMNI ON MONO— Often called MONO mode, this tells a device to listen to all channels, and assign each note monophonically to voice channels by MIDI channel. Generally, this is done to allow for multi-timbral performance from a single device.
SYSTEM MESSAGES
These are messages intended for all devices in a MIDI system and are therefore not encrypted with a channel number. These messages are divided into three groups: Common, Real-time, and Exclusive.
SYSTEM COMMON
Song Position Pointer—(Status 1111 0010) These messages are for "auto-location" functions. For instance a command to a sequencer and drum machine to go to measure 43.
Song Select—(Status 1111 0011) This message selects song number 1-128, much as a program change did under Channel messages above.
Tuning Commands—(Status 1111 0110) This message tells equipment with an internal tuning function to execute the tuning routine.
End of System Exclusive command—(Status 1111 0111) Tells a device to resume listening after an exclusive command has been sent.
SYSTEM REAL TIME
Timing signals—(Status 1111 1000) For synchronizing devices in real-time.
Start/stop/continue commands—(Status 1111 1010, 1111 1011, 1111 1100) These tell sequencers and drum machines to echo play, continue and stop commands.
Active sensing—(Status 1111 1110) Once an active sensing message is received, a device will "expect" further messages at sooner than 300 ms intervals. If a period of 300 ms passes with no message, the receiver will turn off all voices and return to normal operation. This is useful in situations where a performer would need assurance that notes would not be "stuck-on" if for any reason a MIDI connection became undone.
System reset—(Status 1111 1111) Initializes all equipment to a power-on state.
SYSTEM EXCLUSIVE
Bulk Dump, Patch data, etc.—(Status 1111 0000) This area of the language is left unspecified for individual manufacturers to use for data unique to their instruments. A data byte is used to identify the manufacturer, followed by any number of bytes for any purpose as long as they all have a zero as their first bit. At the end of the data, an End of System Exclusive status byte is sent to tell other units to resume listening (see above).
The Hardware:
As mentioned above, the hardware consists of equipment with five pin DIN jacks (females) and cables with five pin DIN plugs (males) at both ends. Most well equipped units will have a MIDI IN, a MIDI OUT, and a MIDI THRU jack, usually located on the back panel of the instrument. This is how the K250 is configured. To fully understand these MIDI jacks' functions, we shall look at a simplified diagram of a synthesizer's internal workings.
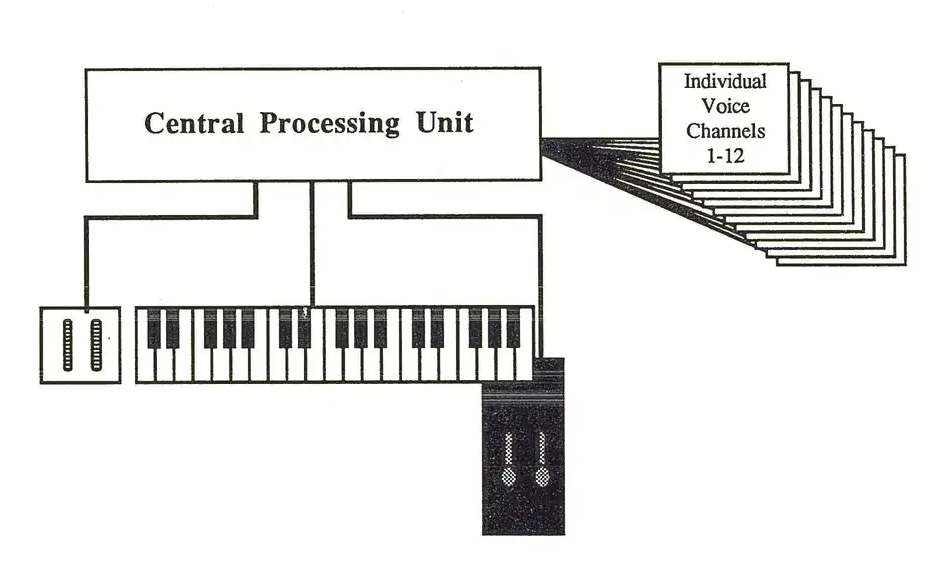
This diagram shows that the keyboard and controllers (levers, wheels, pedals, etc.) are connected to the CPU (Central Processing Unit) which is in turn connected to the individual synthesizer voice channels. Information from the keyboard and controllers is received by the CPU, which sends that information to the appropriate voice channel according to an internal keyboard algorithm. The twelve channels in the K250 are sent voice information (note on/off, pitch bend, sustain pedal on/off, etc.) by the CPU according to the settings in F10 of the PLAY editor (see pages 31-33) and settings in the MIDI editor.
The following diagram shows the addition of MIDI into the keyboard/controller/CPU/voice architecture. From this picture you can see that any information arriving from an external source via the MIDI IN jack is processed by the CPU just as if it came from the instrument's own keyboard or controllers. Information arriving at the MIDI IN jack is also passed unaffected out the MIDI THRU jack, allowing a "Daisy Chain" type of equipment configuration. Information generated by the instrument's keyboard, controllers, or panel controls is sent out the MIDI OUT jack at the same time it is sent to the CPU. This information may be processed by an external instrument's CPU when it arrives at that instrument's MIDI IN jack.
It is very important to understand which signals are present at each of the three MIDI ports in order to effectively configure and control your own MIDI set-up.
There are basically three ways to configure hardware in a MIDI system: "Daisy chain", Star network, and Matrix switching. The daisy chain system requires that all devices have all three types of ports (many units do not have the THRU port). It is the least costly, but has the greatest potential for error. The following is a simple example of a daisy chain configuration.
MIDI Architecture Block Diagram
A SIMPLE DAISY CHAIN CONFIGURATION:

In the above example, assuming all devices are in OMNI mode, information from device number 1 would be performed on device numbers 2, 3, and 4. Information from device number 4 would be performed by device numbers 4 and 1, and information from devices 2 and 3 would be performed by those instruments alone. The potential problems in a daisy chain configuration are:
- 1) Time delays caused by passing information from MIDI IN to MIDI THRU jacks. This is often three milliseconds or more per device, causing a compounding delay from device to device. Delays become noticeable at approximately ten milliseconds.
- 2) MIDI data errors caused by buffer overflows as each device scans the incoming information before acting upon it.
- 3) Data corruption in the circuitry during the transfer from MIDI IN to MIDI THRU.
These possible problems are avoided to some extent in the Star network configuration. This system involves the use of an external adapter called a MIDI THRU box, available from several manufacturers. The following diagram shows a simple star network configuration:
In this type of setup device number 1 is the master, and all others are slaves. Device number 1 sends data from its MIDI OUT jack to the input of the MIDI THRU box. This device creates four copies of the data and sends these copies out the four MIDI THRU jacks simultaneously. In this way, devices 2, 3, 4, and 5 all receive the data at the same time. The only time delay possible here is between the master and the MIDI THRU box, and should be negligible. The only drawbacks to this type of configuration is the extra cost and the inflexibility in master/slave relationships.
MIDI daisy chain configuration diagram showing 4 devices connected in series with MIDI IN, MIDI OUT, and MIDI THRU connections
Star network configuration diagram showing MIDI THRU BOX as central hub with 5 devices connected via MIDI IN/OUT/THRU connections
The third type of hardware configuration is the Matrix switching system. This system is the most flexible, most error-proof, and of course, most costly. This configuration involves the use of a matrix switch box, available from a number of manufacturers, and allows all devices to be either master or slave with no need for recabling. In addition, these matrix switchers are now available with microprocessor control so that the configurations may be stored in memory and changed by sequencer, pedal, or master controller. The following diagram shows a simple matrix switch configuration:
An internal connection is made from the input buses to the output buses to allow devices to communicate. Very complex configurations are possible and may be switched at the touch of a button, or by "patch change" command.
The K250 and MIDI—specifics
The K250 powers up with MIDI enabled and with a set of factory defaults which may be altered through the MIDI editor. Any user alteration of these defaults is stored in battery backed memory until a hard reset is performed. The defaults are:
OMNI MODE BASIC CHANNEL = 1 SEND AND RECEIVE DATA: Note on (with velocity) Note off (with velocity) PEDALS SLIDERS LEVERS PANEL BUTTONS MASTER TUNE PROGRAM CHANGE K250 SEQUENCER DATA MIDI SYNC
MIDI may be toggled on and off by pressing the MIDI button (labeled MODE 1 on older models). A LED will light when MIDI is on and the K250 will prompt MIDI TURNED ON (OFF) in the DISPLAY. Note that enabling SYNC (MODE 2) will also disable MIDI.
The MIDI editor
The MIDI editor allows the user to customize the way in which the K250 communicates with other digitally-based instruments such as synthesizers, computers, drum machines, and sequencers. As the protocol is still young, many instruments have varying degrees of MIDI compatibility. The K250's MIDI editor allows such flexibility that the K250 can be matched to virtually any other MIDI device. This makes the K250 an ideal controller and the K250 EXPANDER an ideal slave synthesizer for just about any musical situation. Access the MIDI editor by pressing EDIT then MIDI (MODE 1). Use either the Menu method or Direct Access method to select parameters to edit and enter values. There is no Panel Page approach to the MIDI editor.
There are five major options, two of which have substantial suboptions. The complete menu and detailed explanation follows.
1 RECEIVE OPTIONS—These options affect the way incoming messages are interpreted by the K250.
6 RECEIVE MODE
The K250 implements the OMNI and POLY MIDI modes. In addition the K250 has two more unique modes, CYCLE and MULTI, that increase its musical flexibility.
OMNI ON 1 The standard OMNI mode described on page MIDI 8. OMNI OFF 2 The standard POLY mode described on page MIDI 8. MULTI 3 A mode unique to the K250, this option allows the user to assign separate keyboard set-ups to individual MIDIchannels. The difference between this and MIDI MONO mode is that in MULTI mode each channel has access to all unused K250 voice channels rather than to only one voice per MIDI channel.
7 RECEIVE CONTROLS
This option allows the user to assign MIDI control numbers (0-121) to the K250's assignable controllers. The factory default numbers are:
SLIDER 1 2 SLIDER 2 3 SLIDER 3 4 LEFT LEVER 1 RIGHT LEVER 66 (BENDER) LEFT PEDAL 65 RIGHT PEDAL 64 EXT. PEDAL 1 7 EXT. PEDAL 2 8 PANEL BUTTONS NO ASSIGNMENT 0 MASTER TUNE NO ASSIGNMENT 0
To change which control number an assignable controller will listen to, use the cursors to cycle through the various controllers until the desired controller is shown in the DISPLAY and press SELECT. Enter the new control number with the keypad, then press SELECT. Only one physical controller may be assigned to a given control number at a given time.
8 RECEIVE PROGRAM CHANGES
This option allows the user to map received program change numbers in one of three ways:
1 SETUP NUMBERS
This is a direct map of program change numbers to internal K250 set-up numbers. A program change number one calls keyboard set-up number one—KURZWEIL GRAND PIANO.
2 LIST ENTRIES
This maps program change numbers to LIST member numbers. This is useful because the K250 can have many more set-ups than the available 128 MIDI program change numbers. See page 24 for details on creating a customized LIST.
0 OFF
This tells the K250 to ignore any program change messages.
9 RECEIVE LOCAL CONTROL OFF
Local control off tells a device to ignore its internal keyboard and controllers. This is useful for turning the K250 into a master controller for external synthesizers, while allowing the internal voice channels to sound in response to either an external or the internal sequencer. This has no useful effect with the K250 Expander (which has no local controls). The options here are:
1 ON (Local control off) 0 OFF ( Local control on)
10 RECEIVE CHANNELS
This option allows the user to assign individual keyboard set-ups to individual MIDI channels when in the MIDI MULTI mode. Pressing SELECT here brings a number of prompts:
KEYBOARD SETUP NUMBER/STEP? Enter the desired keyboard number followed by two SELECTS.
2 TRANSMIT OPTIONS
These options affect the way the K250 will transmit MIDI messages.
11 TRANSMIT MODE
The K250 can transmit messages in one of two modes:
NORMAL MODE This is the usual mode for MIDI data transmission CYCLE MODE This is a mode unique to the K250 and allows additional K250's to be slaved in a manner that turns the system into a 24, 36, 48 or even more voiced K250. This is accomplished by sending successive notes out on different MIDI channels, controlled by option 12, NUMBER OF SLAVES. Another use is connecting a number of different synthesizers together to have notes cycle around the system, each with a different timbre.
12 NUMBER OF SLAVES
Useful only in CYCLE mode above, this option allows the user to select the number of channels to cycle through before returning to the original channel.
13 TRANSMIT CONTROLS
This option is similar to option 7 RECEIVE CONTROLS, but on the sending side. The factory defaults are the same as for the receive side above. Changes are made in the same manner as with the receive options above.
14 TRANSMIT PROGRAM CHANGES
This is again the same as option 8 on the receive side. Suboptions here are:
- 1 SETUP NUMBERS
- 2 LIST ENTRIES
- 0 OFF
3 BASIC CHANNEL
This is generally the channel on which the K250 will transmit and receive data. Exceptions to this are:
MULTI MODE: The K250 is set to play different keyboard set-ups on different MIDI channels. CYCLE MODE: The K250 sends each note on a different MIDI channel. K250 SEQUENCER: Each track may be assigned a specific MIDI play channel.
To set the basic channel, press SELECT, enter the desired channel number with the keypad or VALUE SLIDER and press SELECT.
4 REVERSE VELOCITY
This option tells the K250 to send lower velocity values for hard strikes than for soft strikes, the reverse of the usual process. This might be useful for achieving MIDI crossfades, or in simulating dual hardness keyboards with an external synthesizer. Note that many commercially available instruments do not respond to velocity messages, so what you do on the K250 will have no effect on the slave synthesizer. As always, check the MIDI implementation guide for all instruments in your system.
5 FACTORY DEFAULTS
This option allows the user to quickly reset all MIDI functions to the original default settings (see above). Pressing SELECT here will bring the prompt:
RESET TO FACTORY?
Press YES to reset, press NO to retain your settings in memory.
All user settings within the MIDI editor may be off-loaded to Macintosh™ disk via the MacAttach™ or QLS™ software packages.
MIDI SUMMARY
From reviewing this section you should have a good idea of what MIDI is and what it can mean for your K250 music system. The appendix has a complete MIDI implementation chart for the K250. Use it to complete your understanding of the materials presented here. The following pages give some examples of typical K250 MIDI system configurations.
Typical set-ups:
BASIC K250/ K250 EXPANDER SYSTEM
TO CREATE A 24 VOICE K250:
- 1) Set the K250 to transmit in CYCLE mode.
- 2) Set number of slaves to one.
- 3) Set the basic channel of the K250 to n.
- 4) Set the basic channel of the K250 EXPANDER to n+1.
- 5) Set BOTH instruments to OMNI OFF.
- 6) Set the K250 to transmit program changes as SETUP NUMBERS.
- 7) Set the K250 EXPANDER to receive program changes as SETUP NUMBERS.
- 8) Set both instruments to the same control numbers for all assignable controllers.
(This configuration will also work with two K250s.)
BASIC MIDIBOARD/ K250 EXPANDER SYSTEM

EXPANDER SETTINGS: 1) OMNI OFF 2) BASIC CHANNEL = n 3) Factory defaults for controllers 4) Receive program changes as LIST entries
MIDIBOARD INSTRUMENT SETTINGS: 1) MIDI CHANNEL=n 2) Program=x 3) Transpose = 0 4) No. channels= no effect 5) MONO/POLY = 1 6) OMNI= 0 7) LOWER KBD= 1 8) MID KBD= 1 9) UPPER KBD = 1 10) VELOCITY = 1 11) POLY PRESS = 0 12) CHAN PRESS = 0 13) LEFT WHEEL MODE = 0 14) LEFT DEST = 2 15) RIGHT WHEEL MODE = 0 16) RIGHT DEST= 33
SEE APPENDIX FOR ASSIGNABLE CONTROLLERS AND PANEL BUTTON NUMBERS FOR USE IN PARAMETERS 17-42
MIDIBOARD/TWO EXPANDER SYSTEM
TO CREATE A 24 VOICE K250 EXPANDER SYSTEM:
- 1) Set both EXPANDERS to OMNI OFF.
- 2) Set EXPANDER #1 to MIDI channel n.
- 3) Set EXPANDER #2 to MIDI channel n+1.
- 4) Set both EXPANDERs to receive program changes as SETUP NUMBERS.
- 5) Set both instruments to the same control numbers for all assignable controllers.
- 6) Set MIDIBOARD parameter 1 to n.
- 7) Set MIDIBOARD parameter 4 to 2.
- 8) Set MIDIBOARD parameter 5 to 0.
- 9) Set all remaining MIDIBOARD parameters as instructed above.
USING THE K250 WITH A DEDICATED SEQUENCER
- 1) Set the K250 to MULTI mode
- 2) Set each channel to play the desired keyboard set-up.
- 3) Determine if your sequencer has a 'channelizing' feature.
- If so, leave your K250 set to Basic channel 1 and set the MIDI channels at the sequencer.
- If not, set the Basic channel number for each track to match the desired record channel.
ADVANCED K250 MIDI SYSTEM
A system involving as many diverse units as this must be configured by the user according to individual needs. Hopefully, the above examples and this MIDI chapter will give you the neccessary tools to successfully handle any desired MIDI system configuration. Consult the MIDI implementation guides for all your instruments. The implementation guide for the K250 is in the appendix. If you do not have the implementation guides for your instruments, contact the International MIDI Association. They provide these documents for their members. For membership information, write to:
The International MIDI Association 11857 Hartsook St. North Hollywood, CA 91607 (818) 505-8964
PART II: Applications
| Topic | Page |
|---|---|
| The Sequencer | SEQ |
| Background | SEQ 1 |
| Short tutorial | SEQ 3 |
| Recording | SEQ 4 |
| Playback | SEQ 5 |
| Overdubbing | SEQ 5 |
| Naming and Saving sequences | SEQ 6 |
| Editing | SEQ 7 |
| Global parameters | SEQ 11 |
| Annotated menu | SEQ 14 |
| Musical applications | SEQ 16 |
| Special PLAY MODE features | SEQ 22 |
The SEQUENCER - An Overview:
Sequencer - Background:
Basically, a sequencer is a device which records events in the order in which they occur, and stores them for future playback as a sequence of events. Although in many ways a sequencer appears to act much like a multi-track tape machine, it differs in a most substantial manner. A multi-track tape machine records audio signals (sounds), while a sequencer records musical actions (events). Because it is actions and not sounds that are recorded, a sequence can be altered in ways that a tape recording may not, and with far greater ease.
The K250 sequencer is a very powerful integrated composition/performance tool. With the sequencer, the user can capture a K250 performance, edit the performance down to the individual note level, add to it by overdubbing up to a total of twelve tracks, change orchestration of an entire track or just a portion of the track, change timings, rhythms, tempos, dynamics, or transpositions of tracks, control external synthesizers with MIDI, and synchronize the total performance with external devices through MIDI Clock or Sync Pulse Clock timing codes. All this power is wonderful, but does take some time to learn to master. The sequencer is so feature packed that you may never use all of the utilities of the K250 Sequence Editor, but it is nice to have them just the same. All are covered in the original Kurzweil 250 Player's Manual owners manual and related updates. This chapter will briefly explain all of the sequencer's options, but will concentrate on how to perform the most often needed musical actions.
Sequencer Theory:
Incoming signals from the K250's keyboard and controllers, or signals originating from an external MIDI source, are received by the CPU (see the diagram on page MIDI 11) and assigned to the individual voice channels. They may also be recorded into the sequencer memory as musical events for future playback. In order to assure their correct placement in time, these events are recorded against an internal clock which ticks at a rate of 255 times the setting of the tempo (in beats per minute). This allows a timing resolution of smaller than 256th note triplets, a very fine resolution which simulates accurate real-time performance variations. Once the events are captured in the sequence memory, the Sequence Editor may be employed to alter many attributes of the sequencer events.
Sequence RAM- unlike other K250 memory areas:
The sequence memory may be divided into as many as 40 different sequences, each further divided into as many as twelve tracks, as long as the total number of notes does not exceed 12,018. A track in the K250 sequencer is very much like a track on a tape recorder. It is a physical division of the available space. A track on a tape recorder is 1/x of the width of the tape, where x = the total number of tracks the machine has. The length of a piece of music is a variable of how much blank tape is left on the reel of tape, and the speed at which the tape is traveling. A track in the sequencer is not 1/12th of the available sequence memory space, but rather 1/12th the number of independent parts a given sequence may contain. The length of a sequence is a variable of the available space (number of notes) left in the sequencer's RAM.
Unlike other sections of the K250, there is no sequence ROM, so all sequence operations are performed in a special RAM buffer. The sequence being recorded or played at any given time is known as the "current sequence" or Sequence 0, and is moved into the buffer. When a sequence is saved into the Sequence Library (non-volatile RAM) it is actually moved into a specific location in that RAM. When it is later called for playback it is once again moved into the sequence buffer and becomes the "current sequence". This is unlike the Keyboard or Instrument editors, which made a copy of the data for editing in the buffer, keeping the stored data in RAM or ROM. Here the data is actually moved from RAM location to buffer and back again each time a sequence is called or saved. This is a very important difference in operations. Understanding this difference will help in performing various operations of the Sequence editor such as loading of sequences and tracks for editing, and in naming and saving of tracks and sequences. As all operations are done to the actual data, and not to a copy, the Sequence editor is quite a bit more volatile than other K250 editors. Any mistakes you make are not easily undone by simply recalling the unedited version from RAM or ROM. For this reason, if you use either the MasAtak™ or OLS™ software packages, you should save sequences to disk every time you have something you like, so as to ensure they will not be lost by careless editing. Retrieving a saved sequence from disk is fast and simple, and can provide the same stability as recalling an unedited version from RAM as mentioned above. For details on saving and loading sequences, as well as editing and reordering sequences within sequence groups, see the chapter on Software Utilities.
Sequence events- What is stored:
As mentioned earlier, the sequencer stores events not sounds. An event is a musical action performed by the user, and acted upon or (stored) by the computer inside the K250. These actions are:
- 1. Note events - These include Note On and Off events (key depressions and releases) and their specifics, attack and release velocities (translated by the K250 as dynamics).
- 2. Controller events - These include most real-time controllers such as control lever movements, K250 slider movements, foot switch actions, pedal movements, button depressions, etc. The specifics of these controller actions, such as the amount of controller change are also recorded.
- 3. Timing events - All musical events occur in the time domain, so the K250 records all actions against an internal time-keeper, the clock. Changes in the timing events (like tempo change) can be recorded into the K250 sequencer.
Understanding how normal musical actions translate into K250 technical terms will help you better understand the actions of the sequencer and the Sequence Editor.
A short introductory tutorial on using the K250 sequencer
When you first turn on the K250 sequencer you will find that unlike most other sections of the K250's functions, the sequencer is not "modal". This means that use of the sequencer does not put you into a sequence mode that only allows you to work with sequencer functions. With the sequencer activated, you are still in PLAY mode, allowing you to play and change keyboard set-ups, enter the Keyboard or Instrument Editors, Sample, and perform any other function possible from the PLAY mode while the sequencer operates in the background. When you wish to edit something about a sequence, however, you enter the Sequence Edit mode, from which only sequence editing functions may be performed.
The K250 sequencer turns on with a number of default settings, allowing the user to quickly and easily begin recording. These defaults may of course be changed with the Sequence Editor, but will suffice as a starting point for most uses, especially this short introductory tutorial. The factory default settings are:
- 1. Time signature - 4/4
- 2. Tempo - 110 Beats per minute
- 3. Keyboard set-up - The current set-up chosen by the user
- 4. Looping (automatic repetition) - Off
- 5. Quantization (automatic timing-error correction) - Off
Recording the First Track
- 1. While in PLAY mode, select the keyboard set-up that best fits the sound of the first part (track) you wish to record. The K250 will remember the set-up used for each track, allowing multi-timbral (different instrumental sounds played simultaneously) recording and playback.
- 2. Press the SEQUENCE button. The SEQUENCE button's LED will light, and the DISPLAY will prompt "SEQUENCER ACTIVATED". Note also that the right TEMPO button's LED is flashing at a rate of 110 beats per minute, the default tempo of the sequencer clock.
- 3. Press the RECORD button. The RECORD button's LED will light, and the DISPLAY will prompt :
- "RECORD NEW SEQUENCE: BEATS PER MINUTE = 110."
- Here the K250 is asking you "Do you want to record a new sequence in 4/4 time at a tempo of 110?" For now, we do. As mentioned above, these default parameters may be changed by using the Sequence Editor. (If we did not want to record at all we could abort by pressing PLAY twice.)
- 4. Press SELECT. This in effect is telling the K250 that yes, we do want to record a new sequence in 4/4 at 110). The K250 will prompt you to "PRESS RECORD BUTTON TO START AND STOP RECORD". Fairly staightforward instructions.
(Before proceeding, check to see that an output connection from the Click Out jack is made to an input of your sound system. This will allow you to hear a reference click track of quarter notes, so that you may play in synchronization with the K250's internal clock. This is not really a requirement. The K250 sequencer will continue to flash the TEMPO button's LED in time with the internal clock, and the DISPLAY will show beats going by as well.)
- 5. Press the RECORD button to begin recording. The DISPLAY will prompt "COUNTING INTRO MEASURE, 1... 2... 3... 4..." and then recording will commence. Play the desired musical part for your first track. While you are playing the DISPLAY will show the sequence number (0) and the track number (in this case 1), and will count off measures and beats.
- 6. Press RECORD when finished, to stop the recording process. (It is also possible to stop the recording by pressing PLAY, the standard abort procedure.) If you are not satisfied with your performance, you may redo it by pressing ERASE, answering YES to the "ERASE RECORD TRACK?" prompt, and repeating step 5 above. When satisfied with your performance, proceed to the next step.
Playback
Overdubbing Successive Tracks
- 14. You may continue the overdub process for up to ten more tracks (twelve tracks is the maximum capacity) remembering that the K250 has only twelve voice channels, so that you may not exceed twelve voices sounding simultaneously regardless of the number of available tracks. This limitation may be addressed by playing some of the tracks out through MIDI, connecting the K250 to other MIDI synthesizers (including other K250s or K250 Expanders). This will be covered in the Sequence Editor section of this chapter.
- 15. Repeat steps 8 through 13 for each successive overdub.
Naming and Saving Sequences
Once you have completed your sequence, you will probably want to save it to the K250 Sequence Library for future playback or editing. This will also allow you to use the remaining sequence RAM for additional sequences. The 12018 notes of the K250 will allow several short sequences (or one REALLY long sequence) to be stored at a given time. As mentioned above, once saved to the library, these sequences may also be off-loaded to disk for later retrieval using one of the available software utilities and a Macintosh computer. The procedure for saving and naming sequences is very much like those for keyboard and instruments. Refer to page KBD 13 for more details.
- 1. Press SAVE. The K250 will ask, "SAVE CURRENT SEQUENCE?"
- 2. Press YES. The K250 will prompt you to "INPUT NUMBER FOR SEQUENCE: 1". This gives you the option to choose a number for the location in memory for this sequence. The K250 will automatically assign the sequence to the lowest available memory position for you (that is why the prompt here already showed 1 as the input number). Accept the number 1 by pressing SELECT.
- 3. The K250 will now prompt you to name the sequence. Use the ALPHA slider to select each character of the name, pressing the lit ALPHA button to advance to the next character or the R key in the cursor section to erase the current character and return to the previous one until the desired name has been input.
- 4. Press SELECT to accept the name and complete the save procedure. The K250 will prompt, 'SEQUENCE SAVED AS #1'.
Now that we see how to record, playback, and overdub sequences, we can explore the more intricate possibilities available by using the powerful Sequence Editor.
Editing: Background
Before doing any editing of a sequence, it is necessary to understand first what you want to accomplish musically, how that translates into K250 sequence edit options, and then learn the appropriate actions to perform. As stated earlier, the K250 Sequencer records EVENTS against a clock into divisions of the memory called TRACKS. Groups of TRACKS are stored as SEQUENCES. It is helpful to understand this sequence hierarchy before attempting to perform any edit action, so as to clearly define exactly what you are really going to edit. The following illustration shows the sequencer hierarchy:
Sequencer hierarchy diagram showing SEQUENCE (containing TEMPO, TIME SIGNATURE, SEQ NAME/NO.) connected to multiple TRACKS (1-12) which contain EVENTS (NOTE DATA, QUANTIZATION SETTINGS, KEYBOARD SET-UPS, MUTE SETTINGS, CONTROLLER DATA)
When you wish to edit a global parameter (one that affects the entire sequence), you edit the sequence itself. When you want to change something such as the overall volume of a single track, you edit the entire track. If, however, you want to change something such as the pitch of a single note, you will edit at the event level.
The Sequence Editor- Actions:
Access
The Sequence Editor is accessed by following the standard procedures outlined in the first chapter. First press EDIT to enter the generic edit mode, then press SEQUENCE to call the specific Sequence Editor into operation. As mentioned earlier, the Sequence Editor involves a modal method of operation, meaning that once you access the sequence edit mode, only sequence edit functions may be performed. It is possible, however, to perform many of the edit options while the sequence is running (there are commands to start and stop playback of the sequence within the sequence edit options).
The MENU of options
The Sequence Editor is grouped into major options, suboptions, and subeditors in much the same way as the Instrument Voicing Editor and other K250 editors. The following is a complete list of the Sequence Editor menu, all options and musical actions will be detailed in the next section of this chapter:
| # MAJOR OPTION # SUBOPTION/SUBEDITOR PANEL BUTTON |
| 1 SEQUENCE OPTIONS 9 LOAD SEQ. TO EDIT READ |
| 10 START/STOP SEQ. CONTINUE (ASSIGN TO KEYS) |
| 11 DISPLAY SEQ. STATUS VALUE |
| 2 TRACK OPTIONS 12 LOAD TRACK TO EDIT SEND |
| 13 SET EDIT POINTER SET POINTER |
| 14 SET PLAY POINTER LEFT PEDAL |
| 15 SEARCH TRACK SEARCH |
| 16 MODIFY CURRENT EVENT EDIT |
| 17 INSERT EVENT INSERT |
| 18 ERASE EVENT ERASE |
| 19 RENAME TRACK SLIDER 1 |
| 20 DELETE TRACK FROM SEQ SLIDER 3 |
| 21 CLONE TRACK SLIDER 2 |
| 22 EDIT TRACK PITCH BEND RIGHT LEVER |
| SPB 1 REMOVE PB FROM TRACK |
| SPB 2 SET PB RECORD RESOLUTION |
| SPB 3 ENABLE/DISABLE PB RECORD |
| 23 EDIT PUNCH IN MODES EXT. PEDAL |
| 0 PUNCH IN WILL ERASE NOTES |
| 1 PUNCH IN WILL MERGE WITH TRACK |
| 24 EDIT PUNCH CHANNEL |
| PERFORMANCE KEYBOARD KEYBOARD |
| MIDI CHANNEL 1-16 MIDI (MODE 1) |
| 25 EDIT SEQ CONTROLS RIGHT PEDAL |
| SCC 1 REMOVE CC FROM TRACK |
| SCC 2 SET CC RECORD RESOLUTION |
| SCC 3 ENABLE/DISABLE CC RECORD |
| SCC 4 HIDE CONTROLLERS |
| 3 LOOP/COPY OPTIONS 26 TRIM CURRENT LOOP LOOP |
| 27 CONTINUOUS RECORD LOOP RECORD |
| 28 COPY SECTION TO TRACK SEQUENCE |
| 4 MIX OPTIONS 29 VOLUME ADJUST TRACK TRANSPOSE UP |
| 30 MUTE TRACK RIGHT PEDAL |
| 31 SOLO TRACK CHORUS |
| 32 TRANSPOSE TRACK TRANSPOSE DOWN |
| 33 TRACK DEFAULT KBD KEYBOARD |
| 34 ASSIGN INST TO TRACK INSTRUMENT |
The MENU of options (continued)
5 RHYTHM OPTIONS
35 SET TIME SIGNATURE 36 SET SEQUENCE TEMPO 37 SET/CLEAR QUANTIZATION 38 SET QUANTIZATION DELAY 39 SET QUANT. DURATION
DETUNE TEMPO DOWN TEMPO UP LEFT LEVER
6 MIDI OPTIONS
40 SET TRACK MIDI MODES 41 SET MIDI PLAY CHANNEL 42 SET MIDI RECORD ON/OFF 43 SET SEQ DEFAULT MIDI
MIDI (MODE 1)
7 SYNC OPTIONS
44 SEQUENCER SYNC MODE 45 SET SYNC CLOCK RATE 46 SET TRIGGER IN MODE 47 SET PLAY START MODE 48 SET RECORD START MODE 49 ENABLE/DISABLE CLICK
SYNC (MODE 2) EXT. PEDAL LEVEL (SPLIT KEYBOARD)
8 LIBRARY OPTIONS
50 SAVE CURRENT SEQ. 51 RENAME CURRENT SEQ. 52 ERASE SEQUENCE 53 SHUFFLE DIRECTORY ITEMS 54 CLEAR SEQUENCER MEMORY
SAVE ALPHA LIST
The Sequence Editor- Musical Applications:
Before any editing function can be performed, the sequence to edit must be in the sequence buffer (SEQUENCE 0, the CURRENT SEQUENCE). If you are going to edit a sequence that you are currently recording, the sequence is already in the buffer and you may only need to load the track (if the desired track to edit is not the one you just recorded). If you wish to edit a saved sequence you must load both the sequence and the desired track to edit. All three interface approaches are available with the Sequence Editor. The quickest method (least number of button pushes) will be presented here, but you may refer to the above menu at any point to use a specific method of your choice.
To load a sequence to edit:
- 1. Press EDIT, then SEQUENCE. This accesses the sequence edit mode. The DISPLAY will show "SEQUENCE OPTIONS:"
- 2. Press SELECT. The suboption "LOAD SEQ TO EDIT" will be shown. Press SELECT again to access the suboption. The K250 will prompt you to enter the number for the desired sequence to edit.
- 3. Key in the desired number followed by SELECT to view the sequence name. If the displayed sequence is the desired sequence, press SELECT again to load the sequence. If you don't know the number for the desired sequence, you may use the cursors to cycle through all the sequences in RAM. When you find the desired sequence, press SELECT to load the sequence.
To load a track to edit:
- 1. While in the Sequence Editor press SEND. The K250 will prompt "LOAD TRACK TO EDIT".
- 2. Press SELECT. The K250 will prompt "TRACK TO EDIT (1..12)", requesting that you enter the desired track to enter.
- 3. Key in the desired track number followed by pressing SELECT twice. You are now ready to proceed with any editing task.
Setting the GLOBAL Sequence Parameters:
Global parameters are those that affect the entire piece of music. These include the time signature, tempo, and the name and number for the sequence. These parameters may be altered either for an existing sequence, or before starting to record a new sequence (with the exception of the sequence name and number). The procedure is the same for either circumstance, and for all instructions listed here it will be assumed that either you are going to record a new sequence, or that you have the desired sequence loaded into the buffer and are in sequence edit mode:
Time signature
- 1. While in sequence edit mode, press DETUNE. The suboption SET TIME SIGNATURE will be shown in the DISPLAY.
- 2. Press SELECT.
- 3. Key in a number for the numerator followed by SELECT (if the numerator in the DISPLAY is already correct, simply press SELECT to move to setting the denominator).
- 4. Key in a number for the denominator followed by SELECT (if the denominator in the DISPLAY is already correct, simply press SELECT to exit setting the time signature).
Tempo
For a new sequence:
- 1. When you first press RECORD to record a new sequence (not in edit mode), the K250 prompts "RECORD NEW SEQUENCE: BEATS PER MINUTE = xxx".
- 2. Key in the desired tempo setting followed by pressing SELECT twice.
- 3. The K250 will prompt "PRESS RECORD BUTTON TO START AND STOP RECORD".
For an existing sequence:
- 1. While in sequence edit mode, press the TEMPO DOWN button. The suboption SET SEQUENCE TEMPO will be shown in the DISPLAY.
- 2. Press SELECT. The K250 will prompt "SEQUENCE TEMPO: xx BPM", where xx is the current tempo setting.
- 3. Key in the desired tempo setting followed by pressing SELECT twice.
Renaming an existing sequence:
- 1. Press the ALPHA button. The K250 will prompt "RENAME CURRENT SEQUENCE.
- 2. Press SELECT then follow the procedures outlined under saving and naming sequences above.
The Sequence Editor Continued:
The remaining functions of the Sequence Editor require that you have already recorded at least one track of a sequence and wish to edit something other than the global parameters of the sequence. The first step now is to decide musically what it is you want to edit, and whether the desired edit function is at the track level or the event level (review the sequence hierarchy diagram on page SEQ 7).
Track level editing:
This type of editing involves changes made to an entire track, a sort of limited global or macro-editing. These types of changes might include:
- Naming the track
- Cloning a track (making an exact duplicate copy)
- Deleting a track
- Transposing a track
- Changing the volume level of a track
- Changing the keyboard set-up assigned to a track (reorchestrating the track)
- Adding an Instrument Voicing to a track to add an effect (like vibrato)
- Auto-correcting the timings of a track (quantizing)
- Assigning a track to play through MIDI
- Muting a track (silencing a track)
- Soloing a track (listening to only a chosen track)
Event level editing:
This type of editing involves editing a single event in the track, and is a form of micro-editing. First a specific location for editing must be set, then a variety of micro-editing procedures may be accessed. Remember that any musical action may be thought of as an event, so that changing a keyboard set-up within a track would entail inserting a "KBD CHANGE" event. Changing the pitch of a single note would require the user to select the "wrong" note as the edit location and choose "MODIFY CURRENT EVENT" to change the pitch of that event. Basically all event editing falls into one of three categories:
- INSERT EVENT
- ERASE EVENT
- MODIFY CURRENT EVENT
These three categories of event editing may be further explained by listing all possible types of events and the attributes that may be edited.
Event level editing- Continued
INSERT EVENT -
The following is a list of events that may be inserted into a specific point in the track:
- 1 NOTE ATTACK
- 2 NOTE RELEASE
- 3 SUSTAIN
- 4 KBD CHANGE
- 5 INST CHANGE
- 6 TRANSPOSE
- 7 VOLUME
- 8 TEMPO
- 9 RHYTHM CHANGE (quantization change)
- 10 BEAT NUMBER CHANGE (location)
- 11 SECTION LOOP (automatically repeat section)
- 12 CALL SECTION START
- 13 CALL SECTION END
- 14 SECTION CALL
- 15 SEQUENCE CHAIN
- 16 SILENCE TRACK
- 17 TRACK END
MODIFY CURRENT EVENT
The following lists what attributes of an event (any of the above listed events) may be edited:
EVENT FIELD TO EDIT: 1 SPECIFICS 1 PITCH 2 VELOCITY 2 TIMING 1 BEAT 2 FRACTION
ERASE EVENT
Any of the above listed events may be deleted from a given track.
Sequence Editor Menu:
Editing the Sequence
Parameters that may be edited:
| ACTION | # MAJOR OPTION | # SUBOPTION | BUTTON |
|---|---|---|---|
| Load desired sequence into edit buffer. | 1 SEQUENCE OPTIONS | 9 LOAD SEQ. TO EDIT | READ |
| Play the sequence to hear edit action. | 1 SEQUENCE OPTIONS | 10 START/STOP SEQ. | CONT/ASS. KEYS |
| Find information about a sequence. | 1 SEQUENCE OPTIONS | 11 DISPLAY SEQ. STATUS | VALUE |
| Set the point to play from. | 2 TRACK OPTIONS | 14 SET PLAY POINTER | LEFT PEDAL |
| Set the way punch in works. | 2 TRACK OPTIONS | 23 EDIT PUNCH IN MODES | EXT. PEDAL |
| Set Punch mode when using MIDI | 2 TRACK OPTIONS | 24 EDIT PUNCH CHANNEL | |
| Set the sequence's time signature. | 5 RHYTHM OPTIONS | 35 SET TIME SIGNATURE | DETUNE |
| Set Sequence tempo. | 5 RHYTHM OPTIONS | 36 SET SEQUENCE TEMPO | TEMPO DOWN |
| Set whether the seq. records MIDI? | 6 MIDI OPTIONS | 42 SET MIDI RECORD ON/OFF | |
| Set the seq. to have MIDI defaults | 6 MIDI OPTIONS | 43 SET SEQ. DEFAULT MIDI | |
| Set the Sequencer's sync mode | 7 SYNC OPTIONS | 44 SEQ. SYNC MODE | SYNC/MODE 2 |
| Set the sync clock rate | 7 SYNC OPTIONS | 45 SET SYNC CLOCK RATE | |
| Set the trigger in mode | 7 SYNC OPTIONS | 46 SET TRIGGER IN MODE | |
| What starts the Sequencer? | 7 SYNC OPTIONS | 47 SET PLAY START MODE | |
| What starts the sequencer recording? | 7 SYNC OPTIONS | 48 SET RECORD START MODE | |
| Does the click out sound or not? | 7 SYNC OPTIONS | 49 ENABLE/DISABLE CLICK | LEVEL/SPLIT KB |
| Save Sequence in buffer to library. | 8 LIBRARY OPTIONS | 50 SAVE CURRENT SEQ. | SAVE |
| Rename the sequence in the buffer. | 8 LIBRARY OPTIONS | 51 RENAME CURRENT SEQ. | ALPHA |
| Erase the sequence in the buffer | 8 LIBRARY OPTIONS | 52 ERASE SEQUENCE | |
| Reorder the seqs. in library | 8 LIBRARY OPTIONS | 53 SHUFFLE DIR. ITEMS | LIST |
| Erase all the sequences in RAM | 8 LIBRARY OPTIONS | 54 CLEAR SEQ. MEMORY |
Editing the Track
| Load a specific track to edit. | 2 TRACK OPTIONS | 12 LOAD TRACK TO EDIT | SEND |
|---|---|---|---|
| Assign the track a name. | 2 TRACK OPTIONS | 19 RENAME TRACK | SLIDER 1 |
| Erase the track in the buffer. | 2 TRACK OPTIONS | 20 DELETE TRACK FROM SEQ | SLIDER 3 |
| Make an exact copy of the track. | 2 TRACK OPTIONS | 21 CLONE TRACK | SLIDER 2 |
| Change the pitch bend set-up. | 2 TRACK OPTIONS | 22 EDIT TRACK PITCH BEND | RIGHT LEVER |
| SPB 1 REMOVE PB FROM TRACK | |||
| SPB 2 SET PB RECORD RESOLUTION | |||
| SPB 3 ENABLE/DISABLE PB RECORD | |||
| Change continuous control set-up. | 2 TRACK OPTIONS | 25 EDIT SEQ CONTROLS | RIGHT PEDAL |
| SCC 1 REMOVE CC FROM TRACK | |||
| SCC 2 SET CC RECORD RESOLUTION | |||
| SCC 3 ENABLE/DISABLE CC RECORD | |||
| SCC 4 HIDE CONTROLLERS | |||
| Change an existing loop. | 2 TRACK OPTIONS | 26 TRIM CURRENT LOOP | LOOP |
| Record a continuous loop. | 2 TRACK OPTIONS | 27 CONT. RECORD LOOP | RECORD |
| Copy a section into track. | 2 TRACK OPTIONS | 28 COPY SECTION TO TRACK | SEQUENCE |
| Set the track volume level. | 4 MIX OPTIONS | 29 VOLUME ADJUST TRACK | TRANSPOSE UP |
| Mute a track (don't play). | 4 MIX OPTIONS | 30 MUTE TRACK | RIGHT PEDAL |
| Solo a track (play this track only) | 4 MIX OPTIONS | 31 SOLO TRACK | CHORUS |
| Transpose the current track. | 4 MIX OPTIONS | 32 TRANSPOSE TRACK | TRANSPOSE DOWN |
| Assign/change Keyboard set-up. | 4 MIX OPTIONS | 33 TRACK DEFAULT KBD | KEYBOARD |
| Add an Instrument Voicing to track. | 4 MIX OPTIONS | 34 ASSIGN INST TO TRACK | INSTRUMENT |
| Correct the rhythm for a track | 5 RHYTHM OPTIONS | 37 SET/CLEAR QUANTIZATION | TEMPO UP |
| Offset the rhythm of a track. | 5 RHYTHM OPTIONS | 38 SET QUANTIZATION DELAY | LEFT LEVER |
| Shorten all durations for a track. | 5 RHYTHM OPTIONS | 39 SET QUANT. DURATION | |
| Set K250/MIDI track play mode. | 6 MIDI OPTIONS | 40 SET TRACK MIDI MODES | MIDI/MODE1 |
| Set track MIDI channel assignment | 6 MIDI OPTIONS | 41 SET MIDI PLAY CHANNEL |
Editing an Event
| Locate the event to edit. | 2 TRACK OPTIONS | 13 SET EDIT POINTER | SET POINTER |
|---|---|---|---|
| Auto-locate an event in track. | 2 TRACK OPTIONS | 15 SEARCH TRACK | SEARCH |
| Alter the selected event. | 2 TRACK OPTIONS | 16 MODIFY CURRENT EVENT | EDIT |
| Add an event before selected event. | 2 TRACK OPTIONS | 17 INSERT EVENT | INSERT |
| Delete the selected event. | 2 TRACK OPTIONS | 18 ERASE EVENT | ERASE |
Editing: Specific Musical Tasks
By combining your understanding of the K250 user interface, previously learned editing techniques, and using the above menu, you should be able to perform any sequence edit function that you are likely to need in most musical situations. The following examples of common edit functions is intended to show you how to get started.
Fixing a wrong note:
Suppose you have just finished recording a track, and it is a fantastic take except for one mistake; you played a C#5 in measure 6 when you meant a D5, and you played it very loudly. No problem, simply edit at the event level:
- 1. Press EDIT then SEQUENCE to enter the sequence edit mode.
- 2. Press SET POINTER to choose the event edit location.
- 3. Press SELECT. The K250 will prompt you to enter the measure number in which you wish to edit.
- 4. Key in 6 and press SELECT twice. You may then use the left and right cursors to move backwards and forwards in the track. Each note will sound as it appears in the DISPLAY in case you are not certain of which note is wrong.
- 5. When you have found the offending mistake, press SELECT to set the edit location.
- 6. Press EDIT to "MODIFY CURRENT EVENT".
- 7. Press SELECT. The K250 will ask you which attribute you wish to edit.
- 8. Press SELECT at the "SPECIFICS" prompt.Press SELECT again at the "SET NOTE EVENT: PITCH" prompt.
- 9. The K250 will prompt you to hit the correct note. Play the right note then press SELECT.
- 10. You now want to fix the velocity of the note since you played it too loudly. Press the right cursor once to the prompt "SET NOTE EVENT: VELOCITY" Press SELECT.
- 11. Key in a new velocity value between 1 and 255. The current velocity is shown in the DISPLAY, use it as a guide for choosing a new value. Press SELECT twice to enter the new value.
- 12. Press PLAY four times to exit the sequence edit mode. Press PLAY again to hear the sequence with the mistake corrected.
Auto-correcting a rhythmic performance:
You have just finished recording a track that is just not quite exact enough for the dance feel you are looking for. Don't rerecord, auto-correct (quantize) the timings to an exact subdivision of the beat (like sixteenth notes):
Recording a continuous Loop:
Perhaps you are familiar with the operation of drum machines. When you record with most of these devices, you set a "pattern" length, and once the recording is started, you may record one drum at a time adding new sounds as the pattern repeatedly cycles (loops). You may do the same type of recording with the K250 sequencer by setting up a continuous record loop. This may be used with any keyboard set-up, not just drum sets:
Adding a Loop to a track:
You have just finished recording a short 8 bar bass line, and you decide that it will make a great ostinato for a new piece. Don't bother trying to play it again for the desired 7 more times, add a loop that plays the line eight times through:
- 1. Press EDIT then SEQUENCE.
- 2. Press SET POINTER to locate the position for the loop event.
- 3. Key in 9 and press SELECT twice at the "MEASURE NUMBER" prompt. Since the track is only 8 bars long, keying in 9 will automatically place you at the end of the track.
- 4. Press SELECT again to set the TRACK END as the edit point.
- 5. Press INSERT to insert an event. Press SELECT.
- 6. Key in 11 (the menu number for SECTION LOOP) and press SELECT twice to insert a loop event.
- 7. You must now set all the parameters for the loop. The first is the number of times the section will play. Press SELECT at the "TIMES TO PLAY LOOP" prompt.
- 8. Key in 8 and press SELECT twice to instruct the K250 to play the bass line eight times. Next you must set the start and end beats for the loop.
- 9. At the "END BEAT" prompt press SELECT. As the line is 8 bars long in 4/4 time, the end beat should be set to beat 33. Key in 33 followed by two SELECTs.
- 10. At the "START BEAT" prompt press SELECT, then enter 1 and SELECT to move on to LOOP EVENT COUNT setting.
- 11. Press SELECT at the "LOOP EVENT COUNT" prompt. Press VALUE, and move the value slider all the way to the top to set the proper number of events in the loop (the K250 will calculate this for you). You will now move on to the fraction settings. Unless you want the loop to begin and end off of the beat, these fractions should be set to 0. If you do want to set the start or end off the beat, remember that each quarter note is divided into 255 parts (fractions) so an eighth note is a fraction of 128, a sixteenth is 64, etc...
- 12. Once all the loop parameters have been set, press PLAY four times to exit the edit mode.
- 13. Press PLAY again to hear your new ostinato.
Balancing tracks:
You have just finished recording a track and upon listening to playback decide that it is a bit too loose in relation to the previously recorded tracks. Easy to fix, just adjust the volume level for this track:
- 1. Enter the Sequence Editor (you know how).
- 2. You want to listen to the sequence as you adjust the track level, to use your ears to set the level to taste. Press CONTINUE/ ASSIGN TO KEYS to get the "START/STOP SEQUENCE" prompt. Press SELECT to start the sequence.
- 3. Press TRANSPOSE UP for the "VOLUME ADJUST TRACK" suboption. Press SELECT to enter the suboption.
- 4. Press the VALUE button to activate the value slider. Use the slider to change the volume level for the track.
- 5. When the level suits your taste, press SELECT to set the new volume level.
- 6. Press PLAY to exit the edit mode.
- 7. Press PLAY to listen to the newly balanced sequence.
Transposing tracks:
You have just finished recording a piano accompaniment in the key of Bb. You now realize that you can't sing in that key, and that G is much more suited to your vocal range. Transpose that track:
- 1. Access the Sequence Editor.
- 2. Press the TRANSPOSE DOWN button, and then press SELECT to access the transpose function.
- 3. Key in the desired transposition value, in this case either 3 semitones down or 9 semitones up (depending on the overall range of the part).
- 4. Press SELECT twice to enter the transposition value.
- 5. Press PLAY to exit the edit mode.
- 6. Press PLAY again to hear the transposed part.
Chaining sequences:
You have recorded a complete sequence which you wish to use as the 'A' section of a larger composition. You have also completed the 'B' section. Both are saved to the library. Let's chain them together:
- 1. Load track 1 of sequence A into the edit buffer (review the procedures if necessary).
- 2. Press SET POINTER to set the edit location. Set it to the TRACK END.
- 3. Press INSERT then SELECT to insert an event.
- 4. Enter 15 (the menu number for SEQUENCE CHAIN) and SELECT.
- 5. Enter the number for sequence B at the "SEQUENCE TO CHAIN" prompt. Press SELECT.
- 6. At the prompt "ON CHAIN, SEQUENCE:" choose "RELEASES NATURALLY" if you wish the notes to carry their full release values, or "IS SILENCED" if you want any ringing notes to be cut short.
- 7. Press PLAY 3 times to exit the edit mode.
- 8. Press PLAY again to hear the new extended piece.
Sending out MIDI program changes to external synthesizers:
- 1. Load the desired sequence and track into the edit buffer.
- 2. Press SET POINTER to set the edit location. Set it to the location for the MIDI program change.
- 3. Press INSERT then SELECT to insert an event.
- 4. Enter 4 (the menu number for KBD CHANGE) and SELECT.
- 5. There are 4 suboptions under KBD CHANGE:
- 0 K250 KEYBOARD This allows you to change K250 keyboard setups.
- 1 MIDI PROGRAM This allows you to send out a MIDI program change.
- 2 MIDI ON/OFF This toggles MIDI on and off for a given track.
- 3 ZERO THIS EVENT This reinitializes the event to a 0 value setting.
- Enter 1 and SELECT to choose the MIDI program change suboption.
- 6. Enter the number (1-128) for the desired MIDI program change. Note that the K250 sends out binary 0000 0000 for MIDI program number 1 (see the MIDI chapter for more details). Press SELECT twice to enter the value.
- 7. Press PLAY to exit the SEQUENCE EDIT MODE.
Punching in and out:
The term punch-in refers to the act of re-recording a section of a pre-recorded track. With the K250 sequencer, you can punch in with two different and musically useful modes, 0 ERASE NOTES and 1 MERGE WITH TRACK. The first mode, ERASE NOTES, acts like a tape recorder and replaces the old material with the "corrected" new material. The second mode combines the new material with top existing track. This is particularly useful when adding controller data to a track containing a good musical performance. This would allow for adding dynamics (or automated mixing, track by track) or pitch bend, vibrato, or tremolo after the initial recording. You may punch into a track immediately after recording, or after reloading a chosen track into the edit buffer:
- 1. With the desired track in the edit buffer, choose the punch in mode by selecting option 23 of the Sequence Editor. Select either ERASE NOTES 0 or MERGE WITH TRACK 1. If you are using MIDI, you must also select the punch channel with option 24.
- 2. Press RECORD. The K250 will prompt NEW TRACK (yes) OTHER (no).
- 3. Press NO to bring a new prompt PUNCH IN (yes) CANCEL (no). The prompt will also list the punch in mode (ERASE MODE or MERGE MODE).
- 4. Press YES to set up the punch. The K250 will prompt PRESS RECORD TO START & PUNCH IN/OUT.
- 5. Press RECORD to start playing the sequence, the punch will commence at the next press of the RECORD button.
- 6. At the end of the punch, press RECORD again to end the punch process. The K250 will prompt PUNCH COMPLETE: nn EVENTS ADDED nn ERASED, or nn EVENTS MERGED.
These examples of typical editing procedures should give you the necessary experience which, when coupled with the Sequence Editor menus and your overall understanding of the K250, should enable you to successfully handle any advanced sequence editing challenges you might encounter.
Special Sequencer PLAY MODE Features:
THE PANIC BUTTON:
The LEVEL (SPLIT KEYBOARD) button will act as a special panic button while in PLAY mode. Any hung notes, incorrect volumes, or wrong function settings will be reset by pressing this button. This is not a soft or hard reset, and will not disturb the K250 memory in any way. Pressing the PANIC BUTTON also sends out an "ALL NOTES OFF" command via MIDI and should reset hung notes over MIDI (see the MIDI chapter).
MIXBOARD FEATURE:
When the sequencer is active, but not in edit mode, pressing SEARCH will activate the mixboard function, which allows real-time selection of sequence tracks. When activated, the mixboard function converts the 12 buttons in the lower right hand portion of the panel into track on/off toggle switches corresponding to the twelve tracks of the sequencer as follows:
Button layout diagram showing 12 numbered buttons arranged in two rows, with labels: CONTINUE/TEMPO, LOOP, SAVE, ERASE, MIDI, SYNC (top row), and SET POINTER, INSERT, READ, SEND (bottom row)
This Mixboard feature functions on sequences regardless of whether or not they are loaded into the edit buffer. If you mute tracks in a sequence, then play another sequence, the first sequence will "remember" which tracks were muted when you play it next. Note that when the mixboard is activated the PLAY button LED flashes in tempo rather than the TEMPO UP button (as that button is now track 8 on/off).
CHORUS:
When playing a sequence, turning on the global CHORUS affects the performance keyboard only, leaving the sequence tracks unaffected.
Happy sequencing.

PART II: Applications
| Topic | Page |
|---|---|
| Software Utilities | UTIL |
| Saving Files | UTIL 1 |
| Using MacAttach | UTIL 3 |
| Using QLS | UTIL 4 |
| Loading Files | UTIL 5 |
| Using MacAttach | UTIL 5 |
| Using QLS | UTIL 5 |
| Organizing Files | UTIL 6 |
| Keyboards and Instruments | UTIL 6 |
| Sequences | UTIL 9 |
| Soundfiles | UTIL 10 |
| External File Editing | UTIL 11 |
| Keyboards and Instruments | UTIL 11 |
| Sequences | UTIL 14 |
| File Format Conversion | UTIL 15 |
| Sequences | UTIL 15 |
| Soundfiles | UTIL 17 |
SOFTWARE UTILITIES
There are a number of software programs for the Macintosh™ computer available for use with the K250. These programs enhance the musician's capabilities for creating and maintaining a library of original user samples, instruments, keyboards, and sequences. All of these software packages involve connecting the K250's RS422 serial port to the Macintosh™ Modem port via either a MacAttach™ or QLS™ cable. Most of these software utilities will work with either MacAttach or QLS, however some require the optional QLS hardware circuitry, these will be noted where applicable.
This chapter assumes knowledge of the Macintosh operating system. If you are not already familiar with the Mac, please read the owners manual you received with your computer. Make sure you know which variety of Macintosh you have, as at this writing there are currently four types available; 128K Mac, 512K Mac (Fat Mac), 512Kenhanced, and the Mac Plus. In addition to these standard Apple configurations, there are also third party upgrades such as the Monster Mac, Prodigy 4, and others. It is your responsibility to know the configuration and proper operation of your peripheral equipment. Optimal configuration is either the 512Kenhanced or Mac Plus computer with either an 800K external drive or hard disk (either internal or external via the SCSI port). Your Macintosh dealer can help you decide which computer will best suit your overall needs. All of the individual software packages come with their own instruction manuals. Please read them for more specific details.
Saving Files to the Macintosh:
As mentioned in previous chapters, it is a good idea to off-load your work, saving to disk frequently, to insure that your hard work is safe from any accidental error. The age old adage "Better safe than sorry" was never more applicable than with today's cutting edge computer technologies. Ideally, every time you create something new, or make a successful edit you wish to keep, you should save to disk. At the completion of every work session, you should make at least one extra back-up disk copy to further protect yourself from possible loss. Disks are fairly inexpensive, especially when compared to your total equipment investment and the amount of time and effort that goes into quality music making. Save and back-up often.
Before looking at the specific SAVE operations, we should first study the internal organization of RAM, and how MacAttach and QLS differ in K250 memory structure. The following diagrams illustrate the K250 RAM structure with both packages:
TOTAL K250 RAM: MacAttach
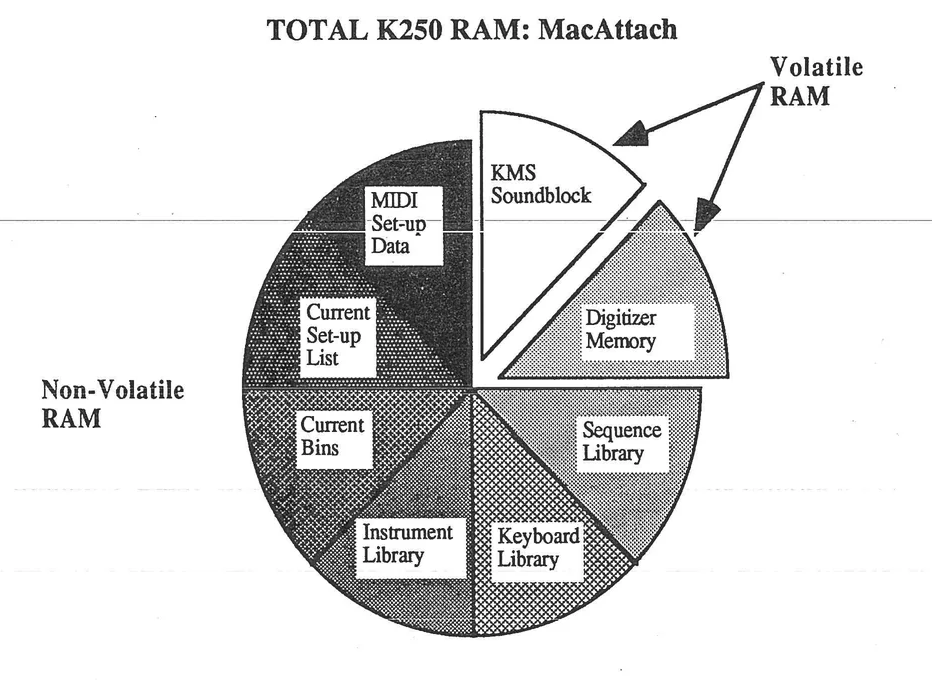
TOTAL K250 RAM: QLS
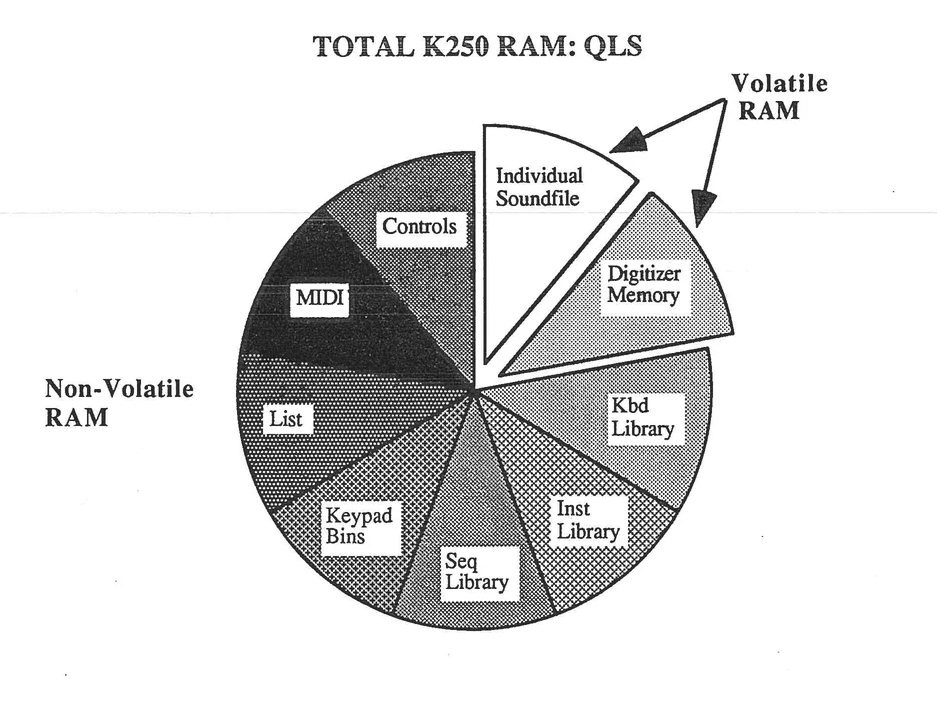
Saving Files continued:
Using MacAttach:
MacAttach requires the user to attend to both the K250 and the Mac. When saving a file, you must first prepare the Macintosh to receive the file. Choose "Save File From K250 to Macintosh" from under the Macintosh FILE menu. You will be prompted to name the file and select the destination for the save (which disk in which drive). Once this has been completed, MacAttach will prompt that the file is ready, and to choose "Receive File from K250" from the TRANSFER menu. When this is done, MacAttach will prompt "In Receive mode, Waiting for file from K250". Turn now to the Media section of the K250 and press SEND. The K250 will prompt for which file type to send. The options are:
| Sequence Library The current saved sequences. |
| Keyboard Library Saved user Keyboard Set-ups. |
| Instrument Library Saved user Instrument Voicings. |
| Keyboard & Instrument Library A combined file of the two above libraries. |
| All Three Libraries A combination file of sequences, keyboards, & instrument voicings. |
| KMS Soundblock The entire sample memory in a special data format. |
| Digitizer Memory Digitizer instruments which are assigned to digitizer keyboards. |
| Current Bins The current user-assigned Bin set-ups. |
| Current Setup List The current user-assigned List set-up. |
| MIDI Setup Data The MIDI settings, including MULTI-mode K250 keyboard to MIDI Channel assignments. |
Using the CURSORS, locate the file type you wish to save and when it is shown in the DISPLAY, press SELECT. Depending on how large the file is, the K250 will prompt SENDING FILE, and the Mac will display a bar gauge illustrating the relative position in the save action. When completed, the K250 will prompt "EXTERNAL FILE SAVE COMPLETED" and the Mac should display "Save completed, File closed OK".
Saving Files continued:
Using QLS:
Unlike MacAttach, QLS requires only that actions be initiated from the Macintosh. QLS operates the K250 under remote control. At the Macintosh, choose "Save..." from under the Macintosh FILE menu. You will be prompted to select the file type to save. The options are:
| Kbd Library Saved user Keyboard Set-ups. |
| Inst Library Saved user Instrument Voicings. |
| Seq Library The current saved sequences. |
| Kbd + Inst Libs A combined file of the two above libraries. |
| All 3 Libs A combination file of sequences, keyboards, & instrument voicings. |
| Digitizer Mem Digitizer instruments and keyboards. If you have SuperRam I or II, you |
| will be prompted to select which bank (1-4) to save. Click on the |
| appropriate button for the desired bank. |
| Sound File An individual user-sampled soundfile. If you have SuperRam I or II, |
| you will be prompted to select which bank (1-4) to save. Click on the |
| appropriate button for the desired bank. |
| Keypad Bins The current user-assigned Bin set-ups. |
| List The current user-assigned List set-up. |
| MIDI The MIDI settings, including MULTI-mode K250 keyboard to MIDI |
| Channel assignments. |
| Controls The current controller assignments and control routings. |
| Save as MacAttach file As MacAttach cannot "see" the difference between file types, this option |
| allows 'downward' compatibility for musicians who use both software |
| packages. |
Click the appropriate button for the desired file type. QLS will then prompt you to name the file and select the destination for the save (which disk in which drive). Once this has been completed, QLS will take over the K250 and start the save procedure. The K250 will display "QLS transaction in progress" and the Mac will display a bar gauge illustrating the relative position in the save action. When the save procedure is complete, the K250 will do a soft reset (you will hear the familiar relay switch click) and will return to PLAY mode with KURZWEIL GRAND PIANO as the keyboard set-up. The Macintosh will return to a ready state for future QLS transactions.
Loading Files from the Macintosh:
When loading a file into the K250, the area of RAM used for the chosen file type is cleared for the new data. Even if there were room in the RAM for both the current file and the file to be loaded, all current files will be cleared before the load occurs. To avoid losing valuable work, save important files before loading new files. If a combination of the current files and previously saved files is desired, you may use one of the librarian utilities described below to create a new combination file. Note that only the RAM area containing the chosen file type is cleared. For instance, loading sequences will not affect keyboard set-ups or instrument files.
Using MacAttach:
Choose "Load file from Mac to K250" from under the Macintosh FILE menu. You will be prompted to select which file to load. Once the file is selected, turn to the K250 to prepare to receive the file. Press READ on the K250. You will be asked "LOAD FILE FROM COMPUTER?" and the YES and NO LEDs will flash. Press YES to prepare the K250 to receive the file. The DISPLAY will change to "WAITING FOR FILE FROM COMPUTER". Turn back to the Mac and choose "Send file to the K250" from the TRANSFER menu. The K250 will show "LOADING FILE" in the DISPLAY, and the Mac will display a bar gauge illustrating the relative position in the load action. At the completion of the load process, the K250 will reset itself to the PLAY mode, and the Mac will display "File Load Completed, File Closed OK".
Using QLS:
At the Macintosh, choose either "Load General" or "Load..." from under the Macintosh FILE menu. The "Load General" option allows you to load in any type of file contained in your disk library. QLS is able to determine the file type and correct memory location for the load. You simply select the file and QLS takes over, loading the file into the K250. Choosing "Load..." from the FILE menu allows you to select which type of file to load. This is helpful if you have disks loaded with lots of files, and mixed file types on each disk. With this option once a file type is selected, you will only be shown the chosen file type on any given disk, saving you the trouble of sorting through sequence file names when you are looking for a keyboard set-up. Choosing this option prompts you to select the file type to save. The "Load.." choices are the same as with the "Save..." option.
Click the appropriate button for the desired file type. QLS will display the available files, select the desired file. QLS will take over the K250 and begin the load procedure. The K250 will display "QLS transaction in progress" and the Mac will display a bar gauge illustrating the relative position in the load action. When the save procedure is complete, the K250 will do a soft reset (you will hear the familiar relay switch click) and will return to PLAY mode with KURZWEIL GRAND PIANO as the keyboard set-up. The Macintosh will return to a ready state for future QLS transactions.
Librarian Functions- Organizing Your Files:
Once you start saving numbers of different files, you may find that you want to reorganize your K250 file library. Perhaps a specific gig calls for a two keyboard set-ups from one group save, three more from a different set, and one other from still a third group. Rather than having to keep loading from different files while on the gig, you could create a new group with all the necessary keyboard set-ups, and load them all into RAM at once. The same scenario holds true for collections of instrument voicings, sequences, soundfiles (if using QLS), and mixed file combinations.
Keyboards and Instruments:
Using the Kbd Mover utility program, keyboard set-ups and instrument voicings may be examined, reordered, and in a limited sense, edited. The resulting sets can then be saved as new files and loaded into the K250 as needed. The structure of this program is very similar to the standard Apple-supplied utility "Font /DA Mover". Two sets of files can be opened, and individual set-ups can then be removed or copied from one set to the other. By pressing the MODIFY button, a limited on-screen edit function can be found. This will be covered under "External File Editing", below.
Modifying existing groups:
After you have saved a group of keyboard set-ups using either MacAttach or QLS, run the KBD Mover program. You will see two empty windows with OPEN buttons below them. Click on the OPEN button beneath the left window. You will be presented with the standard dialog boxes for file selection. Choose the file you want to modify. Once this has been done, your screen should look something like this, although your files will be shown:
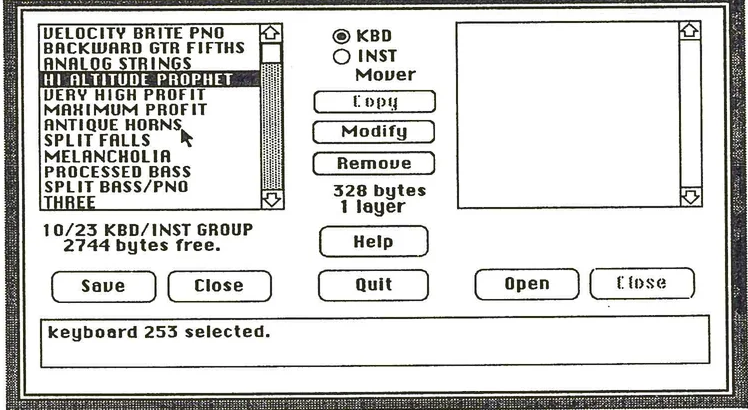
Using this screen, you may delete any unwanted keyboards simply by selecting the name, then pressing the REMOVE button. If you want to reorder the keyboard set-ups, you must enter the edit page by pressing MODIFY.
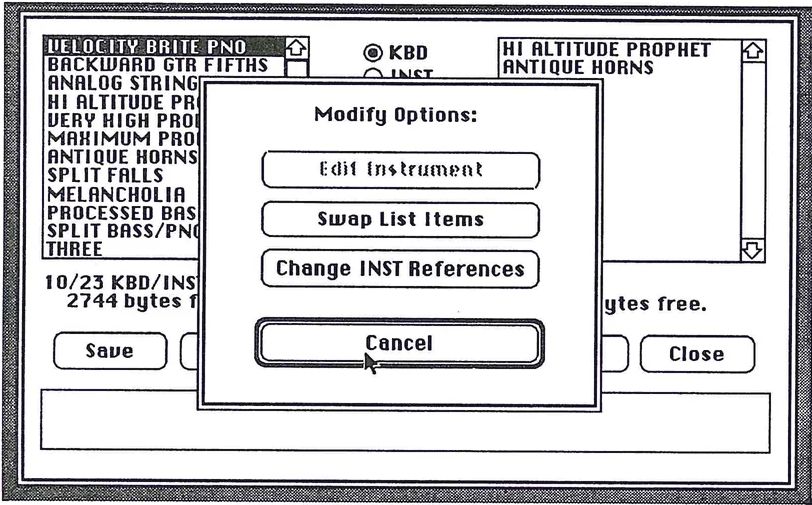
From this editing page, choose "Swap List Items". You will now get a complete list of keyboards within the group. You may move the keyboards around by swapping positions, see page KBD8 for more details.

Press DONE when you are finished reorganizing the keyboard set-up list. Once you have completed all desired modifications to the group, press Save to store the edited group to disk.
Creating a new group from existing groups:
Using the method described above, open an existing group of keyboards which contains one or more set-ups you wish to include in a new collection. Press OPEN under the right window, and find NEW in the file selection dialog box. Pressing NEW creates a new file for you to name, and gives you a blank workspace in the right window. Select a file you wish to include in this new set, and press COPY. The chosen keyboard will appear in the new group. When you have copied as many set-ups from the old set into the new file, put away the original group by clicking on CLOSE. Open another group by clicking on OPEN again, and repeat the copy procedure. When all the desired keyboards have been copied into the new file, you may shuffle the list to suit your needs as described above, then save the new file to disk.
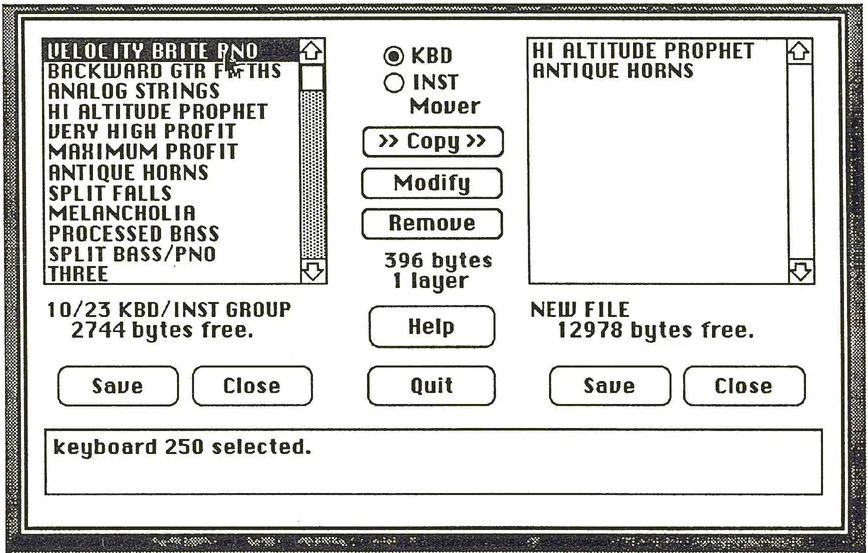
Make sure that for every copied keyboard set-up that is dependent on a user Instrument Voicing that you also copy that Instrument using the INST Mover function. Click on the INST button located at the top center of the screen to access this portion of the utility. It functions exactly like the KBD Mover section described above.
Sequences:
Using the Seq Mover utility program, sequence groups may be examined, reordered, and in a limited sense, edited. The resulting sets can then be saved as new files and loaded into the K250 as needed. The structure of this program is very similar to the standard Apple-supplied utility "Font/DA Mover" and almost identical to the KBD Mover program described above. Two sets of files can be opened, and individual sequences can then be removed or copied from one set to the other. By pressing the EDIT button, a limited on-screen edit function can be found. This will be covered under "External File Editing", below.
Modifying existing groups:
The procedure for modifying sequence groups is exactly the same as for modifying keyboard groups. Review page UTIL6 for details. The following diagram shows the work screen for the Sequence Mover utility.
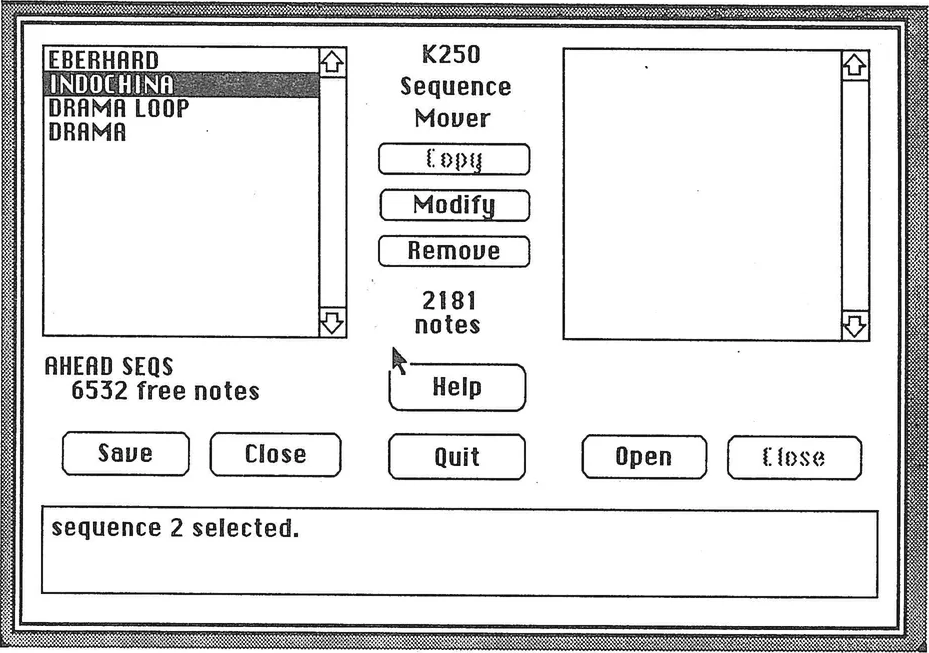
Creating a new group from existing groups:
The procedure for creating new sequence groups is exactly the same as for creating keyboard groups. Review page UTIL8 for details.
Soundfiles:
Using QLS, the user may save individual samples as separate soundfiles. These may be loaded into the K250 one at a time, then grouped or regrouped into keyboard set-ups. These resulting new groups may then be off-loaded to the Macintosh as Digitizer Memory files and saved to disk. Soundfiles may also be edited directly using the Sound Designer™ software by DigiDesign. This will be covered under external file editing, below.
To reorder soundfiles into new Digitizer Memory files:
- 1) After a sampling session, or after loading in a Digitizer Memory file, save each soundfile by following the directions under saving files on page UTIL 4. Make sure to select Sound File as the file type.
- 2) Once all the samples are saved, initialize the digitizer memory bank (see the Sound Modeling Program chapter).
- 3) Choose "Load..." from the QLS FILE menu, and select Sound File as the file type.
- 4) From the file selection dialog box, select a desired soundfile to include in the new Digitizer Memory file group.
- 5) Continue loading soundfiles from any disk group until all desired soundfiles are loaded into the K250.
- 6) Using the K250's Sound Modeling Program, create all desired digitizer keyboard set-ups.
- 7) Following the "Save..." procedures detailed above, save the current group as a new Digitizer Memory file type.
External File Editing:
Within the Kbd and Seq Mover utilities there exists the capability for limited on-screen editing of keyboard set-ups, instrument voicings, and sequences. These edits are done at the Mac, and changes cannot be heard in real-time. Edited files must be saved, then loaded into the K250 before the edits may be heard. In spite of these small limitations, if you know exactly what you need to edit, these utilities can be extremely useful for quick and simplified editing.
Keyboards and Instruments:
Editing Keyboard Set-ups:
Most of the actual Keyboard Editor options are not available within this utility. Layering, splitting, transposing and other powerful aspects of the set-up editor must be performed within the K250 itself (see the Keyboard Editor Chapter for more details). This utility is mostly useful for its librarian functions. See above for details on reordering set-ups within a group. There is, however, a very useful edit function here called "Change Instrument References". This is actually quite important when reordering keyboard and instrument groups using the librarian functions listed above. Although the user can name keyboards and instruments as part of the original save procedure, the K250 links Instrument Voicings to Keyboard set-ups by number. When groups are reordered, their numbers may be changed because the first keyboard or instrument in a group is always numbered 250. Therefore, if this Change INST reference utility is not used, keyboards and instruments may be improperly numbered and thereby disconnected, changing the resultant sounds considerably. The following is the easiest procedure to follow for changing references and maintaining proper set-ups:
From the initial KBD Mover screen, select the desired keyboard, then click on the MODIFY button. Choose "Change INST References" from the MODIFY OPTIONS menu.
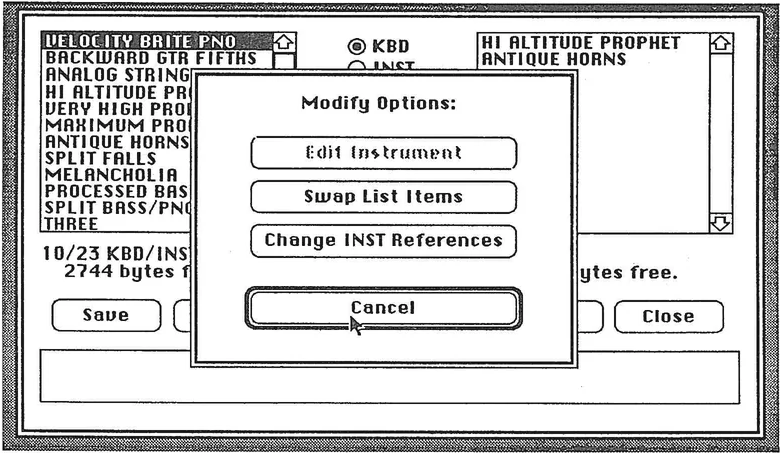
KBD/INST Modify Options dialog showing keyboard list on left with items like VELOCITY BRITE PIANO, BACKWARD GTR FIFTHS, etc. On right shows ALTITUDE PROPHET ANTIQUE HORNS. Center dialog box shows modify options including Edit Instrument, Swap List Items, Change INST References, Cancel, and Close buttons.
You will now see the Change Instrument References screen which looks like this:
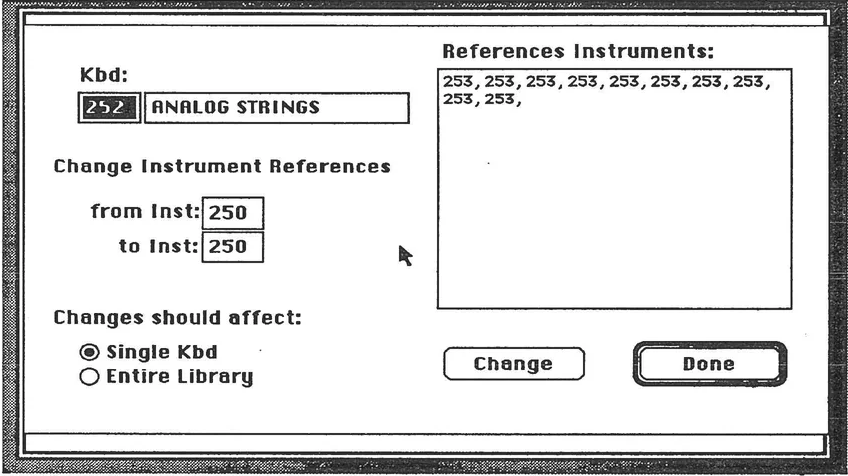
The chosen keyboard is listed by number and name. The instruments referenced are listed in the window to the right of the name. You may change the number by typing in the numbers to change from and to, and indicate whether the changes should affect just this keyboard or the entire library.
The number to change to should be the new number the Instrument was given when copied into the new group. If you do not know what this number is, click on DONE, then click on INST in the mover screen, and look through the Instrument list for the desired Instrument name. Select the desired Instrument. The bottom window will display the number for the selected Instrument. Knowing this number, you may return to the KBD screen, reenter the edit screen for "Change INST References", and complete the modification. When the correct numbers have been entered, click on the CHANGE button to complete the change action. Save the edited group to disk.
Editing Instrument Voicings:
Most functions of the Instrument Voicing Editor may be accessed through this Instrument editing screen. Most noticeably absent is the ability to edit the envelope generator. For a complete explanation of the Instrument Voicing Editor Options please refer to the Instrument Editor Chapter.
Access to this editing screen is through the INST page of the KBD Mover utility. Select the Instrument you wish to edit, then press MODIFY. Choose Edit Instrument from the Modify Options.
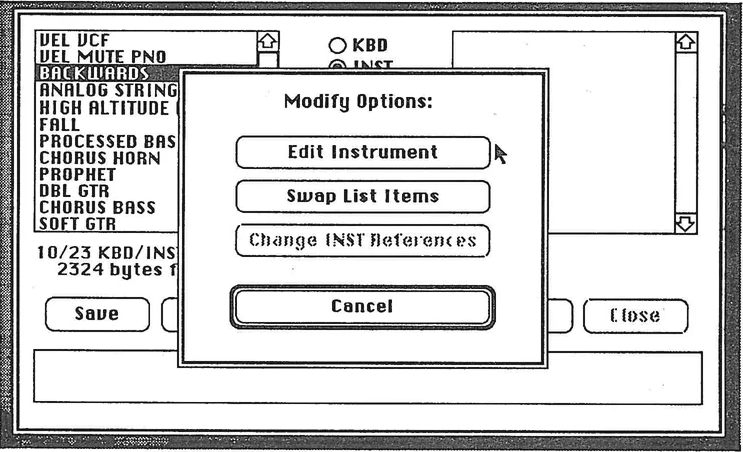
You will now see the Instrument Edit screen which looks like this:
For a complete explanation of these functions, please refer to the Instrument Voicing Editor Chapter.
Sequences:
Editing individual sequences:
Sequence editing is accessed through the Sequence Mover utility program. Select the sequence you wish to edit, then click on the MODIFY button. Choose "Edit Sequence" from the Modify Options. You will then see the Sequence Edit screen which looks like this:
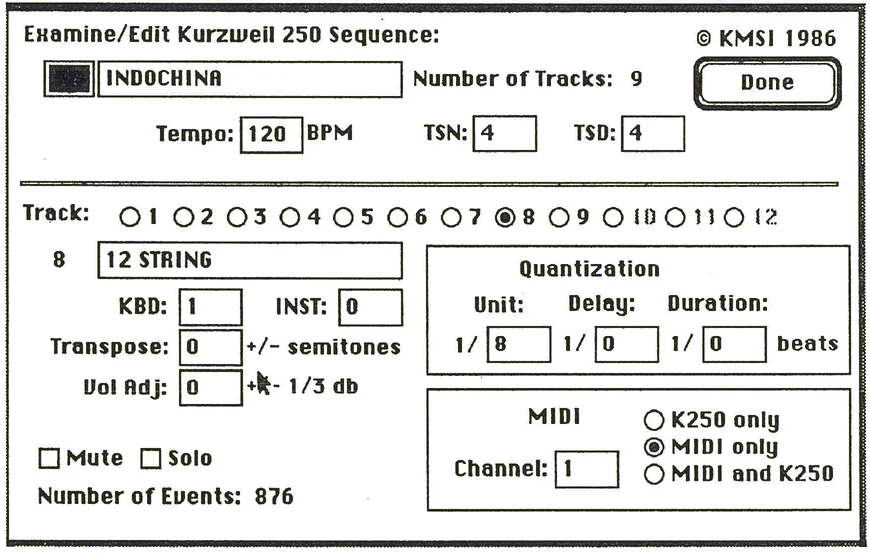
For details on these edit functions, please refer to the Sequencer Chapter.
File Format Conversion:
When K250 files are saved to the Macintosh, they are saved in a special data format unique to Kurzweil instruments. For a variety of reasons the user may need to change the file data format, such as maintaining file utility after a Kurzweil software or hardware upgrade, or for editing K250 data with third party software packages. The two file types currently available for conversion are Sequences and Soundfiles.
Sequences:
The original release of the K250 had a 4000 note sequencer. This was upgraded in version 2 to be an 8000 note file format. Version 3 brought a 12000 note format. Users with valuable sequences in the 8000 note format purchasing upgrades to the 12000 note format needed a way of converting the files to maintain upward compatibility. The software utility SeqConvert was designed for this function. Operation of this utility is quite straightforward. Run the program and choose the desired size for the converted library file from under the Convert menu.
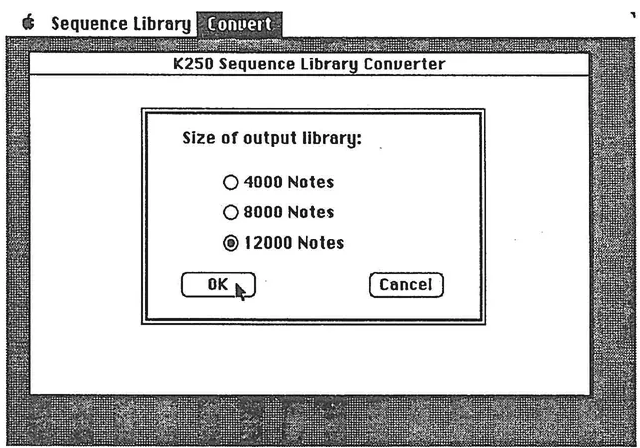
Select the desired file size for the converted sequence file by clicking on the appropriate button. You will see the standard file dialog box. Find the desired file and open it using the standard Macintosh interface methods. The program then will report the status of opening, converting, and writing the sequence back to disk. When examined with the Macintosh FINDER, the new file will appear with the old file name followed by the new file size.
Another feature of this utility is to remap keyboard set-ups in sequence files from the old CGP (prior to V 3.0) keyboard numbers to the new CGP (V 3.0 and higher) keyboard numbers. This feature is accessed under the Convert menu, selecting Remap Keyboards. You will see the following screen, which explains the remap procedure in detail:
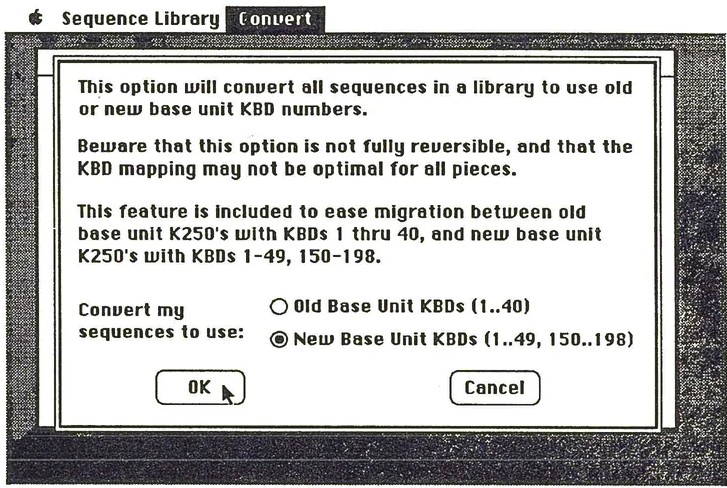
The program then will report the status of opening, remapping, and writing the sequence back to disk. When examined with the Macintosh FINDER, the new file will appear with the old file name followed by OldKBDS or NewKBDS.
Soundfiles:
The utility program "SD Convert" converts soundfiles from QLS data format to a format that may be read by Digidesign's Sound Designer and vice-versa. Sound Designer allows the user to edit soundfiles, and to display them graphically as Fast Fourier Transforms. In addition to Sound Designer functions, sounds created by Digidesign's SoftSynth additive synthesis program may be converted into QLS format, using SD Convert, for loading into the K250. These Digidesign programs augment the capabilities of the K250, and expand the available sound library by allowing access to sounds created by any sampler supported by Sound Designer.
SD Convert:
Run the SD Convert utility. Under the FILE menu you will find the options QLS to SD and SD to QLS. As you might expect, the first option allows you to take a QLS soundfile (note that you must save all your files as individual soundfiles, not digitizer memory, for this to work) and convert it to the Sound Designer format. Then you may open the file with the Sound Designer program for editing and graphic display. Please refer to the instructional manual for details on that program. Once you have made your edited Sound Designer file, and saved it to disk, you may choose the SD to QLS option in SD Convert to reconvert the file format back to the QLS data structure. Now you may run QLS, open the edited file and load it into the K250. Here is a graphic review of the entire procedure:

PART III: Appendices
| Topic | Page |
|---|---|
| Base Unit | APP 1 |
| Sound Block A | APP 7 |
| Sound Block B | APP 11 |
| Sound Block C | APP 13 |
| Sound Block D | APP 15 |
| Base Unit | APP 20 |
| Sound Block A | APP 22 |
| Sound Block B | APP 24 |
| Sound Block C | APP 25 |
| Sound Block D | APP 26 |
| Keyboard control | APP 27 |
| Controllers and assignments | APP 28 |
| Global control | APP 29 |
| MIDI Implementation sheets | APP 30 |
KEYBOARD SET-UPS AVAILABLE IN ROM
Kurzweil uses the following conventions in keyboard set-up names:
- "/" means the keyboard setup is split; see COMMENTS for split point.
- "&" means the keyboard setup is layered.
- "-" means the keyboard is a dual amplitude setup.
- "TO" means that the keyboard set-up changes to another instrument depending on the velocity of the key strike.
- "IG-A" means the instrument voicing is assigned to Instrument Group A.
- "IG-B" means the instrument voicing is assigned to Instrument Group B.
- "S" indicates a stereo split between Instrument groups A and B.
- "LNP" indicates a monophonic instrument with Low Note Priority.
- "HNP" indicates a monophonic instrument with High Note Priority.
- "HS" indicates the instrument assigned to the hard strike in a dual amplitude keyboard.
- "LS" indicates the instrument assigned to the light strike in a dual amplitude keyboard.
- "NR" indicates an instrument with no release segment.
BASE UNIT SOUNDS
| # | NAME | COMMENTS |
|---|---|---|
| 1 | KURZWEIL GRAND PIANO | An acoustic grand piano, covering up to full 88-note keyboard. IG-A. |
| 2 | ACOUSTIC BASS/PIANO | A combination of setups 9 and 1, split between C3 and D♭3. Piano is IG-A, Bass is IG-B. |
| 3 | SLOW STRINGS TO PIANO | A dual amplitude keyboard with SLOW STRINGS as the light strike (IG-B) and PIANO as the hard strike (IG-A). |
| 4 | BOWED STRINGS FAST | Bass, cello, viola, and violin sections blended into one another across a full keyboard, each souding in its correct range, and with a rapid attack. IG-A. |
| 5 | BOWED STRINGS SLOW | String section as above but with a slower attack. IG-B |
| 6 | SLOW TO FAST STRINGS | A dual amplitude keyboard with SLOW STRINGS as the light strike and FAST STRINGS as the hard strike. Both are IG-B. |
| 7 | ACOUSTIC BASS/STRINGS | A combination of set-ups 9 and 5, split between B3 and C4. Both are IG-B. |
| 8 | PIANO & SLOW STRINGS | A layered combination of setups 1 and 5, each covering the full keyboard. When you play any key you will hear both sounds. Piano is IG-A, Strings are IG-B. |
| 9 | ACOUSTIC BASS | String bass; the highest note is C4, with nothing above that on the keyboard. IG-B. |
| 10 | BOWED ACOUSTIC BASS | Same as above, but bowed rather than plucked. IG-B. |
| 11 | DOUBLED ACOUSTIC BASS | Same as set-up 9, but layered in octaves. IG-B. |
| 12 | FLUID ACOUSTIC BASS | Layer of setups 9 and 10 in unison. IG-B. |
| 13 | INFINITE ACOUSTIC BASS | Same as set-up 9 but with no release segment. IG-B. |
14 ELECTRIC ORGAN 1
Electric organ with full drawbars (volume on this setup is not velocity-sensitive). No release segment. IG-A.
15 ELECTRIC ORGAN 2
2nd organ, with different drawbar settings. Volume on this setup is not velocity-sensitive. No release segment. IG-A.
16 ELECTRIC ORGAN 3
3rd organ, with different drawbar settings. Volume on this setup is not velocity-sensitive. No release segment. IG-A.
17 ELECTRIC ORGAN 4
Electric organ percussion setting. Volume on this setup is not velocity-sensitive. IG-A.
18 VIBRATO ORGAN 1
A layer of ORGAN 3, nonvibrato IG-A with ORGAN 1 with vibrato IG-B. Volume is not velocity sensitive.
19 VIBRATO ORGAN 2
Two ORGAN 1's layered at the unison, both with vibrato. Each vibrato setting is at a different rate to create a "leslie" type of effect. ORGAN 1 with fast vibrato is IG-A and the ORGAN 2 with a slower vibrato is IG-B. Volume is not velocity sensitive.
20 DRUM KIT 1
A full kit and then some: from left to right across the keyboard you'll find tom-tom (A0-A2), kick drum (A#2-D3), snare drum (D#3-E4 with A3, A#3, and B3 at the same pitch for rolls), closed hi hat (F4-G#4), closing hi hat (A4-D5), open hi hat (D#5-G5), crash cymbal (G#5-D#6), ride cymbal (E6-G6), cowbell (G#6-b6), handclap (C7-D#7), grater stroked upward (E7), grater stroked downward (F7), sandpaper (F#7), finger snap (G7), and temple block (G#7-C8). IG-B.
21 DRUM KIT 2
Another kit, arranged differently: from left to right across the keyboard are kick drum (A0-B0), snare (C1-B1 with F1, G1,A1, and B1 at the same pitch for rolls), tom-tom (C2-B3), grater stroked upward (C4), grater stroked downward (C#4), finger snap (D4), temple block (D#4-F#4), handclap (C5-E5), crash cymbal (F5-C#6), ride cymbal (D6-F#6), closing hi hat (G6-C7), open hi hat, (C#7-F#7) and closed hi hat (G7-C8). IG-B.
22 DRUM KIT 1/2
A compressed kit -- the highest note is B3. Tom-tom (A0-A#1), Kick (B1-D2), Snare (D#2-G2), closing hi-hat (G#2), open hi hat (A2), closed hi hat (A#2), ride cymbal (B2-C3), crash (C#3-F#3), cowbell (G3-A#3), and handclap (B3). The region C4-C8 is left empty to allow for quickly split keyboards. IG-B.
23 MINI DRUMS
A basic kit in one octave; A0 through B1. Tom-tom (A0-C1), kick (C#1-D1), snare (D#1-E1), closing hi hat (F1), open hi-hat (F#1), closed hi hat (G1), ride cymbal (G#1), crash (A1), cowbell (A#1), handclap (B1). IG-B.
24 LAYERED DRUMS
Heavy sounds: a layered combination of setup 20 with a version of itself one octave lower. IG-B.
25 PERCUSSION KIT 1
Assorted percussion instruments across the entire keyboard. Ratchet (a0-F#2), guiro upstroke (G2-B2), guiro downstroke (C3-B3),sleigh bells (C4-G#5), woodblock (A5-C8). IG-B.
26 PERCUSSION KIT 2
A sweeping synth sound (A0-B3) split with a melodic woodblock (C4-C8). IG-B.
27 SPACE DRUMS
A bizarre modification of the drum kit. Space toms (A0-A2), thunderclap (A#2-G#3), space snare (A3-E4), zap hi hat (F4-D5), whoosh hi hat (D34-G5), space cymbal (G#5-G6), cow bellow (G#6-B6), laser ray (C7-C8). IG-B.
28 ALIEN PERCUSSION
Bizarre modifications of the sounds on set-up 25. Alien guiro downstroke (A0-B1), Alien sleigh bells (C2-C5), alien woodblock (C#5-C8). IG-B.
29 TRUMPET
A single trumpet from A0-C7. IG-A.
30 QUICK TRUMPET
Similar to set-up 29 but with faster attack and release times. IG-A.
31 FLUID TRUMPET
A layer of two set-up 30's slightly out of phase. One is IG-A, the other is IG-B.
32 TROMBONE
A valve trombone from A0-C7. IG-B.
33 TRUMPET & TROMBONE
A layer of trumpet and trombone in octaves (A0-C7). The trumpet is IG-A and the trombone is IG-B.
34 HORN SECTION
A three layer set-up of brass in octaves (A0-C7). All are IG-A.
35 FIFTH HORN SECTION
A four layer set-up of brass in fifths, an octave apart (A0-C7). All are IG-B.
46 FLUID ACOUSTIC GUITAR
Set-up 44 layered at the unison. One is IG-A the other is IG-B.
47 DOUBLED ACOUSTIC GUITAR
Setup 44 layered with a version of itself one octave lower. The high octave is IG-A , the low is IG-B.
48 TRIPLE ACOUSTIC GUITAR
Set-up 44 layered in three octaves. The lower two octaves are IG-A, the highest octave is IG-B.
49 SLOW ACOUSTIC GUITAR
Setup 44 with a slow attack and slow release. IG-B.
SET-UPS 50- 135 ARE USED FOR SOUND BLOCK A (OPTIONAL). 136-149 ARE RESERVED FOR FUTURE USE.
150 HARPSICHORD
A harpsichord spanning A0-A7. Non-traditionally velocity sensitive. IG-A.
151 QUICK HARPSICHORD
Same as 150 but with faster attack and release. IG-B.
152 BRIGHT HARPSICHORD
Same as 150 but with the filters opened up a bit for added brightness. IG-B.
153 DOUBLED HARPSICHORD
A layering of two 150's at the octave. The pitch played is IG-A and the octave below is IG-B.
154 FLUID HARPSICHORD
Two harpsichords doubled at the unison for the flanged effect. One is IG-A, the other is IG-B.
155 BOWED HARPSICHORD
Set-up 150 with a slow attack and release envelope. IG-B.
156 ALIEN HARPSICHORD
Bizarre tremolo and decay effects applied to set-up 150. IG-B.
157 HARPSICHORD & PIANO
A doubling of set-ups 1 and 150. A#7, B7, and C8 are piano only. HARPSICHORD is IG-A, and PIANO is IG-B.
158 HARPSICHORD & STRINGS
Set-up 4 doubled at the unison with set-up 150. The HARPSICHORD is IG-A and the STRINGS are IG-B.
159 HARPSICHORD & 8VA
Like set-up 153, except the doubling is an octave higher. The played pitch is IG-A and the higher octave is IG-B.
160 HARPSICHORD IN SPACE
After a slight delay, the notes move in contrary motion to an octave. IG-B.
161 SCI-FI HARPSICHORD
A slow decaying tremolo, a tritone in depth is applied to set-up 150. IG-A.
162 SINE WAVE
A pure tone with hard attack, across a full keyboard. IG-A.
163 BRIGHT SINE WAVE
The same as 162, but with the filters opened for a brighter effect. IG-B.
164 ENDLESS GLISSANDO
A "Shepard tone" (named after the effect's discoverer, psychologist Roger Shepard). Hold a key down and you will hear the psychoacoustic illusion of an ever-rising pitch. IG-B.
165 SYNTH SWEEP 1
This is a two layer set-up producing the effect of a sine wave arpeggiating through a minor chord, above and below the struck note. IG-A &B.
166 SYNTH SWEEP 2
Similar to 165 but with a faster arpeggiation. IG-A &B.
167 PING PONG PIANO
A two layer set-up which plays 19 decaying repetitions of the note attack. The repetitions ping pong between IG-A and IG-B. Pan the outputs hard right and left for the full stereo effect.
168 SINE DROPS
An open fifth is arpeggiated through several octaves. IG-A arpeggiates the upper note and the lower is IG-B.
169 SCI-FI PIANO 1
Like set-up 161 but with the PIANO sound. IG-A.
170 SCI-FI PIANO 2
Like 169 but the depth of the tremolo is an octave. IG-B.
171 PIANO CHOIR 1
Two layers of PIANO with slow attack and release, each having a slightly different vibrato rate. IG-A & B.
172 PIANO CHOIR 2
Similar to 171 but with an even slower attack. IG-A & B.
173 ORCHESTRA 1
A three layer set-up of BOWED FAST STRINGS in three octaves. The outer octaves are IG-A and the inner note, the note played, is IG-B.
174 ORCHESTRA 2
A four layer set-up of a diminished chord in first inversion with the fifth doubled at the octave. The key played sounds BARITONE HORN with BOWED STRINGS FAST playing the rest. IG-A & B.
SOUND BLOCK A (OPTIONAL)
| 50 | CHOIR | SATB voices blended across full keyboard in correct ranges. | |||||
|---|---|---|---|---|---|---|---|
| 51 | DOUBLED CHOIR | Choir layered with itself one octave down. | |||||
| 52 | CATHEDRAL CHOIR | Stereo, layered, with different vibrato rates and envelopes assigned to choirs on Groups A and B. | |||||
| 53 | SYNTH CHOIR | Choir with lowered brightness threshold and artificial envelope. | |||||
| 54 | SHIFTING CHOIR | Stereo layer - choirs 50 and 53 with delay | |||||
| 55 | FALLING CHOIR | Choir with LFO sawtooth wave. | |||||
| 56 | GALACTIC CHOIR | Stereo choir with LFO sawtooth wave on Group A and square wave on Group B. | |||||
| 57 | HARP/SLOW CHOIR | Mono keyboard; split at C4. "Slow Choir" is mono version of choir 52. Harp is split at F2; below F2 are continuous arpeggios, from F2 - C4 are single upward fluxes. | |||||
| 58 | TIMPANI/CHOIR | Stereo; split at C4. | |||||
| 59 | TIMPANI/HARP | Mono; split at C4. | |||||
| 60 | TIMPANI/SHIMMERING HARPS | Stereo; split at C4. Timpani on lower region, "Shimmering Harps" (stereo harps - single upward flux with square wave on Group A and sawtooth on Group B) above. | |||||
| 61 | CHIMES/HARPS w/ 8ve | Stereo; split at C4. Harp (upper half) doubled and detuned one octave. | |||||
| 62 | HARP/CHIMES | Stereo; split at C4. Chimes on upper half. | |||||
| 63 | OBOE | Full keyboard. | |||||
| 64 | DUAL ATTACK OBOE | Dual amplitude keyboard setup; on hard strikes, oboe has vibrato. | |||||
| 65 | OBOE PIPE ORGAN | 3-way layer, with oboes layered one octave up and down. | |||||
| 66 | CHIMES | A0 to C6; silence above. | |||||
| 67 | SLOW CHIMES | Range same as above; instrument has artificial slow attack. | |||||
| 68 | DIGITAL WAVES | Chimes transposed down, with extended brightness. | |||||
| 69 | SPACE CHIMES | Stereo chimes with different tremolo rates on Groups A and B, plus LFO square wave. | |||||
| 70 | FALLING CHIMES | A0 to G6; LFO sawtooth wave. |
113 GUITAR & FLUTE Mono layer; Guitar stops at C6.
114 STRINGS & FLUTE Stereo layer; full keyboard.
115 CLAR. & STRINGS & FLUTE 3-way layer. Stereo polyphonic strings; mono clarinet with low note priority; mono flute with high note priority.
116 STRINGS & OBOE Stereo layer: Oboe stops at E7.
117 SLOW STRINGS 2 Strings with slow attack and release similar to cathedral choir.
118 SLOW STRINGS DOUBLED Keyboard #117, doubled with itself at octave.
119 DUAL E. BASS/ORGAN 4 Stereo keyboard, split at C4. Organ is velocity-sensitive and ignores pitch bend; bass ignores sustain.
96 FLUID CLARINETS Layered clarinets with slow triangle wave on one layer for a "synth-like" effect.
97 AMBIENT CLARINET Clarinet with long release segment.
98 CLARINET & OBOE 2-way layer, stereo; clarinet stops at C7.
99 CLARINET & FLUTE 2-way layer, stereo; clarinet stops at C7.
100 E. BASS/SLAP BASS Plucked bass A0 to F#7; Slap bass C4 to C8.
101 DOUBLED BASS Range A0 to F#7. Keyboard 100 doubled and detuned one octave.
102 BRIGHT BASS Keyboard 100 timbre-shifted +4 semitones.
103 DUAL ELECTRIC BASS Dual amplitude keyboard, with Slap bass on hard strike. Range A0 to B3, silence above B3.
104 ELECTRIC GLISS BASSES Dual amplitude keyboard, with bass glissando on hard strike. Range A0 to B3, silence above B3.
105 FLUTE PIPE ORGAN 3-way layer, stereo: flute layered with itself +/- one octave.
106 CLARINET PIPE ORGAN 3-way layer, stereo: clarinet layered with itself +/- one octave.
107 20th CENTURY Stereo sound effect based on vibes.
108 STEEL SYNDROME Stereo vibes doubled, detuned, and timbre-shifted down.
109 LUNAR LANDING Stereo sound effect. Full keyboard.
110 ALIEN HARP Stereo sound effect based on harp. Full keyboard.
111 PIANO/FLUTE Stereo layer; full keyboard.
112 PIANO & FLUTE Stereo layer; full keyboard.
120 DUAL E. BASS/ROCK PIANO
Stereo keyboard, split at C3. Piano timbre-shifted +4 semitones with quicker release.
121 PIANO & MARIMBA
Stereo layer; marimba stops at E7.
122 PIANO & VIBES
Stereo layer; vibes stop at F6.
123 ROCK'N'ROLL PIANO
Piano timbre-shifted +4 semitones with quicker release.
124 BOWED PIANO
Piano with slow attack and release.
125 COW PIANO
Stereo layer; cowbell & piano. Full keyboard.
126 PIANO IN FOURTHS
3-way piano layer, doubled and detuned in perfect fourths.
127 PIANOMENTO
Stereo piano with octave trill.
128 CHOIR & PERCUSSION
Layer 1: Timpani A0-B1; Toms C2-G4; Crash Cymbal G#4-C6; Crash Cymbal pitch shifted down 2 octaves C#6-C8. Layer 2: Choir C2-C6.
129 SLOW STRINGS & CHOIR
Stereo; Choir A0 to D7, Strings full keyboard.
130 TINE SINE
Dual amplitude keyboard: sine wave with extended brightness on hard strikes.
134 CYMBAL WINDS
Stereo sound effect based on crash cymbal with low frequency sawtooth waves.
135 DRUM KIT 3
Modified instruments from Drum Kit 1. A0 - G#1: Electronic kick drum. A1 - F#2: Flanged snare. G2 - E3: Modified toms. F3 - F#4: Modified conga. G4 - E5: Modified snare. F5 - B5: Aliased sandpaper. C6 - G#6: Modified crash. A6 - D7: Modified hi-hat (closed). D#7 - F#7: Hi-hat (unmodified). G7 - C8: Modified fingersnaps.
SOUND BLOCK B (OPTIONAL)
Sound Block (Rock Block) contains 51 popular rock keyboard setups. You now have four electric piano variations, including the Fender Rhodes sound; electric guitars, percussion, and analog synth sounds including one based on the Mini Moog. Rock Block also contains an array of percussion instruments sounds that can called up instantly using any of the K250's ten different pre-programmed drum kit setups.
| # | NAME | COMMENTS |
|---|---|---|
| 300 | ROCK DRUMS 1 | Clean drum set |
| 301 | ROCK DRUMS 2 | Gated set |
| 302 | ROCK DRUMS 3 | Rim shot snare sound |
| 303 | ROCK DRUMS 4 | Processes acoustic drum set |
| 304 | ROCK DRUMS 5 | Reverse reverb snare |
| 305 | ROCK DRUMS 6 | Snare 1 layered with itself down a fourth |
| 306 | ROCK DRUMS 7 | Snares 1 and 2 layered; layered toms |
| 307 | ROCK DRUMS 8 | Snares 1 and 3 layered; layered toms |
| 308 | ROCK DRUMS 9 | Snares 1 and 4 layered; layered toms |
| 309 | ROCK DRUMS 10 | Snares 1 and 5 layered; layered toms |
| 310 | NONE | |
| 311 | SYNTH 1 | Mini-Moog with doubling |
| 312 | SLOW SYNTH | Slow attack with doubling |
| 313 | SYNTH LONG DECAY | Decays when held |
| 314 | VELOCITY FILTER | Key velocity affects filter cut-off |
| 315 | SOLO SYNTH 5TH | Root equals group B; down a fifth equals group A |
| 316 | SOLO SYNTH 4TH | Root equals group B; down a fourth equals group A |
| 317 | SLOW STRINGS & SYNTH | Layered |
| 318 | SYNTH BEAT | Stereo echo effect |
| 319 | ACOUSTIC GUITAR & SYNTH | Layered synth group A, group B |
320 ALIEN SYNTH Velocity sensitive, good on low notes
321 SLOW GUITAR Slow attack
322 FILTER SYNTH 2 Echoplex effects, good with chorus
323 HARMONIC FADE IN Octave harmonics fade in when held
324 ELECTRIC PIANO Dual amplitude; key velocity affects timbre
325 FILTER ELECTRIC PIANO Velocity affecting tine sound
326 ELEC PIAN & SLW STRINGS Layered
327 ELEC PIAN CHORUSED Electric Piano with doubling
328 ELEC PIAN 4TH Fourth below root; good with chorus
329 ELEC PIAN DOUBLED Octave above root
330 ELEC PIAN TRIPLED Octave plus two octaves above root
331 ACOUSTIC BASS/ELEC PIAN Split; acoustic bass to C3
332 ACOUS GUITAR/ELEC PIAN Split; acoustic guitar up to C4
334 ELEC PIAN & KURZ PIAN Layered
335 FLUID ELECTRIC PIANO Stereo chorus effect
336 LEAD GUITAR
337 MUTES-LEAD GUITAR Mutes of soft strike; leads on hard strike
338 LEAD-HARMONICS Lead on soft strike; harmonics on hard strike
339 HARMONICS-LEAD Harmonics on soft strike; lead on hard strike
340 ELEC GUIT DOUBLED Root plus octave above
341 ELEC GUIT TRIPLED Root plus octave below
342 POWER CHORD 1 Fourth below root
343 POWER CHORD 2 Fifth below root
344 POWER CHORD 3 Fifth plus octave below root
345 FLUID ELEC GUIT Stereo chorus effect
346 ELEC PIAN & SLW CHOIR Layered
347 ELEC PIAN /TRIM FLUTE Electric piano up to B4
348 ELEC PIAN/HARP UP Electric piano up to B4
349 ELEC BASS/ELEC PIAN Electric bass up to C3
SOUND BLOCK C (OPTIONAL)
400 SOLO VIOLIN Range G3 to C7-delayed vibrato
401 SOLO CELLO Range AO to G5-Vibrato
402 SOLO CELLO/SOLO VIOLIN Split at C4
403 SOLO CELLO/SOLO VIOLIN 2 Split at F#4, Solo violin an octave lower, Cello AO-G5, Violin F#4 - C7
404 SOLO CELLO & SOLO VIOLIN Stereo layer; Solo cello and solo violin, Cello/Violin
405 SLOW SOLO STRINGS Slow attack AO-C7 cello/violin split C4
406 PIANO/SOLO VIOLIN Stereo split at G4, no sustain on violin V/N 8Vb G4-C8
407 STRING SECTION 1 Solo Cello/Solo Violin (402), lowered one octave,with Bowed Strings Fast split C4-C8
408 STRING SECTION 2 Solo Cello/Solo Violin (402) layered with Bowed Strings Fast
409 PIZZACATO STRINGS Range AO to C#7
410 PIZZ FAST STRINGS Stereo layer, Pizzacato Strings and Fast Strings Pizz 8vb, C#3-A#7
411 PLUCKED HARP Range AO to A#6, Stereo layer, Harp and Pizz Strings
412 HARP & PIZZ STRINGS Stereo layer;Harp and Pizzacato Strings
413 HARP@ACOUSTIC GUITAR Stereo layer;Plucked Harp and Acoustic Guitar. (Harp layered one octave higher)
414 CELESTE AO to C8
415 HANDBELLS AO to A#6
416 CELESTE AND HAND BELLS Stereo layer; Celeste and Hand Bells
417 ACOUSTIC GUITAR/SOLO CELLO Stereo split at G#4; no sustain on cell
418 HARP/CELESTE Stereo split at G#
| 419 | SOLO STRINGS DOUBLED 8va | Stereo layer;cello and violin one octave apart cello - C7 |
|---|---|---|
| 420 | PLUCKED HARP FIFTHS | Stereo layer, Plucked Harp in 5ths. 5ths end at C#7 |
| 421 | PIANO/SOLO CELLO | Stereo split at G5; no sustain on cello |
| 422 | SOLO CELLO/PIANO | Stereo split at G4; no sustain on cello |
| 423 | HAWAIAN HARP | Harp modified with LFO |
| 424 | HARP & FAST STRINGS | Stereo layer;no sustain on strings |
| 425 | PIANO & HARP | Stereo layer;no sustain piano |
| 426 | PIANO & PIZZ STRINGS | Stereo layer, piano and pizzacato strings |
| 427 | HARP/ SOLO CELLO | Harp on bottom; split at C#5 |
| 428 | HARP/SOLO VIOLIN | Split at G4, no sustain on violin |
| 429 | BASSOON | AO to C6 |
| 430 | BASSOON W/VIBRATO | AO to C6 |
| 431 | MELLOW BASSOON | AO to C6 |
| 432 | BASSOON (TOUCH SENSITIVE) | Touch sensitive brightness |
| 433 | BASSOON DOUBLED 8VA | Basoon Doubled at the octave |
| 434 | BASSOON & FAST STRINGS | Stereo layer; bassoon and fast strings, bassoon ends at C6 |
| 435 | BASSOON & SOLO CELLO | Stereo layer; bassoon and solo cello,AO - C6 |
| 436 | BASSOON/SOLO VIOLIN | Stereo split at G3, Violin ends at C7 |
| 437 | BASSOON & BRASS | Stereo layer; bassoon and brass |
| 438 | BASSOON & PIZZ STRINGS | Stereo layer; bassoon and pizzacato strings Pizz 8va end at A#6 |
| 439 | SAWTOOTH WAVE | AO to C8 |
| 440 | SAWTOOTH (TOUCH SENSITIVE) | Touch sensitive brightness with chorusing |
| 441 | LEAD SYNTH | AO to C8 |
| 442 | LEAD SYNTH 2 (5ths) | Lead synth layered in fifths |
| 443 | ELECTRONIC PIANO | AO to C8 |
444 CATHEDRAL ORGAN & CHOIR
Manual region: Cathedral Pipe Organ layered with Choir, C3 to C8; Bass pedal region:Cathedral Pipe Organ, AO to C3
445 CHURCH ORGAN & CHOIR
Manual region:Church Organ layered with choir from G3 G7;Bass Pedal Region: Cathedral Pipe Organ, AO to C3
446 CATHEDRAL ORGAN 1
Manual region: C3 to C8; Bass Pedal Region: AO to C3
447 CATHEDRAL ORGAN 2
Manual Region: Cathedral Organ 1 doubled at the octave, C3 to C8; Bass Pedal Region: Cathedral Pipe Organ 1
448 CHURCH PIPE ORGAN 1
Manual Region: Church Pipe Organ, C3 to C8; Bass Pedal Region:Church Pipe Organ, AO to B2
449 CHURCH PIPE ORGAN 2
Manual Region: Church Pipe Organ 1, C3 to C8; Bass Pedal Region:Cathedral Organ, AO to C3
450 CHURCH PIPE ORGAN 3
Manual Region: Church Pipe Organ 1, doubled at the octave, C3 to C8; Bass Pedal Region: Cathedral Pipe Organ, AO ito C3
451 CHURCH PIPE ORGAN 4
Manual Region: Church Pipe Organ, doubled at the second octave, C3 to C8; Bass Pedal Region: Cathedral Pipe Organ, AO to C3
452 ELECTRIC PIPE ORGAN 1
Manual Region: Electric Pipe Organ, C3 to C8; Bass Pedal Region: AO to B2
453 ELECTRIC PIPE ORGAN 2
Manual Region: Electric Pipe Organ 1, doubled at the second octave, C3 to C8; Bass Pedal Region: AO to B2
454 GOSPEL ORGAN 1
Electric Organ 1 with rotor speaker effect
455 GOSPEL ORGAN 2
Electric Organ 2 with rotor speaker effect
SOUND BLOCK D (OPTIONAL)
600 SOLO TRUMPET
A trumpet with no vibrato, spanning the region of A0 to A6. IG-A.
601 TRUMPET MUTES
Trumpet with a Harmon mute, (tip out), and no vibrato, covering the region A0 to E6. IG-B.
602 SOLO TROMBONE
A slide trombone with no vibrato covering the region A0 to A5. IG-A.
603 DUAL HARDNESS TENOR
A touch sensitive tenor sax keyboard. The Soft Strike is assigned to a medium attack tenor sax sound, and the Hard Strike is assigned to a hard growl sax sound. The range is from A0 to C6. IG-B
604 TENOR SAX
A medium attack tenor sax sound without vibrato, range of A0 to C6. (equivalent to the Soft Strike of KBD603). IG-B.
605 GROWL SAX
A hard growl tenor sax sound, range of A0 to C6. (equivalent to the Hard Strike of KBD 603). IG-B.
606 SOFT TENOR SAX
A "breathy", soft attack tenor sax sound, covering the region A0 to A5. IG-A.
607 STABS (FALLS)
A fast attack horn section that "falls" when keys are held down. Covers range A0 to A6. IG-B.
608 SQUARE WAVE
A pure square wave tone with a hard attack, across the full keyboard. IG-B.
609 DIGITAL WAVEFORM 1
A klavinet like tone with a hard attack covering a range of A0 to G7. IG-B.
610 MELLOW TROMBONE
A solo trombone similar to KBD 602 but with a "mellower" low end. Range A0 to A5. IG-A.
611 BASS TRUMPET
KBD 600, The SOLO TRUMPET, timbre shifted down 12 semitones. Range A0 to A5. IG-A.
619 TRP & STABS & MUTES
A 3 layer combination of setups 600, 601, and 607. Both the TRUMPET and the MUTES have a quick decay env. and are IG-A. STABS are IG-B.
620 DUAL TENOR & STABS
A layered combination of setups 603 and 607. DUAL TENOR has a quick decay env. and is IG-A. STABS are IG-B.
621 DUAL TEN & TRP & STAB
A 3 layer keyboard consisting of setups 600, 603 and 607. TRUMPET and DUAL TENOR have quick decay envs., and are IG-A. STABS are IG-B.
622 BIG BAND 1
A 2 layer combination of setups 600, 602, and 604. The TRUMPET and the TROMBONE occupy the first layer; the split point between F4 and FS4 with the TROMBONE covering the lower region. The TENOR SAX alone occupies the second layer in the region of A2 to F5.TRUMPET and TROMBONE are IG-A and TENOR SAX is IG-B.
623 BIG BAND 2
Very similar to BIG BAND 1, the only difference being the use of the SOFT TENOR SAX (606) in the second layer instead of setup 604, TENOR SAX.
624 TRP & BONE & STRING
A 3 layer combination of setups 600, 602 and setup 4, BOWED STRINGS FAST. STRINGS and TRUMPET are IG-A while TROMBONE is IG-B.
625 TRUMPET W/ VIBRATO
Essentially the same as setup 600 except the TRUMPET has a delayed vibrato and is now IG-B.
626 MUTED TRP W/ VIB
Setup 601, TRUMPET MUTES, with a delayed vibrato. IG-B.
627 DUAL TENOR W/ VIB
Setup 603, DUAL HARDNESS TENOR, with a delayed vibrato. IG-B.
628 TROMBONE W/ VIBR
Setup 602, SOLO TROMBONE, with a delayed vibrato. IG-B.
629 A. BASS/ TRUMPET
A split combination of setups 9 (ACOUSTIC BASS) and 600 (SOLO TRUMPET), split at B3 and C4. The BASS ignores pitch bend and vibrato and is IG-B. The TRUMPET is transposed up an octave, ignores sustain and is IG-A.
630 A. BASS/ MUTED TRP
A split combination of setups 9 and 601, split at B3 and C4. The BASS ignores pitch bend and vibrato and is IG-B. The MUTES are transposed up an octave, ignore sustain and are IG-A.
631 A. BASS/TROMBONE
A split keyboard using setups 9 and 602, split point at B3 and C4. The BASS ignores p. bend and vibr. and is IG-B. The TROMBONE is transposed up 2 octaves, ignores sustain, and is IG-A.
632 A. BASS/SOFT TENOR
Another split keyboard. This one using setups 9 and 606, split at D3 and C4. BASS ignores p. bend and vibr and is IG-B. SOFT TENOR is transposed up 1 octave, ignores sustain, and is IG-A.
633 A.BASS/DUAL TENOR
A split combination of setups 9 and 603. Again, the split is at B3/C4, and the BASS ignores p.bend and vibr on IG-B. The DUAL HARDNESS TENOR has a delayed vibrato, is transposed up 1 octave, ignores sustain and is IG-A.
634 TRUMPET & TROMBONE
A layered combination of setups 600 and 602. TRUMPET is IG-A. TROMBONE is IG-B.
635 BONE & SOFT TENOR
A layered keyboard using setups 602 and 606. TROMBONE is IG-B; SOFT TENOR SAX is IG-A.
636 BONE & DUAL TENOR
A layered combination of setups 602 and 603. TROMBONE is IG-A; DUAL TENOR is IG-B.
637 BONE & MUTED TRUMPET
A layered combination of setups 601 and 602. TROMBONE is IG-A; MUTED TRUMPET is IG-B.
638 BONE & TRP & SOFT TEN
A 3 layer keyboard using setups 600, 602 and 606. TROMBONE and SOFT TENOR are IG-A, while TRUMPET is IG-B.
639 BONE & TRP & MUTE
A 3 layer combination of setups 600, 601, and 602. TRUMPET and TROMBONE are IG-A, while MUTES are IG-B.
640 DUAL TEN & SOFT TEN
A layered combination of setups 603 and 606. SOFT TEN IG-A. DUAL TEN IG-B.
641 BONE & 2 SAXES
A 3 layer keyboard using setups 602, 603, and 606. SOFT TENOR is IG-A, while TROMBONE and DUAL TENOR are IG-B.
642 TRIO SECTION 1
This keyboard uses 3 setups, 600, 602, and 603. The TRUMPET and TROMBONE are both monophonic instruments. The TRUMPET is assigned High Note Priority on IG-A, while the TROMBONE takes Low Note Priority on IG-B. The DUAL TENOR is polyphonic in its normal range (IG-B)
643 TRIO SECTION 2
This setup is quite similar to TRIO SECTION 1, except that it uses SOFT TENOR (IG-A) in place of DUAL TENOR.
644 SFZ TROMBONE SWELL
This single layer keyboard uses the TROMBONE (602) with a 5 segment envelope that gives it a sforzando attack, a swell on sustain, and a quick release. IG-A.
645 SFZ SAX SWELLS
A layered combination of the 2 saxes, 603 and 606. Both layers have the same envelope used in KBD 644. SOFT TENOR is IG-A, DUAL TENOR is IG-B.
646 SAX SYNTH
A lead sax sound using setup 604, TENOR SAX with full chorusing and some brightness. (stereo).
647 SQUARE WAVE SYNTH 1
Setup 608, SQUARE WAVE, layered with itself in unison. One layer has a slight vibrato to give the sound a "phasing" effect. Both layers are also timbre shifted, have had some brightness removed and are on different IGs.
648 SQUARE WAVE SYNTH 2
Similar to setup 647 only with the brightness filter fully opened up.
649 SLOW SQUARE SYNTH
Another variation of 608, the SQUARE WAVE. Stereo chorusing, brightness, tremolo, and envelope editing here.
650 TOUCH SENS. SQUARE
A SQUARE WAVE synth setup with key velocity affecting brightness. (stereo)
651 DIGITAL E. PIANO
Setup 609, DIGITAL WAVEFORM 1, layered with itself in unison. Vibrato on one layer for phasing. Timbre shifts and brightness added also. Just one of many interesting possibilities with this sound... Experiment!
652 DIGITAL KLAV #1
A funky klavinet like sound made from setup 609, DIGITAL WAVEFORM 1. Key to brightness and stereo chorusing used here.
FACTORY BASE UNIT INSTRUMENTS
| INST # | NAME | RANGE | SOURCE KEYBOARD SETUP | SETUP # |
|---|---|---|---|---|
| 1 | GRAND PIANO | A0-C8 | KURZWEIL GRAND PIANO | 1 |
| 2 | FAST STRINGS | A0-C8 | BOWED STRINGS FAST | 4 |
| 3 | SLOW STRINGS | A0-C8 | BOWED STRINGS SLOW | 5 |
| 4 | ACOUSTIC BASS | A0-C4 | ACOUSTIC BASS | 9 |
| 5 | BOWED A. BASS | A0-C4 | BOWED ACOUSTIC BASS | 10 |
| 6 | FLUID A. BASS | A0-C4 | FLUID ACOUSTIC BASS | 12 |
| 7 | INFINITE BASS | A0-C4 | INFINITE ACOUSTIC BASS | 13 |
| 8 | ELECT. ORGAN 1 | A0-C8 | ELECTRIC ORGAN 1 | 14 |
| 9 | ELECT. ORGAN 2 | A0-C8 | ELECTRIC ORGAN 2 | 15 |
| 10 | ELECT. ORGAN 3 | A0-C8 | ELECTRIC ORGAN 3 | 16 |
| 11 | ELECT. ORGAN 4 | A0-C8 | ELECTRIC ORGAN 4 | 17 |
| 12 | EFFECTS ORGAN 1 | A0-C8 | VIBRATO ORGAN 1 | 18 |
| 13 | EFFECTS ORGAN 1 | A0-C8 | VIBRATO ORGAN 2 | 19 |
| 14 | TRUMPET 1 | A0-C7 | TRUMPET | 29 |
| 15 | TRUMPET 2 | A0-C7 | QUICK TRUMPET | 30 |
| 16 | BAR HORN 1 | A0-C6 | BARITONE HORN 1 | 38 |
| 17 | BAR HORN 2 | A0-C6 | BARITONE HORN 2 | 39 |
| 18 | VALVE TROMBONE | A0-C7 | TROMBONE | 32 |
| 19 | FLUID TRUMPET | A0-C7 | FLUID TRUMPET | 31 |
| 20 | HORN SECTION 1 | A0-C7 | HORN SECTION | 34 |
| 21 | HORN SECTION 2 | A0-C7 | FIFTH HORN SECTION | 35 |
| 22 | KICK DRUM | A#2-C#3 | DRUM KIT 1 | 20 |
| 23 | SNARE DRUM | D#3-E4 | DRUM KIT 1 | 20 |
| 24 | TOM-TOM #1 | A0-A2 | DRUM KIT 1 | 20 |
| 25 | COWBELL | G#6-B6 | DRUM KIT 1 | 20 |
| 26 | HAND CLAP | C7-D#7 | DRUM KIT 1 | 20 |
| 27 | RIDE CYMBAL | E6-G6 | DRUM KIT 1 | 20 |
| 28 | CRASH CYMBAL | G#5-D#6 | DRUM KIT 1 | 20 |
| 29 | HI HAT OPEN | D#5-G5 | DRUM KIT 1 | 20 |
| 30 | HI HAT CLOSING | A#4-D5 | DRUM KIT 1 | 20 |
| 31 | HI HAT CLOSED | F4-A4 | DRUM KIT 1 | 20 |
| 32 | FINGER SNAP | G7-G7 | DRUM KIT 1 | 20 |
| 33 | TEMPLE BLOCK | G#7-C8 | DRUM KIT 1 | 20 |
| 34 | GRATER DOWN | F7-F7 | DRUM KIT 1 | 20 |
| 35 | GRATER UP | E7-E7 | DRUM KIT 1 | 20 |
| 36 | SANDPAPER | F#7-F#7 | DRUM KIT 1 | 20 |
| 37 | RATCHET | A0-F#2 | PERCUSSION KIT 1 | 25 |
| 38 | DOWN GUIRO | C3-B3 | PERCUSSION KIT 1 | 25 |
| 39 | UP GUIRO | G2-B2 | PERCUSSION KIT 1 | 25 |
| 40 | WOOD BLOCK | A5-C8 | PERCUSSION KIT 1 | 25 |
| 41 | MELODIC WOODBLOCK | C4-C8 | PERCUSSION KIT 2 | 26 |
| 42 | SLEIGH BELLS | C4-G#5 | PERCUSSION KIT 1 | 25 |
| 43 | ACOUSTIC GUITAR | A0-G6 | ACOUSTIC GUITAR | 44 |
| 44 | BRIGHT GUITAR | A0-G6 | SUSTAIN ACOUSTIC GUITAR | 45 |
| 45 | FLUID GUITAR | A0-G6 | FLUID ACOUSTIC GUITAR | 46 |
| 46 | SLOW GUITAR | A0-G6 | SLOW ACOUSTIC GUITAR | 49 |
| 150 | HARPSICHORD 1 A | A0-A7 | HARPSICHORD | 150 |
| 151 | HARPSICHORD 2 B | A0-A7 | QUICK HARPSICHORD | 151 |
152 BRIGHT HARPSICH. A0-A7 BRIGHT HARPSICHORD 152
153 FLUID HARPSI 1 A0-A7 FLUID HARPSICHORD 154
154 FLUID HARPSI 2 A0-A7 FLUID HARPSICHORD 154
155 BOWED HARPSICH A0-A7 BOWED HARPSICHORD 155
156 ALIEN HARPSICH A0-A7 ALIEN HARPSICHORD 156
157 SINE WAVE A0-C8 SINE WAVE 162
158 BRIGHT SINE A0-C8 BRIGHT SINE WAVE 163
159 QUICK PIANO A0-C8 GRAND PIANO 1
160 GLISSANDO BY BC A0-C8 ENDLESS GLISSANDO 164
161 PING PONG A A0-C8 PING-PONG PIANO 167
162 PING PONG B A0-C8 SINE DROPS 168
163-168 SAMPLE & HOLD A-F A0-C8 SINE DROPS 168
| 205 | PERCUSSION KIT 1 | A0-B3 | PERCUSSION KIT 1 | 26 |
|---|---|---|---|---|
| 206 | CHORUS ORGAN 4 | A0-C8 | ELECTRIC ORGAN 4 | 17 |
| 207 | SLOW BALLAD 01 | A0-C8 | SLOW BALLAD ORGAN 1 | 187 |
| 208 | SLOW BALLAD 02 | A0-C8 | SLOW BALLAD ORGAN 2 | 188 |
| 209 | TRUMPET VIBRATO | A0-C7 | VIBRATO TRUMPET | 37 |
| 210 | SYNTH GAMELAN | A0-C8 | SYNTH GAMELAN | 191 |
| 211 | SINAMENTO | A0-C8 | SINAMENTO | 192 |
SOUND BLOCK A
| Number | Name | Hi Note | Source Keyboard | |
|---|---|---|---|---|
| 50 | CHOIR B | C7 | CHOIR | 50 |
| 51 | CHOIR A | C7 | CHOIR | 50 |
| 52 | CATHEDRAL CHOIR A | C7 | CHOIR | 50 |
| 53 | CATHEDRAL CHOIR B | C7 | CHOIR | 50 |
| 54 | SYNTH CHOIR B | C7 | CHOIR | 50 |
| 55 | SHIFT CHOIR 2 A | C7 | CHOIR | 50 |
| 56 | FALLING CHOIR B | C7 | CHOIR | 50 |
| 57 | TORMENT CHOIR A | C7 | CHOIR | 50 |
| 58 | TORMENT CHOIR B | C7 | CHOIR | 50 |
| 59 | GALACTIC CHOIR A | C7 | CHOIR | 50 |
| 60 | HARP STROKE NR A | C8 | TIMP/HARP | 59 |
| 61 | HARP LOOP B | C6 | TIMP/HARP | 59 |
| 62 | SHIMMER HARP A | C6 | T/SHIM HARPS | 60 |
| 63 | SHIMMER HARP B | C6 | T/SHIM HARPS | 60 |
| 64 | SHIMMER HARP NR A | C8 | T/SHIM HARPS | 60 |
| 65 | SHIMMER HARP NR B | C8 | T/SHIM HARPS | 60 |
| 66 | HARP W/DELAYS | C6 | TIMP/HARP | 59 |
| 67 | HARP W/DELAYS NR S | C8 | TIMP/HARP | 59 |
| 68 | OBOE B | C8 | OBOE | 63 |
| 69 | SLOW OBOE B | C8 | OBOE | 63 |
| 70 | OBOE W/VIBRATO B | C8 | OBOE | 63 |
| 71 | MONO OBOE FLNP B | C8 | OBOE | 63 |
| 72 | CHIMES A | G6 | CHIMES | 66 |
| 73 | SLOW CHIMES A | G6 | CHIMES | 66 |
| 74 | DIGITAL CHIMES A | G6 | CHIMES | 66 |
| 75 | SPACE CHIMES S | G6 | CHIMES | 66 |
| 76 | FALLING CHIMES A | G6 | CHIMES | 66 |
| 77 | FLUID CHIMES S | G6 | CHIMES | 66 |
| 78 | QUICK CHIMES A | G6 | CHIMES | 66 |
| 79 | FLUTE W/ TREMOLO B | C8 | FL W/TREM | 74 |
| 80 | DUAL FLUTE LS B | C8 | D/A FLUTE | 75 |
| 81 | DUAL FLUTE HS B | C8 | D/A FLUTE | 75 |
| 82 | MONO CLARINET LNP A | C7 | CLARINET | 94 |
| 83 | PIANOMENTO B | C8 | KURZ GRAND PIANO | 1 |
| 84 | NO PITCHBEND B | C8 | KURZ GRAND PIANO | 1 |
| 85 | NO SUSTAIN B | C8 | E./SLAP BASS | 100 |
| 86 | SUSTAIN ONLY A | C8 | KURZ GRAND PIANO | 1 |
| 87 | NO EFFECTS B | C8 | KURZ GRAND PIANO | 1 |
| 88 | BENT TOM TOM B | B3 | DRUM KIT 3 | 135 |
89 SUBMARINE B B5 DRUM KIT 3 135 90 ROCK SNARE B F2 DRUM KIT 3 135 91 AUTORHYTHM B E5 DRUM KIT 3 135 92 BUBBLE KICK B C#1 DRUM KIT 3 135 93 MARIMBA A E7 MARIMBA 80 94 TIMPANI B G4 TIMP/FL TIMP 85 95 CONGA A D4 CONGA/SL/RING 86 96 SLAPPED CONGA B C6 CONGA/SL/RING 86 97 RINGING CONGA B C8 CONGA/SL RING 86 98 VIBES B C8 VIBES 87 99 VIBES/W TREMOLO A C8 VIBES W/TREM 88 100 FLUID VIBES A C8 VIBES 87 101 STEREO VIBES 1 S C8 STEREO VIBES 90 102 STEREO VIBES 2 S C8 STEREO VIBES 90 103 DIGITAL VIBES A C8 DIGIT.VIBES 91 104 SLAPPED BASS B C8 EL./SLAP BASS 100 105 PLUCKED BASS B C8 EL./SLAP BASS 100 106 BRIGHT BASS B C8 BRIGHT BASS 102 107 GLISS BASS UP B C8 EL. GLISS BASSES 104 108 GLISS BASS DOWN B B3 EL. GLISS BASSES 104 109 CLARINET W/VIBRATO A C7 CLARINET 94 110 FLUID CLARINET A C7 CLARINET 94 111 AMBIENT CLARINET A C7 CLARINET 94 112 1000 MARIMBAS A E7 1000 MARIM. 93 113 1000 MARIMBAS B E7 1000 MARIM. 93 114 20TH CENTURY S C8 20TH CENT. 107 115 STEEL SYNDROME S C8 ST. SYNDROME 108 116 LUNAR LANDING 1 S C8 LUN. LANDING 109 117 LUNAR LANDING 2 S C8 LUN. LANDING 109 118 ALIEN HARP S C8 ALIEN HARP 110 119 HORN SECTION 2 A C7 *HORN SEC. 2 133 120 HORN SECTION 2 B C7 *HORN SEC. 2 133 121 FLANGED CRASH B G6 DRUM KIT 3 135 122 SYNTH TABLA 1 B B3 DRUM KIT 3 135 123 SYNTH TABLA 2 B B3 DRUM KIT 3 135 124 GREMLINS B C8 DRUM KIT 3 135 125 FLUTE B C8 FLUTE 73 126 CLARINET A C7 CLARINET 94 127 MONO CLARINET HNP A C7 CLARINET 94 128 ROCK PIANO LO A C3 R&R PIANO 123 129 ROCK PIANO HI A C8 R&R PIANO 123 130 TINE SINE A C8 TINE SINE 130 131 CYMBAL WIND 1 A C8 CYMB. WINDS 134 132 CYMBAL WIND 1 B C8 CYMB. WINDS 134 133 QUIET ORGAN B C8 EL. ORGAN 4 13 134 BAR. HORN SEC. A C6 BAR HORN SEC 132 135 BAR. HORN SEC. B C6 BAR HORN SEC 132 136 BOWED PIANO B C8 KURZ GR PIANO 1 137 SLOW STRINGS 2 A C8 BOWED STR FAST 4 138 BASS ACCOMPAN B B3 EL/SLAP BASS 100
SOUND BLOCK B INSTRUMENT LIST
| Sound Block B instrument list with Number, Name, Hi Note, and Source Keyboard columns |
SOUND BLOCK B
| Number | Name | Hi Note | Source Keyboard # |
|---|---|---|---|
| 300 | SNARE 1 | E4 | 300 |
| 301 | SNARE 2 | E4 | 301 |
| 302 | SNARE 3 | E4 | 302 |
| 303 | SNARE 4 | E4 | 303 |
| 304 | SNARE 5 | E4 | 304 |
| 305 | BASS DRUM 1 | D3 | 300 |
| 306 | BASS DRUM 2 | D3 | 301 |
| 307 | BASS DRUM 3 | D3 | 302 |
| 308 | BASS DRUM 4 | D3 | 303 |
| 309 | BASS DRUM 5 | D3 | 304 |
| 310 | TOM TOM 1 | A2 | 300 |
| 311 | TOM TOM 2 | D2 | 300 |
| 312 | TOM TOM 3 | G1 | 300 |
| 313 | CLOSED HI HAT | A4 | 300 |
| 314 | CLOSING HI HAT | D5 | 300 |
| 315 | OPEN HI HAT | G5 | 300 |
| 316 | DUAL RIDE CYMBAL | B6 | 301 |
| 317 | CRASH CYMBAL | E6 | 300 |
| 318 | RIM SHOT | G3 | 300 |
| 319 | HAND CLAPS | D#7 | 300 |
| 320 | RIDE BELL | B6 | 300 |
| 321 | RIDE RIM CYM | G6 | 300 |
| 322 | TOUCH FILTER | C8 | 1 |
| 325 | SYNTH #1 | D5 | 311 |
| 326 | LONG DECAY | C5 | 313 |
| 327 | VELOCITY FILTER 1 | C8 | 314 |
| 328 | SLOW SYNTH 1 | C5 | 312 |
| 330 | SYNTH BEAT | C5 | 318 |
| 331 | FILTER SYNTH 2 | C5 | 311 |
| 332 | SYNTH 5TH (CHORUS) | C8 | 315 |
| 334 | SLOW GUITAR 1 | C7 | 321 |
| 335 | LEAD GUITAR FADE | C7 | 323 |
| 336 | HARMONIC FADE IN | C7 | 336 |
| 337 | GUITOPLEX | C7 | 336 |
| 338 | SLOW GUITAR 2 | C7 | 321 |
| 339 | SYNTH 4TH (CHORUS) | C8 | 316 |
| 340 | GUITAR DECAY | C7 | 336 |
| 341 | SLO SYN (FOR STRS) | C8 | 311 |
| 342 | SLO STRS (FOR SYN) | C8 | 5 |
| 343 | ALIEN TRUMPET | C8 | 1 |
| 344 | SYNTH DECAY (FOR FX) | C8 | 311 |
| 345 | ELECTRIC PIANO | C8 | 324 |
| 346 | FILTER E. PIANO | C8 | 325 |
| 347 | CHORUS: DOUBLING | C8 | 327 |
| 348 | FLUID | C8 | 335 |
| 349 | ELECTRIC GUITAR | C7 | 336 |
| 350 | MUTES-LEAD GUITAR | C7 | 337 |
| 351 | LEAD-HARMONICS | C7 | 338 |
| 352 | HARMONICS-LEAD | C7 | 339 |
| 353 | SLOW CHOIR | C7 | 50 |
354 TREM NO SUSTAIN C8 74 355 STRINGS SUS DECAY C8 5 356 HARP STROKE UP C8 59 357 VIBRATO ONLY C8 1 358 PITCH BEND ONLY C8 1 359 NO CHORUS C8 1
SOUND BLOCK C INSTRUMENT LIST
| Number | Name | Hi Note | Source Keyboard # | ||||||
|---|---|---|---|---|---|---|---|---|---|
| 400 | SOLO VIOLIN (B) | C7 | 400 | ||||||
| 401 | SOLO CELLO (A) | G5 | 401 | ||||||
| 402 | SLOW SOLO VIOLIN | C7 | 400 | ||||||
| 403 | SLOW SOLO CELLO | G5 | 401 | ||||||
| 404 | S. VIOLIN NO SUSTAIN | C7 | 400 | ||||||
| 405 | PIZZICATO STRINGS | A#6 | |||||||
| 406 | PLUCKED HARP (A) | C#7 | 411 | ||||||
| 407 | CELESTE (B) | C8 | 414 | ||||||
| 408 | HANDBELLS (A) | A#6 | |||||||
| 409 | SLIDING HARP | C#7 | 411 | ||||||
| 410 | S. CELLO NO SUSTAIN (A) | G5 | 401 | ||||||
| 411 | S. CELLO NO SUSTAIN (B) | G5 | 401 | ||||||
| 412 | NO SUST FAST STRING | C8 | 4 | ||||||
| 413 | NO SUST PIANO (B) | C8 | 1 | ||||||
| 414 | NO SUST PIANO (A) | C8 | 1 | ||||||
| 415 | BASSOON (A) | C6 | 429 | ||||||
| 416 | BASSOON W/VIBRATO | C6 | 429 | ||||||
| 417 | MELLOW BASSOON | C6 | 429 | ||||||
| 418 | BASS. T. SENS. BRIGHT | C6 | 429 | ||||||
| 419 | BASSOON (B) | C6 | 429 | ||||||
| 420 | NO SUST BASSOON | C6 | 429 | ||||||
| 421 | SAWTOOTH WAVE (B) | C8 | 439 | ||||||
| 422 | T.SENS.CHOR.S.TOOTH | C8 | 439 | ||||||
| 423 | SAWTOOTH PIANO | C8 | 439 | ||||||
| 424 | P. ORGAN BASS | C4 | 9 | ||||||
| 425 | P. ORGAN FULL STOPS | C8 | 446 | ||||||
| 426 | P. ORGAN-8'4' CELESTE | C8 | 448 | ||||||
| 427 | CHORUSED SAWTOOTH | C8 | 439 | ||||||
| 428 | P. ORG-BASS-BASSOON | C6 | 429 | ||||||
| 429 | SAWTOOTH ORGAN | C8 | 439 | ||||||
| 430 | P. ORGAN-SINE WAVE' | C8 | 162 | ||||||
| 431 | FULL P. ORGAN-MELLOW | C8 | 446 | ||||||
| 432 | PIPE ORGAN-BASSOON | C6 | 429 | ||||||
| 433 | P. ORGAN-S.WAVE BRIGHT | C8 | 162 | ||||||
| 434 | CHOIR (B) | C7 | 50 | ||||||
| 435 | BASSOON W/VIB (A) | C6 | 429 | ||||||
| 436 | PIANO-ORGAN | C8 | 1 | ||||||
| 437 | P. ORGAN-FULL BASS (A) | C8 | 446 | ||||||
| 438 | P. ORGAN-FULL (A) | C8 | 446 | ||||||
| 439 | P. ORG.FULL-BASS 2 (A) | C8 | 446 | ||||||
| 440 | P. ORGAN 8'4' (A) | C8 | 448 |
441 P. ORGAN BASS ATT 30 C4 9 442 GOSPEL ORGAN C8 14 443 ELECTRIC ORGAN 2+ C8 15
SOUND BLOCK D INSTRUMENT LIST
| Number Name Hi Note Source Keyboard # |
| 600 SOLO TRUMPET A6 600 |
| 601 TRUMPET MUTES E6 601 |
| 602 SOLO TROMBONE A5 602 |
| 603 GROWL SAX C6 605 |
| 604 TENOR SAX 1 C6 604 |
| 605 DUAL HARDNESS TENOR C6 603 |
| 606 SOFT TENOR SAX A5 606 |
| 607 FALLS A6 607 |
| 608 SQUARE WAVE C8 608 |
| 609 SQUARE WAVE SYNTH 1A C8 608 |
| 610 SQUARE WAVE SYNTH 1B C8 608 |
| 611 SQUARE WAVE SYNTH 2A C8 608 |
| 612 SQUARE WAVE SYNTH 2B C8 608 |
| 613 SLOW SQUARE SYNTH C8 608 |
| 614 SAX SYNTH C6 603 |
| 615 NO SUSTAIN A A5 602 |
| 616 DIGITAL WAVEFORM 1 C8 609 |
| 617 TRUMPET STAB (ENV) A6 600 |
| 618 TENOR W/ DELAYED VIBR C6 603 |
| 619 TRUMP W/ DELAYED VIBR A6 600 |
| 620 BONE W/ DELAYED VIBR A5 602 |
| 621 NO P BEND NO VIBR B C4 9 |
| 622 TOUCH SENS SQUARE A C8 608 |
| 623 TOUCH SENS SQUARE B C8 608 |
| 624 MELLOW TROMBONE #1 A5 602 |
| 625 DIGITAL E. PIANO 1A C8 609 |
| 626 DIGITAL E. PIANO 1B C8 609 |
| 627 DIGITAL KLAV #1 C8 609 |
| 628 TRP MONO HNP A A6 600 |
| 629 BONE MONO LNP B A5 602 |
| 630 STRING SLO RELEASE C8 4 |
| 631 GROUP B A6 600 |
| 632 TEN W/ VIB NO SUST C6 603 |
| 633 SFZ SWELL A A5 602 |
| 634 SFZ SWELL B A5 602 |
| 635 SOLO TRUMPET 2 A6 629 |
A Summary of the PLAY editors
Editors governing KEYBOARD control:

Summary of the PLAY editors continued
Editors governing CONTROLLERS and their ASSIGNMENTS:
Summary of the PLAY editors continued
Editors governing global control:
The CHORUS editor
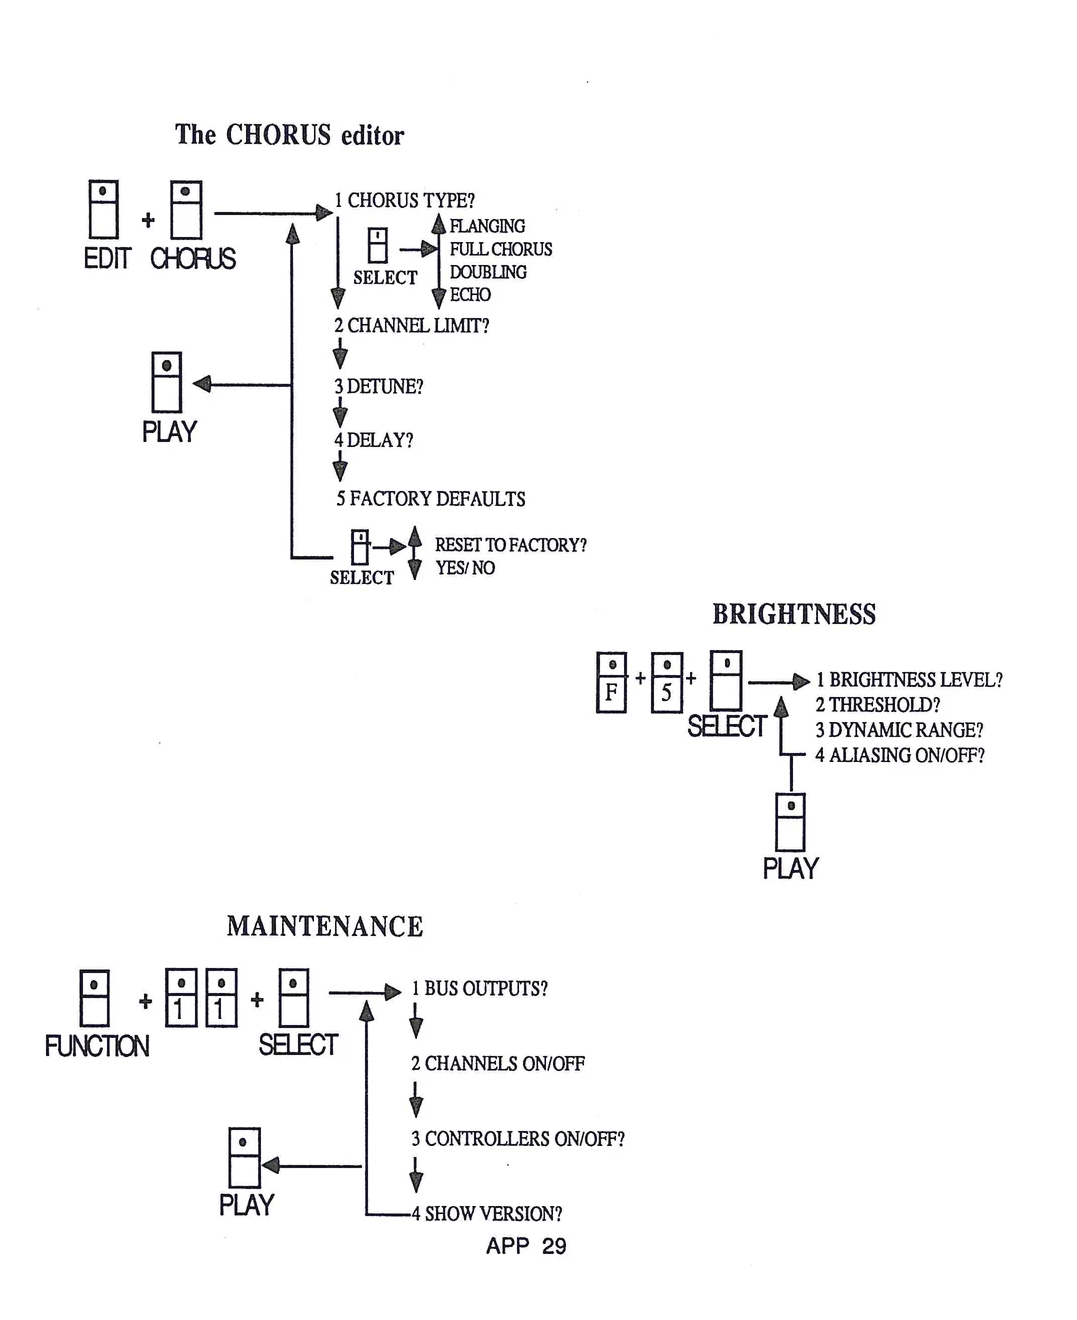
CHORUS editor flow diagram showing EDIT CHORUS and PLAY buttons with menu options including CHORUS TYPE (FLANGING, FULL CHORUS, DOUBLING, ECHO), CHANNEL LIMIT, DETUNE, DELAY, and FACTORY DEFAULTS with RESET TO FACTORY YES/NO option
BRIGHTNESS
BRIGHTNESS editor flow diagram showing button combination F + 5 + SELECT leading to menu options: 1 BRIGHTNESS LEVEL?, 2 THRESHOLD?, 3 DYNAMIC RANGE?, 4 ALIASING ON/OFF?, with PLAY button
MAINTENANCE
MAINTENANCE editor flow diagram showing FUNCTION + 1 1 0 + SELECT leading to menu options: 1 BUS OUTPUTS?, 2 CHANNELS ON/OFF, 3 CONTROLLERS ON/OFF?, 4 SHOW VERSION?, with PLAY button
MIDI IMPLEMENTATION GUIDE
1. Transmitted Data
| Status | Data Bytes | Description |
| 1000nnnn | 0kkkkkk 0vvvvvv | Note off and key number (See notes 1 and 2). Key velocity (See note 3). |
| 1001nnnn | 0kkkkkk 0vvvvvv | Note on and key number (See notes 1 and 2). Key velocity (See note 3). |
| 1011nnnn | 0ccccccc 0vvvvvv | Control change and control number. (See Control Assignments). Control Value |
| 1100nnnn | 0ppppppp | Program change and program number (See notes 1 and 4). |
| 1111nnnn | 0vvvvvv 0vvvvvv | Pitch bend change and least significant 7 bits (See notes 1 and 5). Most significant 7 bits. |
2. Received Data
| Status | Data Bytes | Description |
| 1000nnnn | 0kkkkkk 0vvvvvv | Note off and key number (See notes 1 and 2). Key velocity (See note 3). |
| 1001nnnn | 0kkkkkk 00000000 | Note off and key number (See notes 1 and 2). Key velocity (See note 6). |
| 1001nnnn | 0kkkkkk 0vvvvvv | Note on and key number (See notes 1 and 2). Key velocity (See note 3). |
| 1011nnnn | 0ccccccc 0vvvvvv | Control change and control number. (See Control Assignments). Control value. |
| 1100nnnn | 0ppppppp | Program change and program number (See notes 1 and 4). |
| 1111nnnn | 0vvvvvv 0vvvvvv | Pitch bend change and least significant 7 bits (See notes 1 and 5). Most significant 7 bits. |
Notes
- 1. nnnn--Basic channel number minus 1: 0000 for channel 1 through 1111 for channel 15.
- 2. kkkkkk--Key number: 0001111 for A0 through 1101100 for C7.
- 3. vvvvvv--Key velocity: 0000001 for ppp through 1111111 for fff.
4. Transmission or reception of program change can be off, via direct keyboard setup numbers or via a table look-up using the list. If program change numbers are direct setup numbers, ppppppp ranges from 0000000 for setup 1, KURZWEIL GRAND PIANO, through 1111111 for the highest numbered factory setup. If program change numbers are determined from the list, ppppppp ranges from 0000000 for list entry 1 through 0111111 for list entry 64.
5. Transmission or reception of pitch bend can turned off by not assigning the BENDER controller code to any of the K250's controllers.
6. A note on with a key velocity of zero interpreted as a note off with a key velocity 001111111.
3. Control Assignments.
All K250 controller assignments can be altered to work with other manufactures equipment. In addition, any controller may be set to NO ASSIGNMENT which turns off transmission or reception of data for that controller. The K250 allows selection of a different K250 controller to MIDI control number assignment for transmit than reception.
The standard assignment of K250 controls to MIDI control numbers is shown below:
| K250 Controller | MIDI Control Number | ||
|---|---|---|---|
| Slider 1 | 2 | 00000010 | |
| Slider 2 | 3 | 00000011 | |
| Slider 3 | 4 | 00000100 | |
| Left Lever | 1 | 00000001 | |
| Right Lever | BENDER--Note: transmitted using the reserved Pitch Bend status. | ||
| Left Pedal | 65 | 01000001 | |
| Right Pedal | 64 | 01000000 | |
| External Pedal 1 | 7 | 00000111 | |
| External Pedal 2 | 8 | 00001000 | |
| Panel Buttons | NO ASSIGNMENT--Note: not transmitted when set to factory defaults (See Front Panel Button Codes). | ||
| Master Tune | NO ASSIGNMENT--Note: not transmitted when set to factory defaults. |
Front Panel Button Codes.
The user can select a control number for the transmission and reception of front panel information. Any selection that can be performed fromthe K250's front panel can be sent over the MIDI link. Control information sent the K250 lights the same switches and displays the same information as if someone pressed the appropriate front panel buttons.
| Front Panel Button Codes Table |
Front Panel Button Codes
| Decimal | Hexadecimal | 0vvvvvvv | Front Panel Button |
|---|---|---|---|
| 1 | 01H | 0000000 | SELECT |
| 2 | 02H | 0000010 | Key Pad-5 |
| 3 | 03H | 0000011 | Key Pad-4 |
| 4 | 04H | 0000100 | Key Pad-2 |
| 5 | 05H | 0000101 | Key Pad-1 |
45 46
2DH 2EH
00101101 00101110
ALPHA SLIDER FUNCTION SELECT 1
47 48 49 50 52 53 54 55 56 65 66
2FH 30H 31H 32H 34H 35H 36H 37H 38H 41H 42H
00101111 00110000 00110001 00110010 00110100 00110101 00110110 00110111 00111000 01000001 01000010
VALUE DETUNE SEND READ INSERT SET POINTER SYNC/MODE 2 MIDI/MODE 1 LIST Transpose Reset Tempo Tap